|
For those who have followed the Gold
Guide, you'll have a nice stash of gold to purchase
your Epic Flying Mount - 5,000g training + 100g for the mount.
If not, there's no better time to start the guide than now, to make
sure that you'll at least be able to fly in style as soon as possible.
Make sure you have your Cold Weather Flying learned by now
as well, trainable at the Flight Master for 500g.
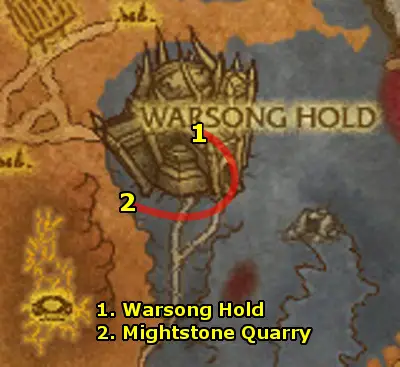
- After taking the zeppelin from Orgrimmar, you will arrive at
Warsong Hold, Borean Tundra. This is also where you can
train your profession skills past the new cap.
Get Hellscream's Vigil. Turn this in inside the keep and
get the follow-up The Defense of Warsong Hold.
Set Your Hearthstone to Hellscream's
Vigil.
Outside the hold, turn in The Defense of Warsong Hold
and pick up the three starter quests:
- Taking Back Mightstone Quarry
- Patience is a Virtue that We Don't Need
- Taken by the Scourge
- Head south into the Mightstone Quarry.
- Kill 15 Nerub'ar
- Collect 15 Warsong Munitions Crates
- Kill all the cocoons to free Nerub'ar Victims until
you free 5 Warsong Peons. You will also free guardians
which will help you - you can get a real army going, even!
Cool stuff.
When done with all the objectives, return to Warsong Hold.
- At Warsong Hold, turn in your quests:
- Patience is a Virtue that We Don't Need and get the
follow-up Bury Those Cockroaches!
- Taken by the Scourge
- Taking Back Mightstone Quarry and get the follow-up
Cutting Off the Source
Also, get the new quest, Untold Truths.
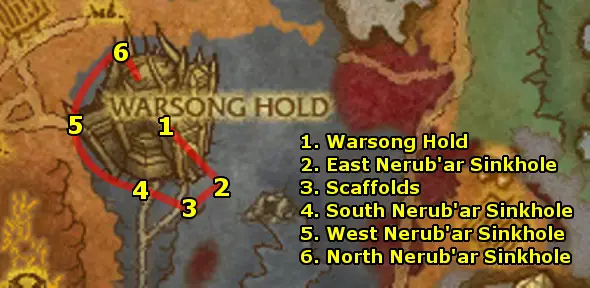
- Head southeast into Mightstone Quarry again. Tip: keep
destroying cocoons while you're here to have some guardians help
you.
Stand on the East Nerub'ar Sinkhole and use your Searforium
Depth Charge Bundle to destroy it.
- Clear your way to the Scaffolds. Destroy 10 Nerub'ar
Egg Sacs on the structure.
- Clear your way to the South Nerub'ar Sinkhole and use
your Searforium Depth Charge Bundle to destroy it.
- Clear your way to the West Nerub'ar Sinkhole and use
your Searforium Depth Charge Bundle to destroy it.
You will also find Shadowstalker Luther. Turn in Untold
Truths and get the follow-up Nerub'ar Secrets.
- Clear your way to the North Nerub'ar Sinkhole and use
your Searforium Depth Charge Bundle to destroy it.
- Then, return to Warsong Hold.
- At Warsong Hold, turn in your quests:
- Bury Those Cockroaches!
- Cutting Off the Source and get the follow-up Wind
Master To'bor
- Nerub'ar Secrets and get the follow-up Message
to Hellscream
- Message to Hellscream and get the follow-up Reinforcements
Incoming...
Also, get the new quest:
- Ride to Taunka'le Village
Go upstairs inside the keep and wait for the lift. Take it
up to the top of the fortress. Go to the flight master and Get
the Flight Path. Also, turn in Wind Master To'bor and
get the follow-up Magic Carpet Ride.
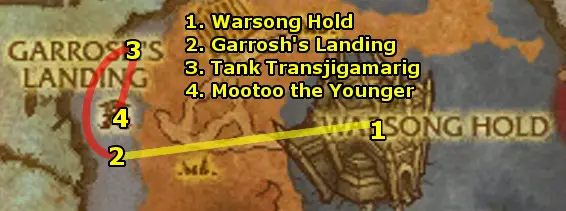
Talk to Yanni and have him send you to Garrosh's Landing.
- At Garrosh's Landing, turn in Magic Carpet Ride and
get the follow-up Tank Ain't Gonna Fix Itself. Turn that
quest in and pick up the four quests here:
- Horn of the Ancient Mariner
- Into the Mist
- Mobu Pneumatic Tank Transjigamarig
- Super Strong Metal Plates!
- Clear your way north to the Pneumatic Tank Transjigamarig.
Loot it. Then, clear your way back and complete these objectives:
- Kill Kvaldir for 8 Tuskarr Relics
- Kill Kvaldir Mistweavers for a Horn of the Ancient
Mariner
- Collect 10 Super Strong Metal Plates
- Go into the building and climb up the stairs to Mootoo the
Younger. Get the escort quest Escaping the Mist to
escort her back to Garrosh's Landing.
- After arriving at Garrosh's Landing, turn in your quests:
- Escaping the Mist
- Horn of the Ancient Mariner and get the follow-up
Orabus the Helmsman
- Into the Mist and get the follow-up Burn in Effigy
- Mobu Pneumatic Tank Transjigamarig
- Super Strong Metal Plates! and get the follow-up
Tanks a lot...
- Tanks a lot... and get the follow-up The Plains
of Nasam
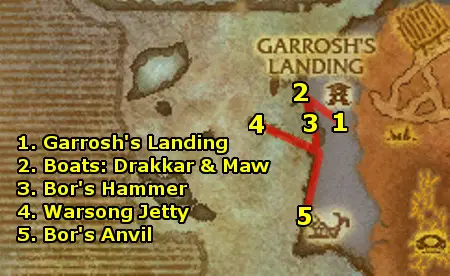
- Ride northwest to the ships The Kur Drakkar and The
Serpent's Maw. Use your Tuskarr Torch next to the ships
to burn them.
- Ride southeast and burn the Bor's Hammer.
- Ride west to the end of the Warsong Jetty and use the
Horn of the Ancient Mariner. Fight through the waves of
crewmen who jump off the ship, then kill Orabus.
- Ride south to Bor's Anvil and burn the ship.
- Then, return to Garrosh's Landing.

- At Garrosh's Landing, turn in Burn in Effigy and
Orabus the Helmsman. Get the follow-up Seek Out Karuk!
Then, enter one of the Horde Siege Tanks by right clicking
it. You will enter the vehicle and gain five abilities:
- Ability 1: The Demoralizer - you can adjust
your aim with the up and down setting to shoot a projectile
farther or closer.
- Ability 2: Land Mine Barrier - use this ability
when there are many monsters next to you.
- Ability 3: Meatpounder - a simple melee range
attack. Use when there aren't many monsters.
- Ability 4: Meatsaw - this is a channeled frontal
attack which grinds up all monsters in front of you.
- Ability 5: Rescue - when you're next to an
Injured Warsong Soldier, use the ability to rescue
it. You'll need to rescue 3 of them.
- Also, whenever you drive over an Oil Drum, you will
Restore Mana.
-
The fastest way to complete this objective is to drive right
into an area with a lot of Scourge Minions. Use Meatsaw
(Ability 4) when you've gathered up a lot of them
to kill a lot all at once. When Meatsaw is down, drive into
another area with a lot of Scourge Minions and use Land Mine
Barrier (Ability 2) to kill all the minions around
your tank. Repeat gathering a lot of minions and alternating
the cooldowns of Meatsaw and Land Mine Barrier until
you've killed 100 Scourge Minions.
Also, make sure to have gained credit for "Scourge Leader
Identified" which you will get when you drive near
the Image of Kel'Thuzad in the center of the field. Finally,
make sure you've rescued 3 Injued Warsong Soldier.
- Once done, ride southeast to Karuk.
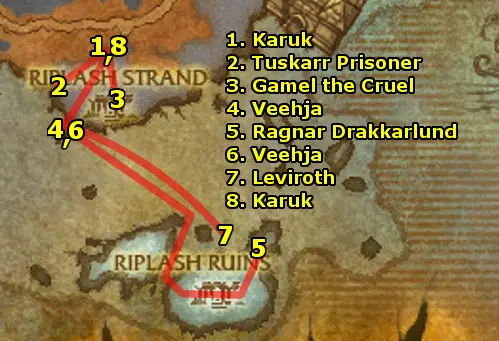
- At Karuk, turn in Seek Out Karuk! and get the
follow-up Karuk's Oath.
- Clear your way through the Skadir to the Captured
Tuskarr Prisoner. Kill the naga and the prisoner will give
you the quest Cruelty of the Kvaldir. Also, finish killing
6 Skadir Raider and 5 Skadir Longboatsman.
- Then, return to Karuk. Turn in Cruelty of the
Kvaldir and Karuk's Oath and get the follow-up
Gamel the Cruel.
- Go south into the cave and kill Gamel the Cruel.
- Then, return to Karuk. Turn in Gamel the Cruel
and get the follow-up A Father's Words.
- Ride southwest to Veehja. Turn in A Father's Words
and get the follow-up The Trident of Naz'jan.
- Swim southeast. Head to small passageway between the two islands
and climb up from there. Head down the corridor east and up the
stairs and kill Ragnar Drakkarlund and loot the Trident
of Naz'jan.
- Swim back to Veehja and turn in The Trident of Naz'jan
and get the follow-up The Emissary.
- Swim just north of the east island and dive down. Use the Trident
of Naz'jan on Leviroth, then kill it.
- Finally, return to Karuk (not the Naga) and turn
in The Emissary.
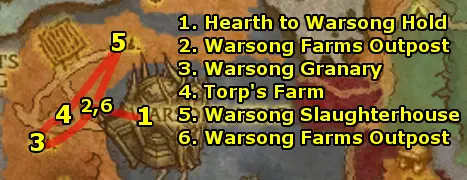
- Hearth to Warsong Hold.
- Ride out west to the Warsong Farms Outpost. Turn in Reinforcements
Incoming and get the quests:
- The Warsong Farms
- Merciful Freedom
- Damned Filthy Swine
During the next steps, clear Unliving Swine, Warsong Aberrations,
and En'kilah Necrolords on the way to kill 10
Unliving Swine and gather 5 Scourge Cage Keys and
free 5 Prisoners.
- Clear your way southwest to the Warsong Granary and scout
it.
- Clear your way to Torp's Farm and scout it.
- Clear your way to the Warsong Slaughterhouse and scout
it.
- Return to Warsong Farms Outpost.
- At the Warsong Farms Outpost, turn in the three quests:
- The Warsong Farms and get the follow-up Get to
Getry
- Merciful Freedom
- Damned Filthy Swine and get the follow-up Bring
'em Back Alive
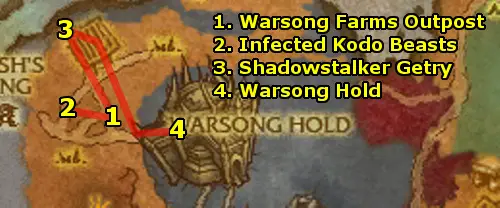
- Ride west and find an Infected Kodo Beast. Use Torp's
Kodo Snaffle on it, then Sprint (Ability 1) back
and Deliver the Kodo (Ability 2). Deliver 8 Kodos
back.
- Ride northwest to Shadowstalker Getry at the top of the
tower. Turn in Get to Getry and get the follow-up Foolish
Endeavors. Follow him to the field and Saurfang will
come help - give him a lot of time to get aggro, then help out.
- Ride back to Warsong Hold.
- At Warsong Hold, turn in Foolish Endeavors and
get the follow-up Nork Bloodfrenzy's Charge. Also, get
the new quests, To Bor'gorok Outpost, Quickly! and Too
Close for Comfort.
Outside the keep, turn in Nork Bloodfrenzy's Charge and
get the follow-up Coward Delivery...Under 30 Minutes or It's
Free.
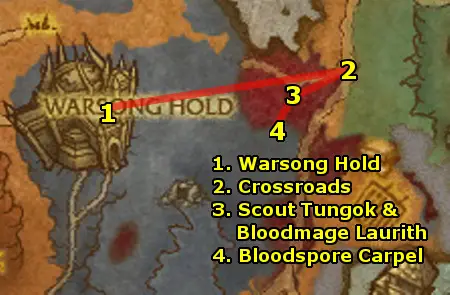
- Ride out the east gate to the Crossroads. Use your Warsong
Flare Gun and your Alliance Deserter will be picked
up.
- Ride back west to Scout Tungok. Turn in Coward Delivery...Under
30 Minutes or It's Free and get the follow-up Vermin Extermination.
Also, a bit southwest is Bloodmage Laurith - get The
Wondrous Bloodspore from her.
- Ride southwest and gather 10 Bloodspore Carpel. Kill
the Bloodspores along the way.
- Then, return to Bloodmage Laurith. Turn in The
Wondrous Bloodspore and get the follow-up Pollen from
the Source.
- Kill Bloodspore Moths in the area for 5 Bloodspore
Moth Pollen.
- Then, return to Bloodmage Laurith. Turn in Pollen
from the Source and get the follow-up A Suitable
Test Subject.
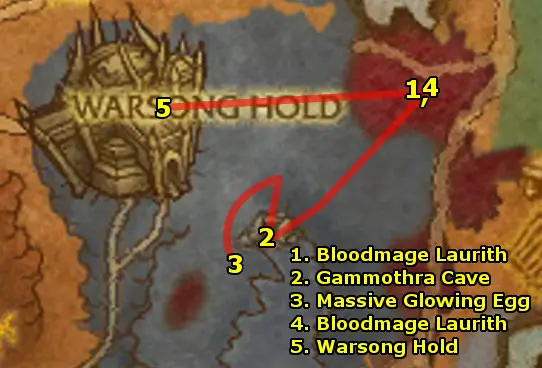
- At Bloodmage Laurith, use the Pollinated Bloodspore
Flower. This will complete A Suitable Test - get the
follow-up The Invasion of Gammoth. Turn this quest in immediately
to Primal Mighthorn and get the follow-up Gammothra
the Tormentor.
- Ride southwest into the magnataur cave. Clear your way down
the cave - use your Pouch of Crushed Bloodspore on any
Magnataurs on the way to turn them un-elite. When you reach the
bottom of the cave, in a side cavern, you will find Gammothra
the Tormentor. Use the pouch on her and kill her for the Head
of Gammothra.
Then, fight your way back up and out of the cave.
- Outside the cave, follow the path upwards and walk around the
ledge to reach the Massive Glowing Egg. Get the quest Massive
Moth Omelet from it.
- Return to Bloodmage Laurith and Scout Tungok,
making sure to have finished killing 8 Bloodspore Harvester,
5 Bloodspore Firestarter, and 2 Bloodspore Roaster along
the way. Turn in your quests:
- Gammothra the Tormentor and get the follow-up Trophies
of Gammoth
- Massive Moth Omelet?
- Vermin Extermination (to Scout Tungok a
bit northeast.)
- Ride west back to Warsong Hold. Turn in Trophies of
Gammoth and get the follow-up Hellscream's Champion.
- Go to the stables inside the keep (western side) and
talk to the stables master. Get a ride to Taunka'le Village.
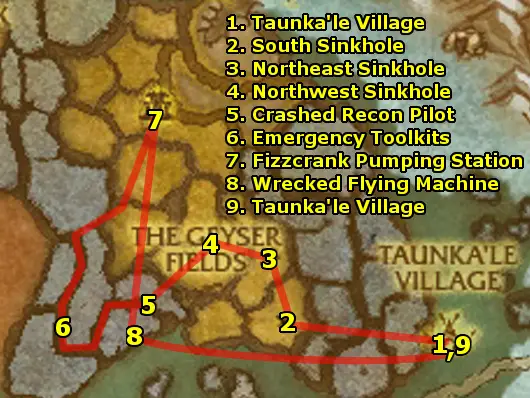
- The wolf ride will take you to Taunka'le Village. Get
the Flight Path. Set your Hearthstone to
Taunka'le Village. Turn in Ride to Taunka'le Village
and Hellscream's Champion and get all the quests in
the village:
- Load 'er Up!
- Sage Highmesa is Missing
- Scouting the Sinkholes
- What Are They Up To?
- Ride west to the South Sinkhole. Stand on it and use
the Map of the Geyser Fields.
- Ride north to the Northeast Sinkhole. Stand on it and
use the Map of the Geyser Fields.
- Ride west to the Northwest Sinkhole. Stand on it and
use the Map of the Geyser Fields.
- Ride southwest to the Crashed Recon Pilot. Get the quest
Emergency Supplies from him.
- Ride on the dry strips of land in the pools and search for Fizzcrank
Recon Pilots. Search them for 7 Emergency Toolkits.
- Ride north to Fizzcrank Pumping Station and clear your
way up to the station until you get credit for exploring the station
for What Are They Up To?
- Ride back south to a Wrecked Flying Machine. Use Jenny's
Whistle next to it to summon a mule.
- Mount up and ride back to Taunka'le Village - make sure
to avoid mobs so that your mule does not get hit much.
- At Taunka'le Village, turn in your quests:
- Emergency Supplies and get the follow-up The Power
of the Elements
- Load 'er Up!
- Scouting the Sinkholes and get the follow-up The
Heart of the Elements
- What Are They Up To? and get the follow-up Master
the Storm
Head inside the small hut behind the questgiver and click the
Storm Totem. This will summon the Storm Tempest.
Defeat it. Then, outside, turn in Master the Storm and
get the follow-up Weakness to Lightning.
Also, pick up the new quests which open up:
- Cleaning Up the Pools
- Souls of the Decursed
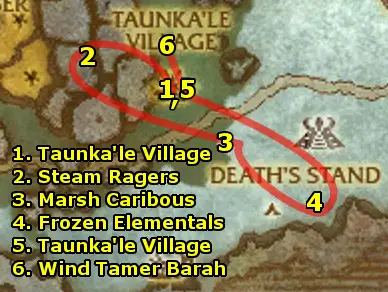
- Ride west to the pool area which has many Steam Ragers.
Use your Windsoul Totem next to the ragers. Pull the Steam
Ragers towards the totem and kill them when they're next to
the totem and Collect 10 Energy.
- Then, return to Taunka'le Village. Turn in The
Power of Elements and get the follow-up Patching Up.
- Ride southeast and kill Marsh Caribous for 5 Uncured
Caribou Hide.
- Go further southeast to the shore and kill Frozen Elementals
for 5 Elemental Hearts.
- Return to Taunka'le Village. Turn in Patching Up.
- Ride northwest to Wind Tamer Barah.
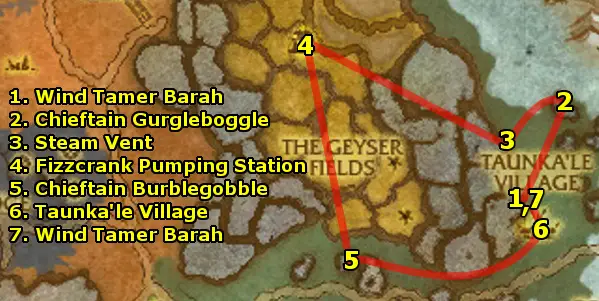
- At Wind Tamer Barah, turn in The Heart of the Elements.
Get the follow-up The Horn of Elemental Fury.
- Clear your way northeast through the Gorlocs to Chieftain
Gurgleboggle. Kill it for Gurgleboggle's Key, and use
it on Gurgleboggle's Bauble in the pond nearby for the
Lower Horn Half.
- Ride west and find a Steam Vent - steam coming up from
the ground. Stand on it and use your Uncured Caribou Hide five
times to get 5 Cured Caribou Hides.
- Ride northwest to the Fizzcrank Pumping Station. Clear
your way towards the main station since there are many mechagnomes
and robots on it. In the area, you'll need to:
- Kill 15 Robots after using the Sage's Lightning
Rod on them
- Kill Fizzcrank Mechagnomes then use The Greatmother's
Soulcatcher on 10 Corpses
- Collect 15 Fizzcrank Spare Parts lying around
- Ride south to another gorloc camp. Kill Chieftain Burblegobble
for Burblegobble's Key, and use it on Burblegobble's
Bauble in the pond nearby for the Upper Horn Part.
- Return to Taunka'le Village. Turn in your quests:
- Cleaning Up the Pools
- Patching Up
- Souls of the Decursed and get the follow-up Defeat
the Gearmaster
- Weakness to Lightning and get the follow-up The
Sub-Chieftains
- Head northwest to Wind Tamer Barah.
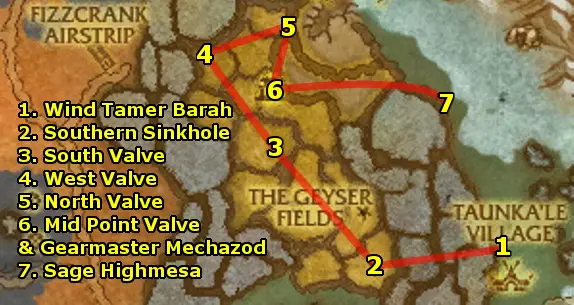
- At Wind Tamer Barah, turn in The Horn of Elemental
Fury. Wait for her to complete her ritual and then get the
follow-up The Collapse.
- Ride southwest to the Southern Sinkhole. Use the Horn
of Elemental Fury while standing on the sinkhole to summon
Lord Kryxix. Kill him.
- Ride northwest to the South Point Station Valve. Click
it, then kill The Grinder.
- Ride northwest to the West Point Station Valve. Click
it, then kill Twonky.
- Ride east to the North Point Station Valve. Click it,
then kill ED-210.
- Follow the pipe southwest and click the Mid Point Station
Valve. Click it, then kill Max Blasto.
- Then, fight your way the top of the Fizzcrank Pumping
Station. Inside the cabin at the top, loot the Gearmaster's
Manual to spawn Gearmaster Mechazod. Kill him and
loot Mechazod's Head.
- Ride east to Sage Highmesa.
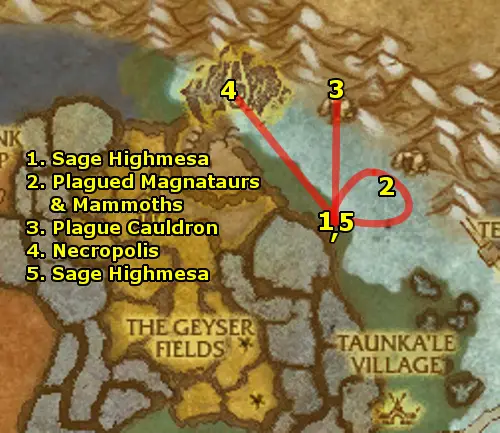
- At Sage Highmesa, turn in Sage Highmesa is Missing.
Get the follow-up A Proper Death.
- Head east and kill 10 Plagued Magnataurs as well as enough
Mammoths for 5 Scourged Mammoth Pelt.
- Then, return to Sage Highmesa and turn in A Proper
Death and get the follow-up Stop the Plague.
- Head north into the cave and use Highmesa's Cleansing Seeds
next to a Plague Cauldron.
- Then, return to Sage Highmesa and turn in Stop
the Plague. Get the follow-up quests Find Bristlehorn
and Fallen Necropolis.
- Head northwest and fight your way into the necropolis. Head
up a ramp and talk to Longerunner Bristlehorn. Turn in
Find Bristlehorn and get the follow-up The Doctor and
the Lich-Lord.
- Clear your way up the stairs of the necropolis, killing
20 Talramas Scourg along the way.
- On the third floor on the upper level of the necropolis,
enter the side room and kill Doctor Razorgrin.
- On the very top of the necropolis, kill Lich-Lord Chillwinter.
- Return to Sage Highmesa and turn in Fallen Necropolis
and The Doctor and the Lich-Lord. Get the follow-up
Return with the Bad News.
- Hearth to Taunka'le Village. Turn in your quests:
- Return with the Bad News
- The Collapse
- The Sub-Chieftains
- Defeat the Gearmaster
- Shrouds of the Scourge and get the follow-up The
Bad Earth
- Ride northeast and pick up 8 Scourged Earth.
- Then, return to Taunka'le Village. Turn in The
Bad Earth and get the flolow-up Blending In.
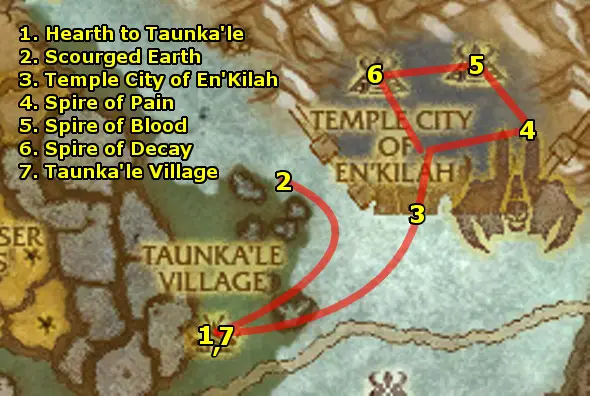
- Ride northeast to the Temple City of En'Kilah. At the
entrance, put on the Imbued Scourge Shroud which will make
you invisible to all the monsters in the area except abominations.
- Ride northeast up the stairs to the Spire of Pain. Go
to the middle of the room and you will get credit for Spire
of Pain Scouted.
- Ride northwest to the Spire of Blood. Head up the stairs
on the outer building and enter the middle of the room on the
second floor and you will get credit for Spire of Blood Scouted.
- Ride west to the Spire of Decay. Go to the middle of
the room and you will get credit for Spire of Decay Scouted.
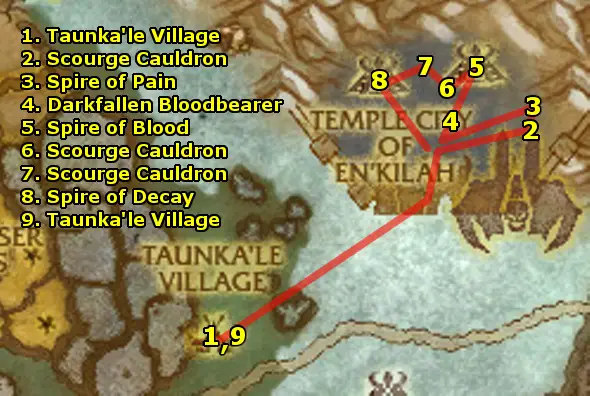
- Ride back to Taunka'le Village. Make sure to re-equip
your normal cloak!
- At Taunka'le Village, turn in Blending In and
get the follow-up Words of Power. Also, get the new quests:
Neutralizing the Cauldrons and A Courageous Strike.
- Ride to the Temple City of En'kilah again. Clear your
way up east to the Scourge Cauldron outside. Use Sage
Aeire's Totem next to it.
- Clear your way north to the Spire of Pain. Kill the two
Mystical Webbing to free High Priest Talet-Kha.
Kill him for his scroll.
- Head back down to the ground level of the temple. Clear your
way up to the middle set of stairs while looking for the Darkfallen
Bloodbearer, who patrols up and down this middle set of stairs.
Kill him for the Vial of Fresh Blood, which starts the
quest The Spire of Blood.
- Head into the Spire of Blood's lower floor. Talk to Snow
Tracker Grumm and turn in The Spire of Blood. Get the
follow-up Shatter the Orbs.
- On the ground floor, destroy 5 En'kilah Blood Globe.
- Head out and up the outer stairs to the upper floor. Kill
High Priest Andorath for his scroll.
- Head southwest to another Scourge Cauldron. Use Sage
Aeire's Totem next to it.
- Head northwest to another Scourge Cauldron. Use Sage
Aeire's Totem next to it.
- Head southwest into the Spire of Decay and kill High
Priest Naferset for his scroll.
- Ride back to Taunka'le Village.

- At Taunka'le Village, turn in your quests:
- Shatter the Orbs
- A Courageous Strike
- Neutralizing the Cauldrons
- Words of Power and get the follow-up Breaking
Through (Group)
(Optional) - If, during the rest of your time in the zone,
you find somebody else interested in doing Breaking Through
with you, go back to the Temple City, take the teleporter,
and complete the quest.
- Ride southwest to Kaskala.
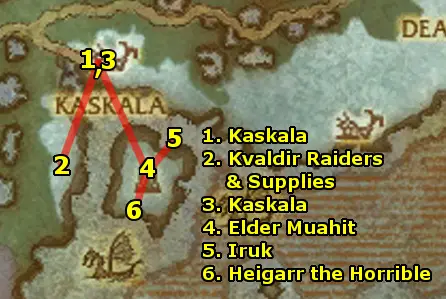
- At Kaskala, get the quests:
- Not Without a Fight!
- Preparing for the Worst
- Head southwest and pick up 12 Kvaldir Raiders and pick
up 8 Kaskala Supplies. If you need more, swing around to
east of Kaskala to finish gathering them.
- Return to Kaskala and turn in:
- Not Without a Fight! and get the follow-up Muahit's
Wisdom
- Preparing for the Worst
- Head southeast to the island to Elder Muahit and turn
in Muahit's Wisdom and get the follow-up Spirits Watch
Over Us.
- Head northeast into the sea and look for Iruk, drowned
in the water. Right click him and get Issilruk's Totem.
- Then, return to Elder Muahit and turn in Spirits
Watch Over Us and get the follow-up The Tides Turn.
- Head south and kill Heigarr the Horrible.
- Then, return to Elder Muahit and turn in The Tides
Turn and get the follow-up Travel to Moa'ki Harbor.
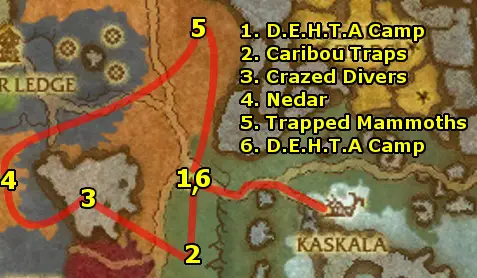
- Ride northwest to the D.E.H.T.A Encampment. Get and turn
in the starter quest, A Mission Statement. Then, pick up
all the unlocked quests:
- Ears of Our Enemies
- Happy as a Clam
- Help Those That Cannot Help Themselves
- Ned, Lord of Rhinos...
- Unfit for Death
- Head south and kill Loot Crazed Poachers and Hunters for
their ears (you don't have to get 15 yet) and use your
Pile of Fake Furs on the Caribou Traps 8 times.
- Head west into the lake and kill 10 Loot Crazed Divers and
collect their ears. Keep killing them until you collect 15
Nesingwary Lackey Ears.
- Head west up the hill and kill Lunchbox. This will cause
Nedar, Lord of Rhinos to dismount - then, kill him. Its
soloable despite being labeled a group quest.
- Head northeast to the large area of mammoths and use the D.E.H.T.A
Trap Smasher on the Trapped Mammoth Calf. Smash
8 Traps in the area.
- Return to the D.E.H.T.A Encampment.
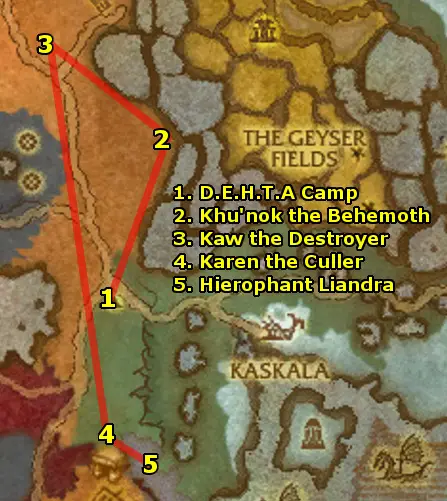
- At the D.E.H.T.A Encampment, turn in all your quests:
- Unfit for Death and get the follow-up The Culler
Cometh
- Happy as a Clam and get the follow-up The Abandoned
Reach
- Ned, Lord of Rhinos...
- Help Those That Cannot Help Themselves and get the
follow-up Khu'nok Will Know
- Ears of Our Enemies
- Ride north to Khu'nok the Behemoth and turn in Khu'nok
Will Know and get the follow-up Kaw the Mammoth Destroyer.
- Mount a Wooly Mammoth Bull nearby, then ride north to
the area with Kaw's Minions.
This is your new action bar.
Use Ability 1: Mammoth Trample on cooldown in melee range
to do AoE damage.
Use Ability 2: Mammoth Charge to initiate a fight and charge
and stun the minion.
Use Ability 3: Thundering Roar, the AoE fear ability,
if you get a large amount of minions on you and need to break
them up.
You can take Kaw the Mammoth Destroyer on solo despite
the group quest label. Clear the minions near him, and walk near
the platform to initiate the fight. First, kill the mount simply
by using ability 1, the AoE stomp, on cooldown.
Then, to fight Kaw, you can use run away-charge tactics
since you will be faster than him - run away, then use ability
2 to charge and stun him, then use ability 1 to deal a lot of
damage. Rinse and repeat to easily take him down, then loot Kaw's
War Halberd which he drops on the ground.
- Ride southeast to a plateau at the hill to Karen "I Don't
Caribou" the Culler and kill her. Though a group quest, this
is easily soloable.
- Further southeast, go to Hierophant Liandra.
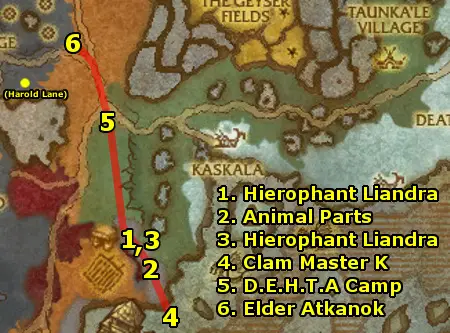
- At Hierophant Liandra, turn in The Abandoned Reach.
Get the follow-up Not On Our Watch.
- Head southeast and kill the Northsea Thugs and loot the
objects on the ground to collect 12 Shipment of Animal Parts.
- Return to Hierophant Liandra and turn in Not On Our
Watch. Get the follow-up The Nefarious Clam Master...
- Ride southeast to the shore and dive into the water to the sunken
ship. Kill Clam Master K.
- Ride back to the D.E.H.T.A Encampment and turn in your
quests:
- The Nefarious Clam Master...
- The Culler Cometh
- Kaw the Mammoth Destroyer
Get the follow-up quest The Assassination of Harold Lane
(Group). Optional: If you find a groupmate or have a
class with strong soloing ability, you can hunt down Harold
Lane who is located just north of the lake with the Crazed
Divers to the west. Use the Cenarion Horn to lead off
to summon a stampede who will bring Harold down a big chunk
of health.
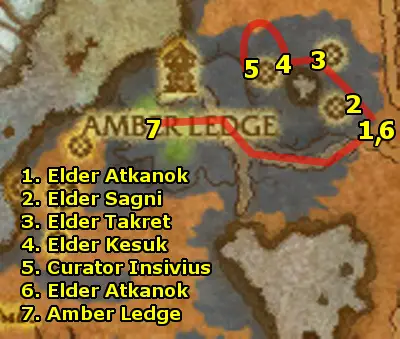
- Ride northwest to to Elder Atkanok.
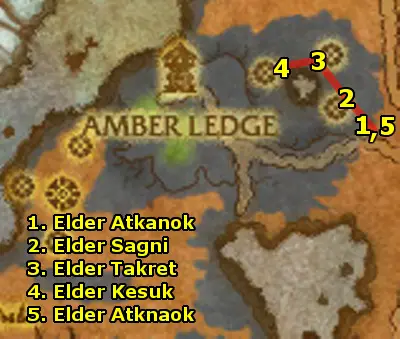
- Get the quests from Elder Atkanok:
- The Honored Ancestors
- Reclaiming the Quarry
Enter the quarry and kill Beryl Treasure Hunters while
visiting the elders (small stone statues on the ground).
- Head northwest to under the east platform and identify Elder
Sagni.
- Head north to under the north platform and identify Elder
Takret.
- Head west to under the west platform and identify Elder Kesuk.
- Return to Elder Atkanok.
- At Elder Atkanok, turn in The Honored Ancestors and
get the follow-up The Lost Spirits.
- Head into the quarry again and kill Beryl Hounds for
6 Core of Malice. Use the cores on 3 Kaskala Craftsmen
and 3 Kaskala Shaman. Also, finish killing 12 Beryl Treasure
Hunter.
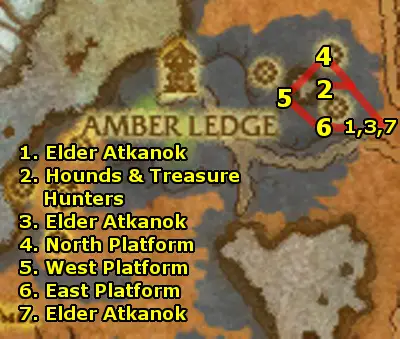
- Return to Elder Atkanok and turn in:
- The Lost Spirits and get the follow-up Picking
Up the Pieces
- Reclaiming the Quarry and get the follow-up Hampering
Their Escape
- Head into the quarry and kill Beryl Reclaimers for 3
Gnomish Grenade. Gather 6 Tuskarr Ritual Object scattered
throughout the quarry during the next couple steps.
Then, climb up the hill near the Eastern Platform and use
the Gnomish Grenade. (If it says "Too far away", then
look around for a climbable hill closer. Throw it from there.)
- From the top of the hill, throw the Gnomish Grenade to
destroy the Western Platform.
- Use the Gnomish Grenade under the Northern Platform
to destroy it.
- Return to Elder Atkanok.
- At Elder Atkanok, turn in:
- Picking Up the Pieces and get the follow-up Leading
the Ancestors Home
- Hampering Their Escape and get the follow-up A
Visit to the Curator
- Just like earlier, we're going to visit the 3 Elders again.
First, use the Tuskarr Ritual Object inside your backpack
when standing next to Elder Sagni.
- Use the Tuskarr Ritual Object next to Elder Takret.
- Use the Tuskarr Ritual Object next to Elder Kesuk.
- Head around northwest out of the quarry and onto the platform
to kill Curator Insivius.
- Return to Elder Atkanok and turn in the quests:
- Leading the Ancestors Home
- A Visit to the Curator
- Ride to Amber Ledge.
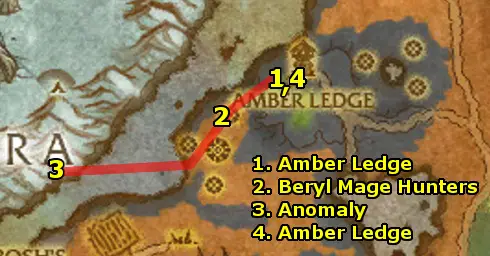
- At Amber Ledge, turn in Too Close For Comfort.
Get the Flight Path. Get the quests:
- Prison Break
- Monitoring the Rift: Cleftcliff Anomaly
- Head southwest and kill Beryl Mage Hunters until you
get a Beryl Prison Key. Use the key to unlock an Arcane
Prison.
- Head south down the slope and swim west to the anomaly. Use
the Arcanometer when standing on the glowing purple anomaly.
- Return to Amber Ledge and turn in:
- Prison Break and get the follow-up Abduction
- Monitoring the Rift: Cleftcliff Anomaly and get the
follow-up Monitoring the Rift: Sundered Chasm
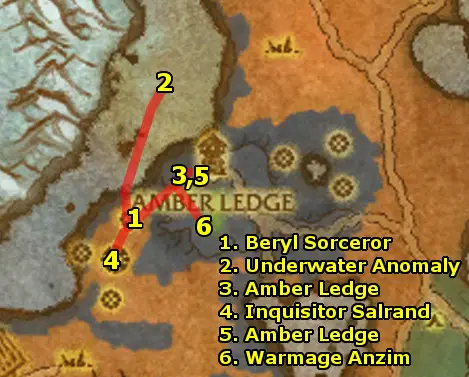
- Head south and damage a Beryl Sorcerer to low health,
then use the Arcane Binder to capture it.
- Head down the path south, then swim north and dive. Use the
Arcanometer at the glowing purple anomaly.
- Return to Amber Ledge the way you came. Turn in:
- Abduction and get the follow-up The Borean Inquisition
- Monitoring the Rift: Sundered Chasm and get the follow-up
Monitoring the Rift: Winterfin Cavern
Enter the tower and head up and turn in The Borean Inquisition
and get the follow-up The Art of Persuasion.
Target the Imprisoned Beryl Sorcerer and use the Neural
Needler on him to torture him several times until he speaks.
Once he does, turn in The Art of Persuasion and get the
follow-up Sharing Intelligence. Outside, turn that in
and get the follow-up A Race Against Time.
- Head south and kill Inquisitor Salrand. Loot Salrand's
Broken Key from Salrand's Lockbox.
- Return to Amber Ledge and turn in A Race Against Time
and get the follow-up Reforging the Key. Turn that
in to Surristrasz and get the follow-up Taking Wing.
- Head slightly southeast to Warmage Anzim and turn in
Taking Wing. Get the follow-up Rescuing Evanor.
Get on the drake and fly to the cage holding Evanor. Click the
cage and stand next to Evanor to get teleported back to the top
of the mage tower. Turn in Rescuing Evanor and get the
follow-up Dragonspeak. Exit the tower to Surristrasz
and turn the quest in to get the follow-up Traversing the
Rift. Accepting the quest summons a drake to fly you to Coldarra.
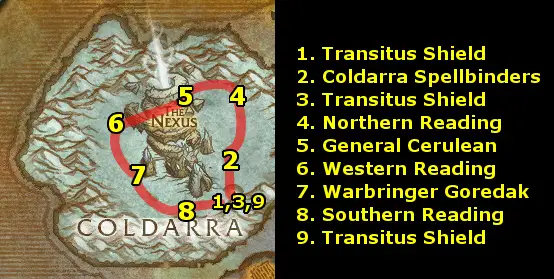
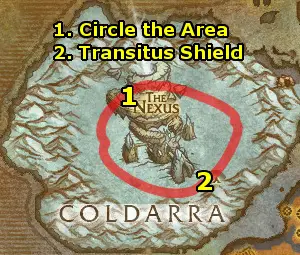
- Arrive at Transitus Shield and turn in Traversing
the Rift, and get all the quests:
- Basic Training
- Nuts for Berries
- Reading the Meters
- Secrets of the Ancients
- Have They No Shame?
- Head north and kill Coldarra Spellbinders until you loot
a Scintillating Fragment, a random quest drop item from
them. Get the quest Puzzling... from it.
- Return to Transitus Shield and turn in Puzzling...
and get the follow-up The Cell.
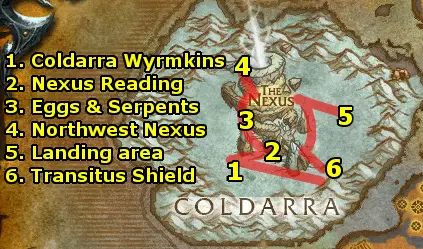
Next, we're going to loop around Coldarra - make sure to
aim for the following objectives. They don't need to all be finished
in this one loop.:
- Kill 10 Coldarra Spellweaver
- Collect 10 Frostberries from Frostberry Bushes
- Kill 3 Glacial Ancients for 3 Glacial Splinters
- Kill 3 Magic-Bound Ancients for 3 Magic-Bound
Splinters
- Head north and enter the building to find a blue globe near
the entrance. Click it to obtain the Northern Coldarra Reading.
- Head west and kill General Cerulean and loot the Prison
Casing.
- Head southwest and obtain the Western Coldarra Reading.
- Head southeast and kill Warbringer Goredak and loot the
Energy Core.
- Head southeast and obtain the Southern Coldarra Reading.
- Return to Transitus Shield and use the turn in The
Cell.
Then, use the Augmented Arcane Prison to summon Keristrasza.
Get her quest, Keristrasza and turn it in and get the follow-up
Bait and Switch
- Make another loop around the Nexus, to finish completing all
of the following objectives:
- Kill 10 Coldarra Spellweaver
- Collect 10 Frostberries from Frostberry Bushes
- Kill 3 Glacial Ancients for 3 Glacial Splinters
- Kill 3 Magic-Bound Ancients for 3 Magic-Bound
Splinters
- Gathering 10 Crystallized Mana Shards from the Crystallized
Mana around the cliff edges.
- Return to Transitus Shield and use the Augmented Arcane
Prison to summon Keristrasza. Turn in your quests:
- Bait and Switch and get the follow-up Saragosa's
End
- Basic Training and get the follow-up Hatching
a Plan
- Nuts for Berries and get the follow-up Keep the
Secret Safe
- Secrets of the Ancients and get the follow-up Quickening
Then, talk to Keristrasza and say that you're ready to
face Saragosa. You will be teleported to an empty platform.
Use your Arcane Power Focus to attract the weakened Saragosa.
Kill her and loot Saragosa's Corpse.
How do you get off the platform with Saragosa? Use
the Augmented Arcane Prison to summon Keristrasza and
turn in Saragosa's End and get the follow-up Mustering
the Reds and ask her to return you to Transitus Shield.
Turn in Mustering the Reds and get the follow-up Springing
the Trap.
- Head northwest and kill Coldarra Wyrmkins for 5 Frozen
Axes.
- Head down into the ravine and collect the Nexus Geological
Reading near the Meeting Stone on the south side of the Nexus.
- Head counter-clockwise around the ravine.
- Kill Arcane Serpents for 5 Nexus Mana Essence
- Shatter 5 Blue Dragon Eggs
- Reach the northerneast entrance (its not on an edge, but
rather an entrance leading towards the center) to The Nexus
and use Raelorasz's Flare. Follow Keristrasza and
you'll enter a flying sequence.
- You'll land around this area. Finish collecting the objectives
as you head back to the Transitus Shield.
- Return to the Transitus Shield and turn in your quests:
- Keep the Secret Safe
- Hatching a Plan and get the follow-up Drake Hunt
- Reading the Meters and get the follow-up Postponing
the Inevitable
- Springing the Trap and get the follow-up Prisoner
of War
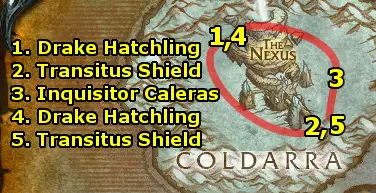
- Ride northwest and stand in the open and look up to see Nexus
Drake Hatchling flying around. One will fly around the point
1 marked on the map - use the Raelorasz's Spear when its
in range, then wait for the effect for it to turn friendly.
- Ride back to Transitus Shield. Turn in Drake Hunt
and get the follow-up Cracking the Code. Also, get
the quest Drake Hunt again since its a daily quest and
gives full experience for another go!
- Head north and kill Inquisitor Caleras for the Azure
Codex and the nearby Coldarra Spellbinders for 3
Shimmering Runes.
- Head northwest again and spear another Nexus Drake Hatchling.
- Return back to Transitus Shield and turn in:
- Cracking the Code
- Drake Hunt
That finishes Coldarra - also, you've gathered the four quests
for The Nexus - Have They No Shame?, Postponing the Inevitable,
Prisoner of War, and Quickening. Try to join a group for The
Nexus at least once, because one complete run through and turning
in all of those quests gives you an extra 70,400 experience in
addition to the instance experience.
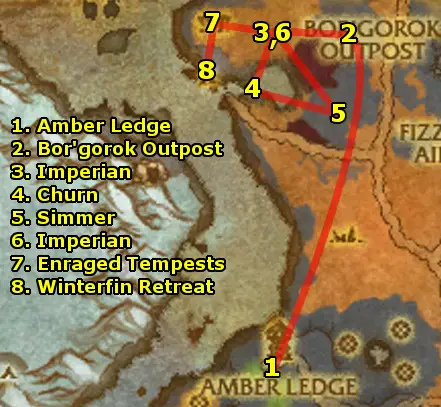
- Fly back to Amber Ledge.
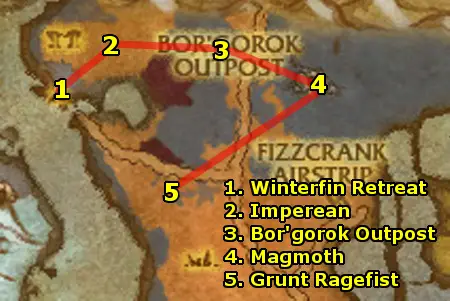
- Ride northwest to Bor'gorok Outpost. Turn in To Bor'gorok
Outpost, Quickly! and get the follow-up The Sky Will Know.
Also, get the quests Report to Steeljaw's Caravan and King
Mrgl-Mrgl.
- Ride west to Imperian. Turn in The Sky Will Know and
get the follow-up Boiling Point.
- Ride south into the Blistering Pool and defeat Churn.
- Ride east to the Charred Rise and defeat Simmer.
- Return to Imperian and turn in Boiling Point.
Get the follow-up Motes of the Enraged.
- Head west and kill Enraged Tempests for 5 Tempest
Motes.
- Head south to Winterfin Retreat.
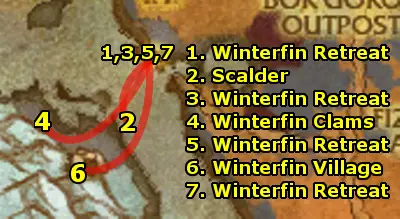
- At Winterfin Retreat, turn in King Mrgl-Mrgl and
get the follow-up Learning to Communicate.
- Dive southwest and find Scalder. Kill him and use the
King's Empty Conch on its corpse.
- Then, return to Winterfin Retreat and turn in Learning
to Communicate and get the follow-up Winterfin Commerce.
- Swim southwest to the murlocs and search for Winterfin Clams.
They are small objects scattered on the ground all around the
camp.
- Then, return to Winterfin Retreat and turn in Winterfin
Commerce. Get the new quests:
- Oh Noes, the Tadpoles!
- Them!
- Swim back to Winterfin Village. Open cages to Free
Murloc Tadpoles and kill murlocs all throughout the next steps.
Head into the cave at the back of the village.
At the entrance of the cave, Use the
Arcanometer to get a reading.
Don't get the escort quest (Escape from the Winterfin Caverns)
from Lurgglbr yet. Get the quest Keymaster Urmgrgl
from Glrglrglr. Head into the cave a bit to find Keymaster
Urmgrgl and kill him for his key, then return to Glrglrglr
and turn in Keymaster Urmgrgl.
Now take the Escape from the Winterfin Caverns escort quest
and escort Lurgglbr out of the cave. Finish killing 15
Winterfin Murlocs and freeing 20 Murloc Tadpoles.
- Return to Winterfin Retreat.

- At Winterfin Retreat, turn in the quests:
- Oh Noes, the Tadpoles! and get the follow-up I'm
Being Blackmailed By My Cleaner. Then, turn that in on
the northern side of the island.
- Escape from the Winterfin Caverns
- Them!
and get the new quests:
- Grmmurggll Mrllggrl Glrggl!!!
- Succulent Orca Stew
- Head northwest and kill orcas for 7 Succulent Orca Blubber.
Hunt down Glrggl who swims around the big iceberg for Glrrgl's
Head.
- Return to Winterfin Retreat and turn in:
- Grmmurggll Mrllggrl Glrggl!!! and get the follow-up
The Spare Suit. Turn that in and get the follow-up
Surrender... Not!
- Succulent Orca Stew
- Put on King Mrgl-Mrgl's Spare Suit and swim southwest
to Winterfin Village. Head all the way to the end of the
cave through the murlocs as they are now friendly to you. Kill
Claximus for the Claw of Claximus.
Put the suit back on, try out the /dance emote by claximus and
take a nice screenshot, then exit the cave.
- Return to Winterfin Retreat.
- At Winterfin Retreat, turn in Surrender...Not!
- Ride northeast to Imperean. Turn in Motes of the Enraged.
Get the follow-up Return to the Spirit Talker.
- Ride east to Bor'gorok Outpost. Turn in Return to
the Spirit Talker and get the follow-up Vision of Air.
Use Imperean's Primal to complete Vision of Air.
Get the follow-ups Farseer Grimwalker's Spirit and Revenge
Upon Magmoth.
- Ride east to Magmoth. Enter the cave and clear your way
down the spiral.
- Near the bottom, at a side cavern full of Offsprings
of Magmothregar is Farseer Grimwalker's Spirit.
Turn in Farseer Grimwalker's Spirit and get the follow-up
Kaganishu.
- Clear your way deeper into the cave to Kaganishu.
Kill him and loot Kaganishu's Fetish.
- Return to Farseer Grimwalker's Spirit and use Kaganishu's
Fetish on him, then turn in Kaganishu. Get the
follow-up Return My Remains. Loot Farseer Grimwalker's
Remains (the pile of bones under the spirit).
- Clear your way out of the cave, making sure to have killed
10 Magmoth Shaman, 5 Magmoth Forager, 3 Magmoth Crusher,
and 3 Mate of Magmothregar before you move on to
the next step.
- Ride southwest to Grunt Ragefist.
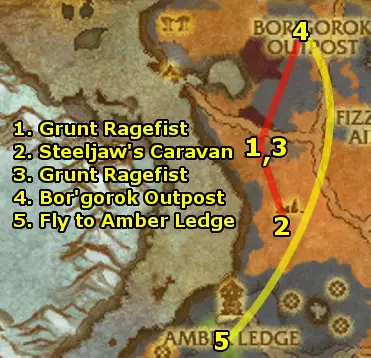
- At Grunt Ragefist, turn in Report to Steeljaw's Caravan
and get the quests in the area:
- The Honored Dead
- Put Them to Rest
- We Strike!
- Once you get We Strike!, the group of orcs will rush
into the caravan area straight to Steeljaw. They run in
a straight line right to Steeljaw and ignore many mobs, so make
sure to pull them along the way to the orc group so that the orcs
will engage them and not pull too many extra mobs.
- Kill Steeljaw
- Kill 20 Tanuka Spirits
- Use Ragefist's Torch to burn 10 Dead Caravan Guards
/ Workers.
- Return to Grunt Ragefist and turn in The Honored Dead
and Put Them to Rest.
- Ride north back to Bor'gorok Outpost. Turn in your quests:
- Return My Remains
- Revenge Upon Magmoth
- We Strike!
- To finish up, Fly to Amber Ledge. Turn in Monitoring
the Rift: Winterfin Cavern.
This should take you to Level 71. At this point, Fly
to Warsong Hold.
Take the Zeppelin back to Orgrimmar and train your
skills.
Take the Zeppelin to Tirisfal Glades. Then, go to
the other zeppelin platform and take that Zeppelin to the
Howling Fjord.
|
|
