|
Fly to Dalaran and Set
your Hearthstone to Dalaran.
Then, Talk to Archmage Pentarus at Krasus' Landing to
get Where in the World is Hemet Nesingwary and ask for a
ride to the basin.
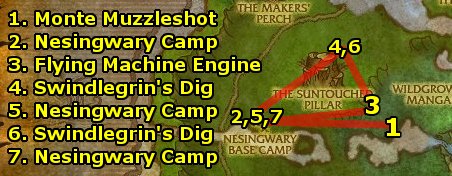
- Talk to Monte Muzzleshot and turn in Where in the
World is Hemet Nesingwary? and get the follow-up Welcome
to Sholazar Basin.
- Fly west (I'll use "fly" as terminology now since
you can use your flying mount!) to the Nesingwary Base
Camp. Turn in Welcome to Sholazar Basin and get the
quests:
- It Could Be Anywhere! (Note: it really could be
anywhere. Don't specifically look for the Golden Engagement
Ring anywhere - it is a zone wide drop from most anything.
Turn it in when you find it.)
- Need an Engine, Take an Engine
- Venture Co. Misadventure
- Fly east back to the crash location and pick up the Flying
Machine Engine.
- Ride northwest to Swindlegrin's Dig. Talk to Engineer
Helice and get the escort quest Engineering a Disaster.
Kill 15 Venture Company Members while escorting her out.
- Return to Nesingwary Base Camp and turn in:
- Engineering a Disaster
- Need an Engine, Take an Engine and get the follow-up
Have a Part, Give a Part
- Venture Co. Misadventure and get the follow-up Wipe
That Grin Off His Face
- Fly northeast back to Swindlegrin's Dig.
- Kill Foreman Swindlegrin and Meatpie on top
of the platform
- Gather 7 Venture Co. Spare Parts
- Return to Nesingwary Base Camp and turn in:
- Have a Part, Give a Part
- Wipe That Grin Off His Face
Get the Flight Path now that the flying machine is fixed.
Get the new quests:
- Dreadsaber Mastery: Becoming a Predator
- Kick, What Kick? - Equip the RJR rifle and
select Lucky Wilhelm and keep using the rifle until
you hit the apple. There are no tricks, just keep using the
rifle on cooldown until you hit.
- Rhino Mastery: The Test
- Aerial Surveillance
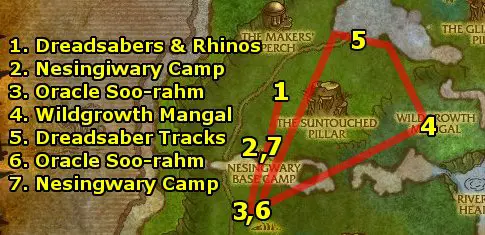
- Fly north and kill 15 Dreadsabers and 15 Shardhorn
Rhino.
- Fly back to the Nesingwary Base Camp and turn in:
- Dreadsaber Mastery: Becoming a Predator and get the
follow-up Dreadsaber Mastery: Stalking the Prey
- Rhino Mastery: The Test and get the follow-up Rhino
Mastery: The Chase
Get all the new quests as well:
- A Steak Fit for a Hunter
- Crocolisk Mastery: The Trial
- Some Make Lemonade, Some Make Liquor
- Fly south to Oracle Soo-rahm and turn in Rhino Mastery:
The Chase and get the follow-up An Offering for Soo-rahm.
Kill Longneck Grazers for 5 Longneck Grazer Steak.
- Fly northeast to Wildgrowth Mangal.
- Look around trees for Sturdy Vines (Hanging from
the trees in the air). Pull them for fruit. Collect
1 Orange, 2 Banana Bunch, and 1 Papaya.
- Kill 15 Mangal Crocolisks.
- Kill Emperor Cobras for 5 Intact Cobra Fang.
- Finish killing 60 Game Animals as well.
- Fly northwest and examine Dreadsaber Tracks until you
identify 3 Shango Tracks.
- Fly southwest to Oracle Soo-rahm and turn in An Offering
for Soo-rahm and get the follow-up The Bones of Nozronn.
Use Soo-rahm's Incense at the Offering Bowl.
- Return to the Nesingwary Base Camp and turn in all your
quests:
- A Steak Fit for a Hunter
- Crocolisk Mastery: The Trial and get the follow-up
Crocolisk Mastery: The Plan
- Dreadsaber Mastery: Stalking the Prey and get the
follow-up Dreadsaber Mastery: Ready to Pounce
- Some Make Lemonade, Some Make Liquor and get the
follow-up Still At It
- The Bones of Nozronn and get the follow-up Rhino
Mastery: The Kill
- The Great Hunter's Challenge
Speak to "Tipsy" McManus to begin distillation.
Follow his instructions quickly by clicking the object he tells
you to. Complete it and turn in Still At It.
At camp, offer the Jungle Punch Sample to Hemet Nesingwary
and Hadrius Harlowe.
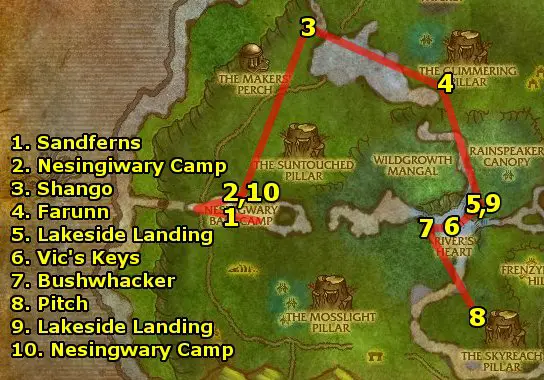
- Fly south and look along the lake and along the river to the
east for 5 Sandfern.
- Return to Nesingwary Base Camp and turn in Crocolisk
Mastery: The Plan and get the follow-up Crocolisk Mastery:
The Ambush. Also get the new quest Lakeside Landing.
- Fly northwest and kill Shango, near the waterfall.
- Fly northeast and kill Farunn. It wanders between the
northeastern area of the lake and The Glimmering Pillar.
- Fly south to Lakeside Landing. Get the Flight Path.
Turn in Aerial Surveillance and Lakeside Landing.
Offer Tamara Wobblesprocket a taste test with your Jungle
Punch Sample. Get the quests:
- The Part-time Hunter
- An Embarrassing Incident
- Force of Nature
- Dive into the lake and get Vic's Keys in a Raised
Mud. It may take several tries before you find them.
- Get out on the west side of the lake and stand on the log. Use
the Sandfern Disguise and kill Bushwhacker.
- Fly south to Pitch, being cornered in by three trackers.
Kill it. Get the quest from Tracker Gekgek, Playing
Along.
- Fly northwest back to Lakeside Landing. Turn in:
- The Part-time Hunter
- An Embarrassing Incident and get the follow-up Reconnaissance
Flight.
Take the flight. Shoot missiles at the gargoyles that attack
you, then fly back to Lakeside Landing and land the plane
in the circle of blue markers. Turn in Reconnaissance Flight.
- Take the flight back to Nesingwary Base Camp. Turn in
- A Taste Test
- Crocolisk Mastery: The Ambush
- Dreadsaber Mastery: Ready to Pounce
- Rhino Mastery: The Kill
Get the new quest, In Search of Bigger Game.
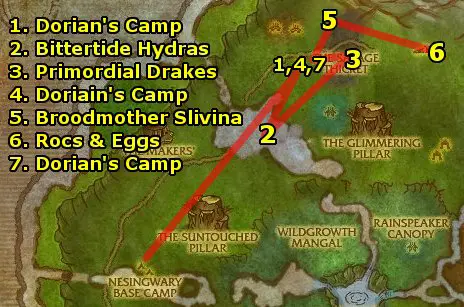
- Fly northeast to Dorian's Camp. Turn in In Search
of Bigger Game and get the quests:
- Burning to Help
- Securing the Bait
- Sharpening Your Talons
- Fly southwest and dive into Bittertide Lake. Kill 5
Bittertide Hydra. After each kill, use the Sample Container
to take a sample of Bittertide Hydra Sputum, a debuff
they put on you when fighting. Collect 5 samples.
- Fly northeast to The Savage Thicket. Kill 6 Primordial
Drake and "kill" the Primordial Drake Eggs and
pick up 6 Primordial Hatchling.
- Fly west to Dorian's Camp and turn in your quests:
- Burning to Help
- Securing the Bait
- Sharpening Your Talons
Get the new quests:
- A Mammoth Undertaking
- My Pet Roc
- Reagent Agent
Look around camp for a Shattertusk Mammoth and use the
Mammoth Harness on it, then hand it over using ability
1. Turn in A Mammoth Undertaking and get the follow-up
Post-partum Aggression.
- Ride the mammoth northeast to Broodmother Slivina. Use
Signal Hemet to Attack (Ability 4) to mark it and
have Hemet attack it. Keep spamming Gore (Ability 6),
and pulling Slivina into the trap whenever Hemet drops one.
- Head further east into The Bonefields. Gather 7 Roc
Eggs and kill Goretalon Rocs for 5 Twisted Roc Talons.
- Then, fly back to Dorian's Camp and turn in your quests:
- A Mammoth Undertaking
- My Pet Roc
- Reagent Agent
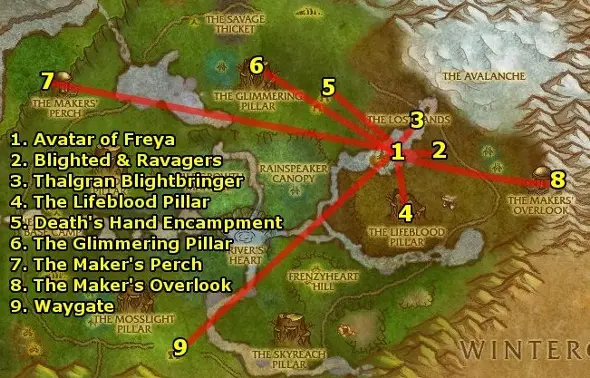
- Fly southeast to the Avatar of Freya. Turn in Force
of Nature and get the follow-up An Issue of Trust.
- Head east and kill 6 Blighted Corpse and 10 Bonescythe Ravager.
- Then, return to Freya and turn in An Issue of Trust.
Get the follow-up Returned Sevenfold.
- Fly north and aggro Thalgran Blightbringer. Be ready
to use Freya's Ward - when Thalgran's hands start glowing
black, quickly use it and stand still since it channels. It will
reflect the Deathbolts back to him. You can choose not to go into
melee range at all and just kite him in circles and kill him with
his own bolts.
- Then, return to Freya and turn in Returned Sevenfold.
Get the two follow-up quests, The Fallen Pillar and
Salvaging Life's Strength.
- Fly south and up to The Lifeblood Pillar.
- Turn in The Fallen Pillar at the Cultist Corpse.
Get the follow-up Cultist Incursion.
- Kill 8 Lifeblood Elementals and use the Lifeblood
Gem on their corpses.
- Then, fly back to Freya and turn in Cultist Incursion
and Salvaging Life's Strength. Get the follow-up
quests, Exterminate the Intruders and Weapons of
Destruction.
- Fly northwest to Death's Hand Encampment
- Kill 8 Cultist Infiltrators
- Destroy 4 Unstable Explosives
- Then, fly back to Freya and turn in Exterminate
the Intruders and Weapons of Destruction. Get the
follow-up The Lifewarden's Wrath.
- Fly northwest to the top of The Glimmering Pillar. Use
Freya's Horn under the structure, where the explosives
are.
- Then, fly back to Freya and turn in The Lifewarden's
Wrath. Get the follow-up Freya's Pact. Talk to her
and go through the dialogue to complete the quest and get the
follow-up Powering the Waygate - The Maker's Perch.
- Fly far northwest to The Maker's Perch. Enter the building,
and use Activation Switch Gamma.
- Then, fly back to Freya and turn in Powering the
Waygate - The Maker's Perch. Get the follow-up Powering
the Waygate - The Maker's Overlook.
- Fly east to The Maker's Overlook. Outside the building,
get the quest A Timeworn Coffer. Enter the building, killing
Sholazar Guardians for a Huge Stone Key throughout,
and head down the corridor east all the way to the end (avoiding
the elite Overlook Sentry), and use Activation Switch Theta.
Return to the Timeworn Coffer and complete A Timeworn Coffer.
- Then, fly back to Freya and turn in Powering the
Waygate - The Maker's Overlook. Get the follow-up The
Etymidian.
- Fly southwest into the Waygate. Head up the stairs and
turn in The Etymidian and get the follow-up The Activation
Rune.
- Enter the hall and kill High Cultust Herenn at the
end of it for the Omega Rune.
- Return to The Etymidian and turn in The Activation
Rune and get the follow-up Back Through the Waygate.
- Don't start flying back to Freya yet! Fly to Frenzyheart
Hill.
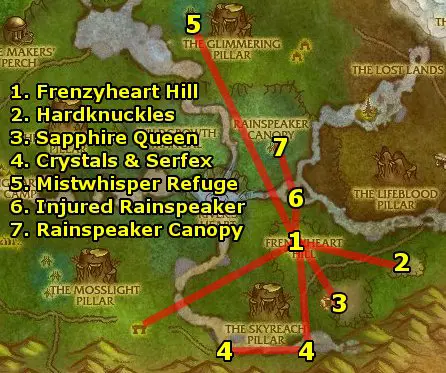
- Fly northeast to Frenzyheart Hill and turn in Playing
Along. Get the follow-up The Ape Hunter's Slave. Also,
get Tormenting the Softknuckles from Goregek (you
can use Goregek's Shackles to summon him).
- Fly southeast and kill 8 Hardknuckle Forager and 6 Hardknuckle
Charger. Use your Softknuckle Poker to poke Softknuckles
until the Hardknuckle Matriarch comes. Kill her.
- Then, return to Frenzyheart Hill and turn in The
Ape Hunter's Slave and Tormenting the Softknuckles.
Get the follow-ups The Wasp Hunter's Apprentice and The
Sapphire Queen.
- Fly southeast into the Sapphire Hive. Kill 6 Sapphire
Hive Wasp and 9 Sapphire Hive Drone. Fight your way to the
end of the tunnel and kill the Sapphire Hive Queen for
the Stinger of the Sapphire Queen.
- Then, return to Frenzyheart Hill and turn in The
Wasp Hunter's Apprentice and The Sapphire Queen.
Get the follow-up Flown the Coop! Capture 12 Chickens
around camp, then turn in the quest and get the follow-ups
The Underground Menace and Mischief in the Making.
- Fly south and gather 8 Skyreach Crystal Cluster along
the river. Also, search for Serfex - he's underneath the
ground, walk over his dirt mound to make him come up - and kill
him for the Claw of Serfex - he spawns in two places on
the river.
- Then, return to Frenzyheart Hill and turn in The
Underground Menace and Mischief in the Making.
Get the follow-up Rough Ride. Get on the Captive
Crocolisk at the northeastern area of camp.
- Ride the crocolisk at the west side of camp to Mistwhisper
Refuge. You'll arrive just southeast of the camp. Use Zepik's
Hunting Horn to call Zepik and turn in A Rough Ride.
Get the follow-ups Lightning Definitely Strikes Twice and
The Mist Isn't Listening.
- Kill 12 Mistwhisper Gorlocs
- Use the Skyreach Crystal Clusters at the base of
the weather shrine, then shatter the crystals by interacting
with them when they appear next to the shrine.
- Turn in Lightning Definitely Strikes Twice and The
Mist Isn't Listening to Zepik. (Use Zepik's
Hunting Horn to summon him if he's not with you). Get
the follow-up Hoofing It.
- Then, return to Frenzyheart Hill and turn in Hoofing
It. Get the follow-up Just Following Orders.
- Fly north to an Injured Rainspeaker Oracle. Talk to it,
then complete Just Following Orders. Get the follow-up
Fortunate Misunderstandings.
- Talk to the oracle again and escort it to Rainspeaker Canopy.
Turn in Fortunate Misunderstandings and get the follow-ups
Make the Bad Snake Go Away and Gods Like Shiny Things.
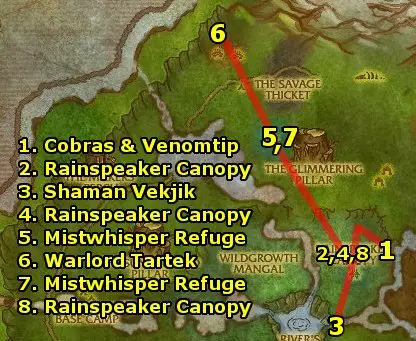
- Head north and kill 10 Emperor Cobras and Venomtip.
Keep a careful lookout at the ground - some places sparkle just
slightly. Stand on them and let Lafoo dig them up. Collect
6 Shiny Treasures.
- Then, return to Rainspeaker Canopy and turn in Gods
like Shiny Things and Make the Bad Snake Go Away. Get
the follow-up Making Peace.
- Fly southwest to Shaman Vekjik and talk to him.
- Then, return to Rainspeaker Canopy and turn in Making
Peace. Get the follow-up Back So Soon?
- Fly northwest to Mistwhisper Refuge and turn in Back
So Soon? and get the follow-ups The Lost Mistwhisper Treasure
and Forced Hand.
- Fly northwest to the Mistwhisper Treasure. Warlord
Tartek will come - kill him. Head down and kill 8 Frenzyheart
Spearbearer and 6 Frenzyheart Scavenger.
- Then, return to Mistwhisper Refuge and turn in The
Lost Mistwhisper Treasure and Forced Hand. Get the
follow-up Home Time!
- Fly to Rainspeaker Canopy and turn in Home Time! Get
the follow-up The Angry Gorloc.
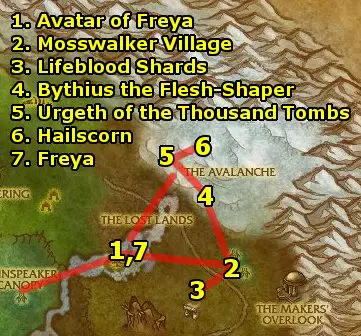
- Fly northeast to Avatar of Freya and turn in Back
Through the Waygate. Get the follow-up Reclamation.
- Fly east to Mosswalker Village. Turn in The Angry
Gorloc to your summon, Moodle. Get the follow-up quests
The Mosswalker Savior and Lifeblood of the Mosswalker
Shrine.
- .Rescue 6 Mosswalker Victims in the village by killing
the undead standing over them.
- Fly southwest and pick up 10 Lifeblood Shard scattered
on the ground near the red crystals.
- Summon Moodle using Moodle's Stress Ball and
turn in The Mosswalker Savior and Lifeblood of the
Mosswalker Shrine. Get the follow-up A Hero's Burden
(Group).
Look for somebody to group with to do the group quest while
you proceed to The Avalanche. He's inside the bottom of the
Lifeblood Pillar.
Fly northeast to The Avalanche. Use the Omega Rune
to take control of The Etymidian. Start heading up
the slope. All the abilities are very relevant, so read up on
them first and try them out while killing the lesser undead..
Ability 1: Colossal Strike - A frontal cleaving attack
which should be constantly spammed.
Ability 2: Cataclysm - A large AoE around you which does
a lot of damage and instantly kills the lesser undead.
Ability 3: Reconstruction - A self-heal to full.
Ability 4: Titanic Surge - Evocation -- regains all your
mana as its charging, but you take extra damage while "Evocating."
Ability 5: Maker's Sanctuary - A self-divine intervention.
Takes you out of combat and makes you immune. This is the ability
to use when you're about to die and have no outs.
- Kill Bythius the Flesh-Shaper. This one is fairly simple,
just spam Colossal Strike and Cataclysm. Use Reconstruction when
you're low on health.
- Kill Urgreth of the Thousand Tombs - Keep a lookout for
Urgeth's emote, Urgeth begins to emanate a powerful dark energy!
When he does, run away since you will instantly die if you're
near him. Take the opportunity to Reconstruction and Titanic Surge
while he's running back to you. As usual, spam Colossal Strike
and Cataclysm.
- Kill Hailscorn - Just spam Colossal Strike, and save
Cataclysm for when Hailscorn emotes: Hailscorn calls forth
an army of frozen corpses. Cataclysm to kill all the adds
he spawns. Rinse and repeat.
- Once you've finished killing 200 Lesser Undead, fly southwest
to Freya and turn in Reclamation.
If you can find a partner to go kill Artruis, then go for
it - otherwise, Hearth to Dalaran.
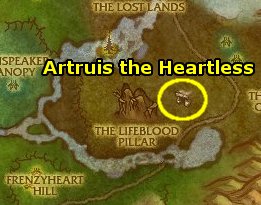
- (Group) A Hero's Burden Quest: Fly to The Lifeblood
Pillar and enter the lower entrance. Kill Artruis the Heartless
- at 30%, he becomes immune to attack and you then must kill either
the Gorloc or Wolvar. Whoever you don't kill you become friendly
with their faction, and whoever you kill you become enemies of
that faction. Don't worry too much about this decision, since
you can change factions at any time from the same daily.
Complete the quest at Artruis's Phylactery as well as the
follow-up quest to either the Gorloc or Wolvar.
Then, Hearth to Dalaran.
Level 68 is the minimum level requirement to enter Northrend.
And should you go to Northrend at level 68? Absolutely!
- Northrend quest experience is much greater than that of The
Outlands, with pretty much every single quest rewarding over 20k
experience apiece.
- The monsters give more experience and are not more difficult.
- The quest rewards are huge upgrades.
Fly to Shattrath. Take the portal to Stormwind. Train your skills.
Fly to Menethil Harbor, Wetlands.
Take the boat at the northern pier to Valgarde
Keep, Howling Fjord.
Welcome to Northrend!

In this exciting expansion, there are many interesting new types
of quests here. As you fight your way through the armies of the
Lich King, you'll have a blast!
|
|
