|
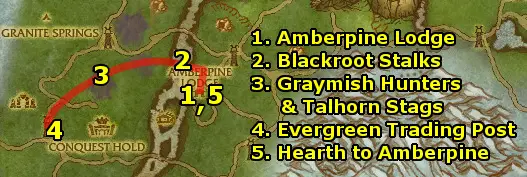
- Arrive at Amberpine Lodge. Get the quest Mmm... Amberseeds!
right inside the main lodge. Then, turn it in further inside.
Get the quests:
- Just Passing Through
- Local Support
- Replenishing the Storehouse
- Them or Us!
- Head west to the river bank. Kill all Talhorn Stag along
the way. Collect 5 Blackroot Stalks.
- Head west and kill 6 Graymist Hunters and Talhorn
Stags to finish collecting 8 Succulent Venison.
- Reach the Evergreen Trading Post and go into the building
to get the Cedar Chest.
- Hearth to Amberpine Lodge.
-
At Amberpine Lodge, Turn in all your quests:
- Just Passing Through and get the follow-up Doing
Your Duty - then, head just outside the lodge and
use the Outhouse to get the Partially Processed
Amberseeds. Turn in Doing Your Duty.
- Local Support and get the follow-up Close the
Deal
- Replenishing the Storehouse and get the follow-up
Take Their Rear!
- Them or Us! and get the follow-up Eagle Eyes
Also, get the new quest, Troll Season.
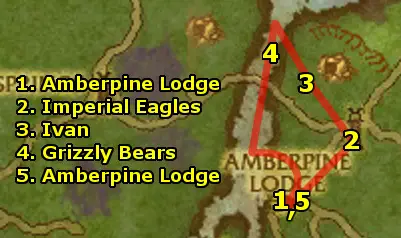
- Head northeast to Ivan and turn in Close the Deal
and get the follow-up A Tenative Pact.
- Head west and kill 5 Imperial Eagles.
- Head west and kill Grizzly Bears along the river for
8 Grizzly Flank.
- Return to Amberpine Lodge.
- At Amberpine Lodge, turn in your quests:
- A Tentative Pact
- Eagle Eyes
- Take Their Rear!
Get the new quests:
- An Exercise in Diplomacy
- Secrets of the Flamebinders
- Thinning the Ranks
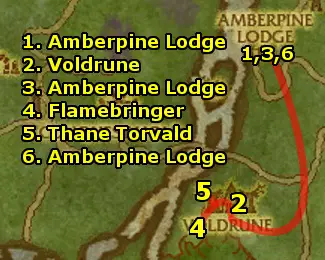
- Head south and follow the path into Voldrune. Kill 12
Dragonflayer Huscarls and kill Dragonflayer Flamebinders
for 3 Flame-Imbued Talismans.
- Return to Amberpine Lodge and turn in Secrets of the
Flamebinders and Thinning the Ranks and get the new
quest, The Thane of Voldrune.
- Go to Flamebringer in the southwestern area of Voldrune
and mount it.
- Fly northeast and look at the top of at the balconies of buildings
to find Thane Torvald Eriksson. First, fly right next to
him to melee range.
This fight is a bit tough, but the key thing is to make sure that
you use all of your abilities on cooldown, namely Use Wing
Buffet (Ability 2) and Molten Fury (Ability
3). Make sure to keep spamming Flame Breath (Ability
1) when the other two abilities are on cooldown.
- Fly back, still mounted on your drake, to Amberpine Lodge
and turn in The Thane of Voldrune.
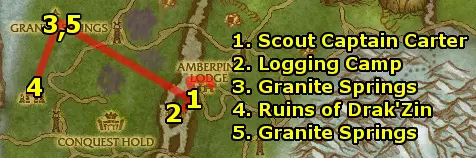
- Head west to Scout Captain Carter. Get Blackriver
Skirmish.
- Head down to the Blackriver Logging Camp and kill 10
Conquest Hold Raiders.
- Then, return to Scout Captain Carter and turn in
Blackriver Skirmish.
- Ride northwest to Granite Springs. Turn in Troll Season!
and get the follow-up Filling the Cages.
Talk to Budd at camp and get him to come play with the
ice trolls with you.
- Head southwest to the Ruins of Drak'Zin and use Budd's
Tag Troll ability to stun a troll when you're near one
but not in combat with one. Then, use the Bounty Hunter's Cage
on it.
- Return to Granite Springs. Turn in Filling the Cages
and get the follow-up Truce? get and use the Dull
Carving Knife right next to the cage and then turn in Truce?
and get the follow-up Trial of Visions.
Buy an Imbued Vial from Ameenah in camp.
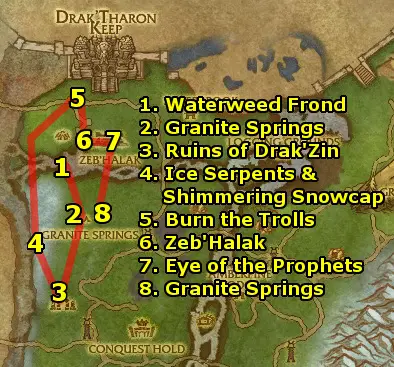
- Head northwest, pick up 3 Haze Leaf along the way. Dive
into the lake and get a Waterweed Frond.
- Return to Granite Springs and turn in Vial of Vision
and get the follow-up Subject to Interpretation and
the new quest, Scourgekabob.
- Get a Scourged Troll Mummy on the ground nearby
and drop it off at the fire to the east (past the campfire
- the fire with lots of mummy corpses next to it.) Turn
Scourgekabob, listen to him sing for a bit, and get
the follow-ups:
- Seared Scourge
- Simmercap Stew
- Head southwest back to the Ruins of Drak'Zin. Kill the
trolls for 5 Frozen Mojo. Use Drakuru's Elixir at
Drakuru's Brazier and turn in Subject to Interpretation
and get the follow-up Sacrifices Must Be Made.
- Head northwest to the snow bank along the river and kill Ice
Serpents for 5 Ice Serpent Eyes and collect 5 Shimmering
Snowcap from plants growing near trees on the snow.
- Head northeast to the many Scourge Trolls. Stay your
distance and throw Mack's Dark Grog at them. You have to
throw it far, it has a big minimum range. Throw them into the
most clumped scourge and burn 20 Scourge Trolls.
Faster strategy for the daring: throw the Mack's Dark Grog
to the troll area, then mount up and run to the fire. Aggro
everything and pull it into the fire to burn the Scourge Trolls
quickly.
- Head south into Zeb'Halak. Collect 5 Sweetroot and
kill Warlord Zim'bo for Zim'bo's Mojo.
- Clear your way east up the Ziggurat and get the Eye of the
Prophets from the statue of the Seer of Zeb'Halak.
Use Drakuru's Elixir at Drakuru's Brazier and turn
in Sacrifices Must Be Made. Get the follow-up Heart
of the Ancients.
- Return to Granite Springs and turn in:
- Seared Scourge and get the follow-up Search and
Rescue (Dungeon - Drak'Tharon Keep)
- Shimmercap Stew and get the follow-up Say Hello
to My Little Friend
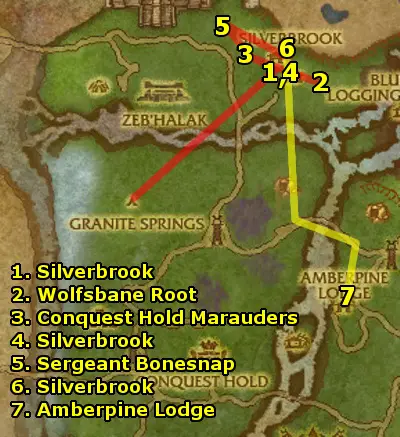
- Ride northeast to Silverbrook. Turn in An Exercise
in Diplomacy and get the quests there:
- Northern Hospitality
- Wolfsbane Root
- Head east of Silverbrook and destroy 8 Wolfsbane Root.
- Head just west of Silverbrook and kill 8 Conquest Hold Marauders.
- Return to Silverbrook and turn in:
- Northern Hospitality
- Wolfsbane Root
Get the new quest, Test of Mettle.
- Head northwest to Sergeant Bonesnap and kill him. Turn
in Test of Mettle to the Captured Trapper and get
the follow-up Words of Warning.
- Return to Silverbrook and turn in Words of Warning.
Get the follow-up Escape from Silverbrook.
- Ride all the way back to Amberpine Lodge while being
pursued by worgen. To keep them away from you, use all your abilities
on cooldown essentially. Hold the camera to look behind you at
all times.
- Burning Oil (Ability 1) - Spam this ability
whenever its up - throw it backwards at the Worgen to kill
them.
- Gallop (Ability 2) - Use this ability whenever
its up to go faster.
- Trample (Ability 3) - Whenever there are Worgen
on you, use this to slow them all down.
Turn in Escape from Silverbrook and get the follow-up
Swift Response.
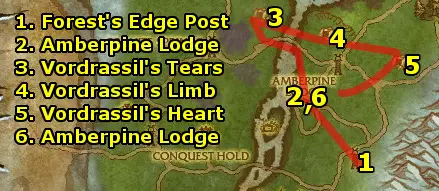
- Head southeast to Forest's Edge Post and kill 7 Silverbrook
Hunters and Vladek, inside the building. Loot Mikhail's
Journal from Vladek to start Descent into Darkness.
- Return to Amberpine Lodge and turn in:
- Descent into Darkness
- Swift Response and get the follow-up Report to
Gryan Stoutmantle... Again
Get the new quests in town from Hierophant Thayreen:
- The Failed World Tree
- A Dark Influence
During the next steps, kill all Entropic Oozes along
the way for 6 Slime Samples. You should have plenty by
the end of step 5.
- Ride northwest to Vordrassil's Tears. Clear your way
through the slime and enter the tunnel. Go underground and use
the Geomancer's Orb at the end of the tunnel.
- Ride southeast to Vordrassil's Limb. Use the Geomancer's
Orb at the end of the tunnel.
- Ride southeast to Vordrassil's Heart. Use the Geomancer's
Orb at the end of the tunnel and finish collecting 6 Slime
Sample from the Entropic Oozes.
- Return to Amberpine Lodge and turn in your quests:
- The Failed World Tree
- A Dark Influence
Get the follow-up quests:
- A Possible Link
- Children of Ursoc
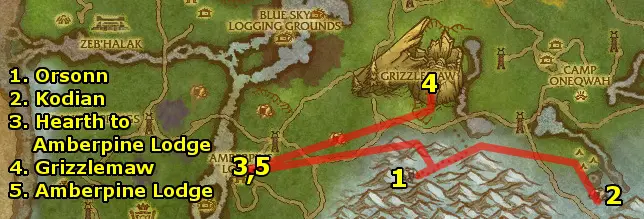
- Ride east into the mountains and kill Frostpaw Furbolgs
on the way for Crazed Furbolg Blood (you don't have
to finish gathering 8 yet) and listen to Orsonn's Story
by talking to Orsonn inside the cave.
- Ride further east and kill Redfang Furbolgs for 8
Crazed Furbolg Blood. Listen to Kodian's Story by talking
to Kodian inside the cave.
- Return to Amberline Lodge and turn in your quests:
- A Possible Link
- Children of Ursoc
Get the follow-up quests:
- Vordrassil's Sapling
- Vordrassil's Seeds
- Ride northeast to Grizzlemaw. Outside the tree at the
southern side, pick up 8 Vordrassil's Seeds. Then, head
into the tree from the southern entrance. Go to the bottom and
use the Verdant Torch on the bottom of the huge tree and
burn it to get Vordrassil's Ashes.
- Return to Amberpine Lodge. Turn in:
- Vordrassil's Sapling
- Vodrassil's Seeds
Get the follow-up: Ursoc, the Bear God (Group)
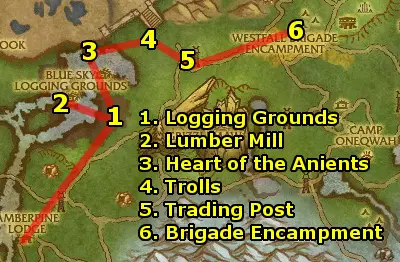
- Ride northeast to the Blue Sky Logging Grounds. Get the
quests:
- Kick 'Em While They're Down
- Life or Death
- Pieces Parts
- Shredder Repair
- Note: this is a PvP location and is a daily quest hub, so level
80 Horde may be around! If its too hot an area, come back later.
Head west across the lake and complete all the quest objectives:
- Kill 15 Horde (The Wounded Skirmishers are all
sitting, so you get a guaranteed first hit critical on them
- use a big opening attack)
- Heal 10 Westfall Infantry
- Get 4 Grooved Cog, 3 Notched Sprocket, 2 High Tension
Spring
- Deliver 3 Broken-Down Shredders
Then, return to the NPCs and turn in all the quests.
- Head north and up the rig at the lake. At the top, inside the
building, complete Heart of the Ancients and get the follow-up
My Heart is in Your Hands.
- Head northeast and kill the Drakkari Trolls for 5
Desperate Mojo. Use Drakuru's Elixir at Drakuru's
Brazier and turn in My Heart is in Your Hands. Get
the follow-up Voices From the Dust.
- Ride east to the Heartwood Trading Post. Talk to Emily
in the building and get the escort quest Mr. Floppy's Perilous
Adventure.
- Escort Emily and Mr. Floppy to the Westfall Brigade Encampment.
Turn in:
- Mr. Floppy's Perilous Adventure
- Report to Gryan Stoutmantle... Again
Get all the quests:
- Hollowstone Mine
- Softening the Blow
- Mounting Up
Start looking for a group for Ursoc, the Bear God. Two
people is enough as long as you have at least one healer or one
tank, because when you go up to Ursoc's Den (northwest
of Westfall Brigade Encampment) you talk to Tur Ragepaw
who will join your group as either a bear (tank), tree (healer),
or cat (dps). Choose whatever will help your group the most. Follow
him and kill Ursoc.
Keep looking while you're in the zone, there's plenty of time to
go there so just keep following the steps until someone also needs
to kill Ursoc.
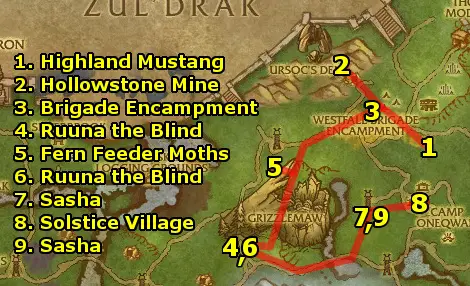
- Head southeast. Gather 5 Wild Carrots. Use your Stick
on one of the Highland Mustangs galloping around, then
return it back to the Westfall Brigade Encampment in front
of Squire Percy. Bring 5 Highland Mustangs back.
Turn in Mounting Up.
- Ride northwest into the Hollowstone Mine. Turn in Hollowstone
Mine to Petrov and get the follow-up Souls at Unrest.
- Head into the mine and kill 8 Undead Miners and use
the Miner's Lantern on their corpses.
- Return to Petrov and turn in Souls at Unrest and
get the follow-up A Name from the Past.
- Ride to Westfall Brigade Encampment and turn in A
Name from the Past and get the follow-up, Ruuna the Blind.
- Head southwest to Ruuna the Blind and turn in Ruuna
the Blind. Get the follow-up Ruuna's Request.
- Ride northeast and kill Fern Feeder Moths for 4 Gossamer
Dust.
- Return to Ruuna the Blind and turn in Ruuna's Request.
Get the follow-up Out of Body Experience. Drink the Gossamer
Potion and watch the scene. When you return, turn in Out
of Body Experience and get the follow-up Fate and Coincidence.
- Ride northeast to Sasha at the White Pine Trading
Post. Turn in Fate and Coincidence and get the follow-ups:
- Sasha's Hunt
- Anatoly Will Talk
- Head east to Solstice Village. Kill 12 Solstice Hunter
and continue to the east side of the village. Target Tatjana
(not the horse) and use the Tranquilizer Dart.
- Ride back to Sasha. Turn in your quests:
- Sasha's Hunt
- Anatoly Will Talk
Get the follow-up, A Sister's Pledge.
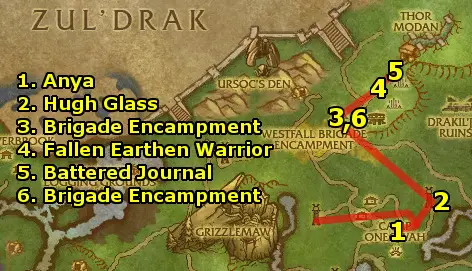
- Ride back east. Head into the cave (NOTE: face west at the
"M" in Camp) to Anya. Turn in A Sister's
Pledge and get the follow-up Hour of the Worg (Group).
- Ride east to Redwood Trading Post. Talk to Hugh Glass
and buy one Howlin' Good Moonshine. Also, get his quest,
A Bear of an Appetite.
- Ride back to the Westfall Brigade Encampment. Turn in
Softening the Blow and get the follow-up Brothers in
Battle.
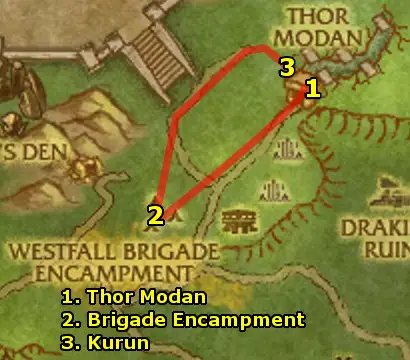
- Ride northeast to Thor Modan. Go to the Fallen Earthen
Warrior and get Find Kurun!
- Head further northeast to the Battered Journal and get
the quest The Damaged Journal. Wander around the area and
pick up 8 Missing Journal Page then use the Incomplete
Journal to form Brann Bronzebeard's Journal. Also,
kill 10 Runic Battle Golem.
- Return west to the Westfall Brigade Encampment and turn
in:
- Brothers in Battle
- The Damaged Journal
Get the follow-ups:
- The Runic Keystone
- Uncovering the Tunnels
(Optional - Group) Start looking for a group for Hour
of the Worg. When you get a group of three, follow the steps
below. You don't have to go there right away, skip it and go to
the next steps if you don't readily find someone, then come back
later.
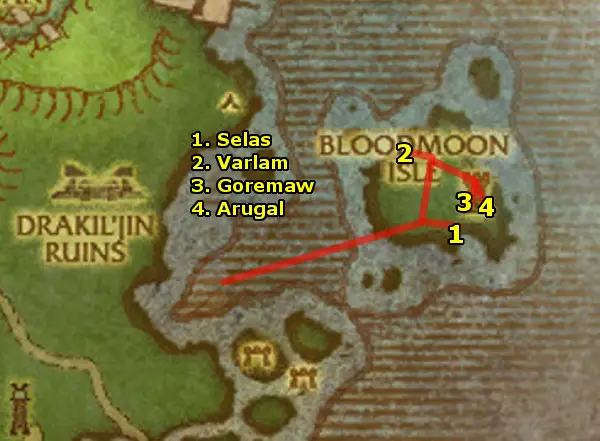
- (Group) Swim northeast to Bloodmoon Isle. As you
head up the path, to the right, kill Selas in the first
camp.
- (Group) Continue up the path. To the left, kill Varlam.
- (Group) Outside the tower, at the "stables",
kill Goremaw.
- (Group) Kill Arugal. Whenever he summons adds,
kill the adds first. Turn in Hour of the Worg on the top
of the tower.
- Ride east to Thor Modan. Enter the three buildings to
explore them in the outer area and also kill enough dwarves for
5 Runic Keystone Fragments.
- Return to the Westfall Brigade Encampment and turn in:
- The Runic Keystone and get the follow-up The Runic
Prophecies
- Uncovering the Tunnels and get the follow-up The
Fate of Orlond
- Take the northeast path to Kurun.

- At Kurun, turn in An Expedient Ally and get the
follow-up Raining Down Destruction.
- Head northeast and pick up a Boulder around the area
where many giants and throwing boulders into the city below. Target
an Iron Dwarf and throw the boulder. You may only carry
one boulder at a time. Kill 5 Iron Dwarves this way.
- Then, return to Kurun and turn in Raining Down
Destruction. Get the follow-up Rallying the Troops.
- Head northeast and use the Shard of the Earth on the
Grizzly Hill Giants fighting in melee. Each time you rally
a giant, an Iron Rune Avenger will spawn - kill it.
Rally 5 Giants and Kill 5 Avengers.
- Then, return to Kurun and turn in Rallying the
Troops. Get the follow-up Into the Breach.
- Head around and down into Thor Modan. In the tunnel,
go to Surveyor Orlond and turn in The Fate of Orlond.
Get the follow-up Steady as a Rock?
- Jump into the water below and kill Subterranean Threshers
for a Portable Seismograph.
As you clear your way through, you will find Rune Plates
on both sides - from the entrance as you clear your way deeper
in, the order in which you'll find them is:
- Third Prophecy
- First Prophecy
- Second Prophecy
At the very end of the tunnel, kill Iron Thane Argrum.
Also, use the Poratble Seismograph at the eastern end
of the tunnel. Clear your way back out, making sure to finish
killing 10 Iron Dwarf Defenders.
- Return to Kurun.
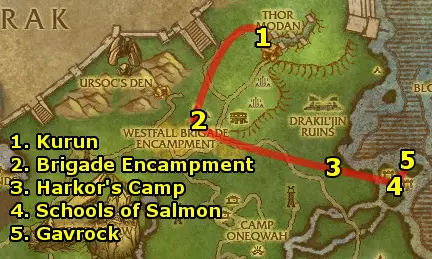
- At Kurun, turn in Into the Breach and get the
follow-up Gavrock.
-
Return to Westfall Brigade Encampment and turn in:
- Steady as a Rock? and get the follow-up Check
Up on Raegar
- The Runic Prophecies
- Ride southeast to Harkor's Camp. Turn in Say Hello
to My Little Friend and get the quests:
- It Takes Guts...
- Nice to Meat You
- Therapy
- Head east and look for Schools of Northern Salmon around
the islands. Stand in it and use your Fishing Net and fish
up 6 Northern Salmon.
- Go to Gavrock.
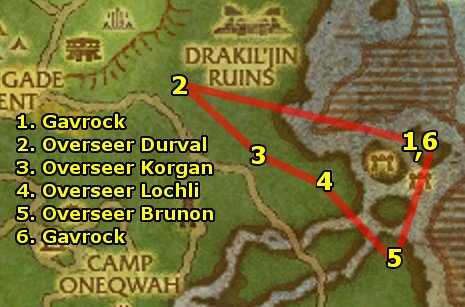
- At Gavrock, turn in Gavrock and get the follow-up
Runes of Compulsion.
- Ride northwest and kill the Rune-Weavers to spawn and
kill Overseer Durval.
- Ride southeast and kill the Rune-Weavers to spawn and
kill Overseer Korgan.
- Ride southeast and kill the Rune-Weavers to spawn and
kill Overseer Lochli.
- Ride southeast and kill the Rune-Weavers to spawn and
kill Overseer Brunon.
- Return to Gavrock.
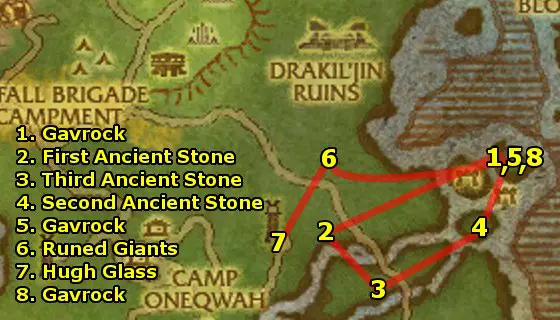
- At Gavrock, turn in Runes of Compulsion. Get the
follow-up Latent Power.
- Ride southwest to the First Ancient Stone and use the
Shard of Gavrock.
- Ride southeast to the Third Ancient Stone and use the
Shard of Gavrock.
- Ride northeast to the Second Ancient Stone and use the
Shard of Gavrock.
- Return to Gavrock and turn in Latent Power. Get
the follow-up Free At Last.
- Ride west. Use Gavrok's Runebreaker on Runed Giants
and Successfully Free 4 Giants. Note that you can and
should repeatedly use the runebreaker on a giant until it succeeds
- sometimes, it can take several tries until you successfully
free it. Also, finish collecting 10 Fibrous Worg Meat from
Duskhowl Prowlers and 10 Shovelhorn Steak from Longhoof
Grazers.
- Ride to Hugh Glass and turn in A Bear of an Appetite.
- Ride back to Gavrock and turn in Free at Last.
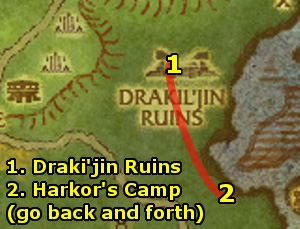
- Ride northwest to the Draki'jin Ruins.
- Head down into the ruins. Pick up 5 Drakkari Canopic
Jars along the way. Near the exclamation mark on the radar,
pick up the Drakkari Tablets. Then talk to Harrison
Jones and accept his escort quest, Dun-da-Dun-tah!
Let him tank the snake, kill the adds.
- Go outside and kill 10 Drakkari Protectors and 10 Drakkari
Oracles and collect 5 Sacred Mojo. Go to Drakuru's
Brazier and turn in Voices From the Dust. Get the
follow-up Cleansing Drak'tharon.
- Ride to Harkor's Camp and turn in the quests:
- It Takes Guts... and get the follow-up Drak'aguul's
Mallet.
- Nice to Meat You
- Therapy
- Ride north and kill Drak'aguul. He pulls solo while his
adds wait around. He's located between the camp and the ruins.
- Return to Harkor's Camp and turn in Drak'aguul's Mallet.
Get the follow-up See You on the Other Side.
- Ride north to the Drakil'jin Ruins and use the Charged
Drakil'jin Mallets on the gongs outside the crypt.
- Then, head into the crypt. Turn in See You on the Other
Side to Gan'jo. Get the follow-up Chill Out,
Mon. Open Gan'jo's Chest for the Snow of Eternal
Slumber. Talk to Gan'jo again to return to the
living world.
- Use the Snow of Eternal Slumber on the Ancient
Drakkaris and pick up the Drakkari Spirit Particles
which they spawn.
- Ride back to Harkor's Camp and turn in Chill Out,
Mon. Get the follow-up Jin'arrak's End.
- Ride north to the Drakil'jin Ruins again. Enter the crypt
and collect the Sacred Drakkari Offering in the first room.
Use your Drakkari Spirit Dust. Then, head out and use the
Infused Drakkari Offering at the gongs outside the crypt
and kill Warlord Jin'arrak.
- Ride back to Harkor's Camp and turn in Jin'arrak's
End.
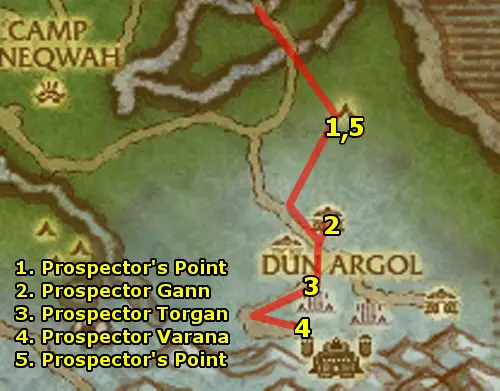
- Ride south to Prospector's Point. Turn in Check Up
on Raegar and get the quests:
- The Captive Prospectors
- The Perfect Plan
Then, clear your way south up Dun Argol. Gather Dun
Argol Cage Keys along the way as well as Golem Blueprint
Sections from Iron Rune-Smiths.
- Rescue Prospector Gann. He's inside a building.
- Rescue Prospector Torgan. He's outside in the open.
- Rescue Prospector Varana. She's outside in the open.
- Return to Prospector's Point. Turn in:
- The Captive Prospectors and get the follow-up Why
Fabricate When You Can Appropriate?
- The Perfect Plan and get the follow-up Looking
the Part
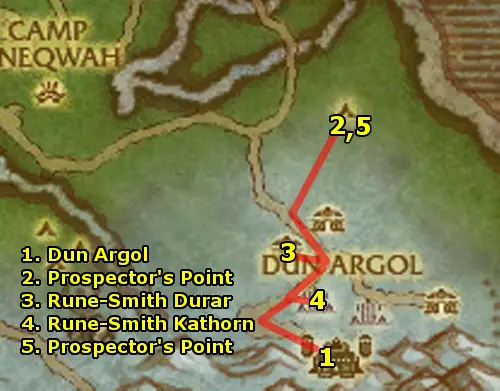
- Head back up to the top of Dun Argol. Kill any Iron
Rune Overseers on the way for an Overseer's Uniform.
Collect 8 War Golem Parts from the top building.
- Return to Prospector's Point. Turn in:
- Why Fabricate When You Can Appropriate? and get the
follow-up Cultivating an Image
- Looking the Part and get the follow-up We Have the
Power
- Return to Dun Argol. Kill Rune-Smith Durar for
Durar's Power Cell.
- Kill Rune-Smith Kathorn for Kathorn's Power Cell.
Finish killing 8 Iron Dwarves and use Killian's Camera
on them.
- Return to Prospector's Point. Turn in:
- Cultivating an Image and get the follow-up Put
on Your Best Face For Loken
- We Have the Power and get the follow-up ...Or
Maybe We Don't
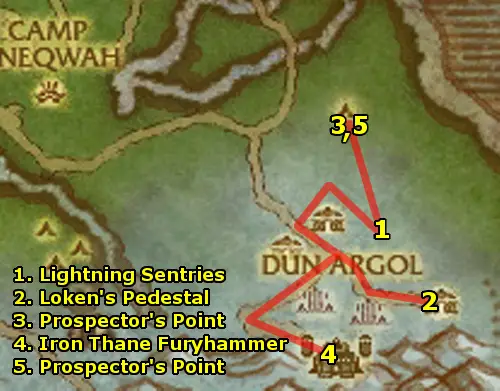
- Use your Golem Control Unit and head south. Kill 10
Lightning Sentries with your Depleted War Golem out.
- Mount up, then use your Overseer Disguise Kit (you
can use the kit while mounted to be disguised while riding) .
Ride to the easternmost building and click Loken's Pedestal.
Receive the Message from Loken.
- Mount up, then use your Overseer Disguise Kit again.
Ride back to Prospector's Point. Turn in:
- Put on Your Best Face for Loken
- ...Or Maybe We Don't
Get the follow-ups:
- Blackout
- The Iron Thane and His Anvil
- Ride up to the top building. Take the elevator down, and use
your Golem Control Unit. Walk up to Iron Thane Furyhammer
and use EMP (Ability 2) to make him vulnerable.
Spam Charged Smash (Ability 1) on him to kill him,
then run away to avoid aggroing The Anvil. Leave your vehicle
and use Raegar's Explosives on the Power Core in
the same area as Iron Thane Furyhammer.
- Return to Prospector's Point and turn in:
- Blackout
- The Iron Thane and His Anvil
To finish, ride back to Amberpine Lodge and turn in Ursoc,
the Bear God if you did it.
Fly to Dalaran. Set your Hearthstone
to Dalaran.
|
|
