|
At Stormwind, train your Cold Weather Flying at the
Flight Master for 500g. That's a decent chunk of gold...or maybe
not much at all if you've been following the Gold
Guide. If you have been, you might be in the thousands
of gold right now - and you'll be on track for the Epic Flying Mount
coming up at level 70 with the cost of 5,000g.
Fly to Menethil Harbor, Wetlands. Then, take the boat on
the northern pier to arrive at Valgarde Keep.

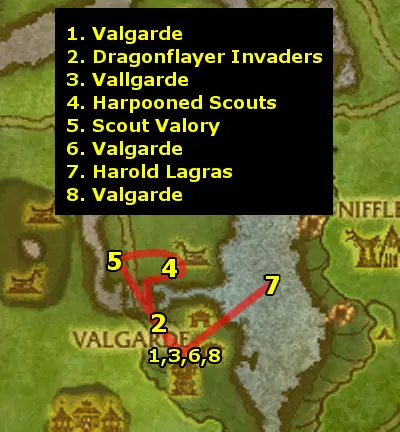
- At Valgarde Keep, get Hell Has Frozen Over...,
then turn it in the nearby Vice Admiral Keller and get
the follow-up If Valgarde Falls...
- Head just north of Valgarde and kill 12 Dragonflayer
Invaders who continue spawning and charging the keep.
- Return to Valgarde and turn in If Valgarde Falls...
and get the follow-up Rescuing the Rescuers.
- Head north past the river and pick up Ceremonial Dragonflayer
Harpoons off the scouts. Rescue 8 Scouts.
- Head west to Scout Valory and get Fresh Legs.
- Return to Valgarde and turn in Rescuing the Rescuers.
Get all the new quests:
- Prisoners of Wyrmskull
- The Human League
- Into the World of Spirits
- The Path to Payback
- Head northeast into the water and dive and meet Harold Lagras
underwater. Get Daggercap Divin'.
- Collect 10 Valgarde Supply Crates around the area.
- Get the Reagent Pouch on the deck of the underwater
wrecked ship, slightly northwest of Harold.
- Then, turn in Daggercap Divin'.
- Return to Valgarde and turn in Into the World of Spirits
and get the follow-up The Echo of Ymiron.

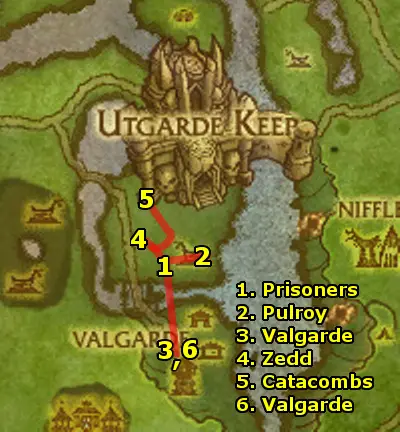
- Head north into Wyrmskull Village. Kill Dragonflayers
until you have 3 Dragonflayer Cage Keys - open the
cages around the area and Rescue 3 Capture Valgarde Prisoners.
- Go to Pulroy the Archaelogist inside a building to the
east and turn in The Human League and get the follow-up
Zedd's Probably Dead.
- Return to Valgarde and turn in Prisoners of Wyrmskull
and get the follow-up Dragonflayer Battle Plans.
- Head into Wyrmskull Village again, and head down the
slope into the pit on the northwest side. Clear the worgs and
find Zedd, hanging. Complete in Zedd's Probably Dead
and get the follow-up And Then There Were Two...
Near Zedd along at the end of the path is a cave - go into
it and loot the Dragonflayer Battle Plans hanging on a
wall.
- Head out of the pit and take the bridge - cross it and enter
the Utgarde Catacombs.
- Go down to Glorenfeld and turn in And There Were
Two... and get the follow-up The Depth of Depravity.
- Head onwards and look for 10 Wyrmskull Tablets along
the corridors. At the intersection, turn left and loot the
Harpoon Operation Manual. Also, get The Shining
Light from Ares the Oathbound.
- Head back towards the intersection and head straight - then,
go all the way down the stairs. Go straight through the ghouls
- while the shield is on you, the ghouls will die when they
hit you just once. Note: you can still die though! Recover
some health after getting hit a bit. Loot the Sacred
Artifact, then head back through the ghouls.
- Then, return to Ares the Oathbound and turn in The
Shining Light and get the follow-up Guided by Honor.
- Return towards the entrance and turn in The Depths of
Depravity and get the follow-up The Ring of Judgement.
- Go back to the stairs and go down just one floor. Turn in
The Ring of Judgement to the caged Daegarn and
get the follow-up Stunning Defeat at the Ring. Fight
the gladiator in the center as well as the next two gladiators,
then loot the Ancient Cipher upon defeating all of
them.
- Return to the entrance and turn in Stunning Defeat at
the Ring and get the follow-up Return to Valgarde.
- Return to Valgarde and turn in:
- Dragonflayer Battle Plans and get the follow-up To
Westguard Keep!
- Guided by Honor
- Return to Valgarde and get hte follow-up The Explorers'
League Outpost
- The Path to Payback and get the follow-up Locating
the Mechanism

- Head north out of Valgarde into the village and head
to the northeast big house near the river. Kill the Dragonflayer
Harpooners outside to get a Harpoon Control Mechanism.
Then, head into the house and use the Incense Burner and
listen to the two Vrykuls' conversation. Then, right click off
the spirit world buff to return to the physical world.
- Head northeast up the path by the river. At the end of the path,
find Defender Mordun and turn in Fresh Legs and
get the follow-ups:
- Into Utgarde!
- Disarmament
These are the two quests for the Utgarde Keep instance.
Try to find a group during your time in the Fjord to run it
at least once. In addition to the normal instance experience,
the quests give you an additional 60,500 Experience!
- Return to Valgarde and turn in your quests:
- The Echo of Ymiron and get the follow-up Anguish
of Nifflevar
- Locating the Mechanism and get the follow-up Meet
Lieutenant Icehammer...
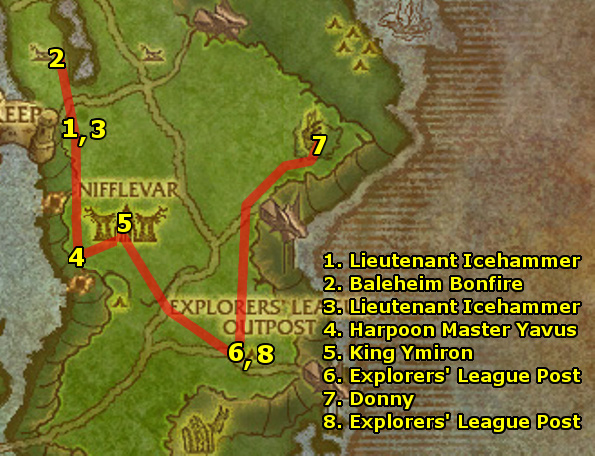
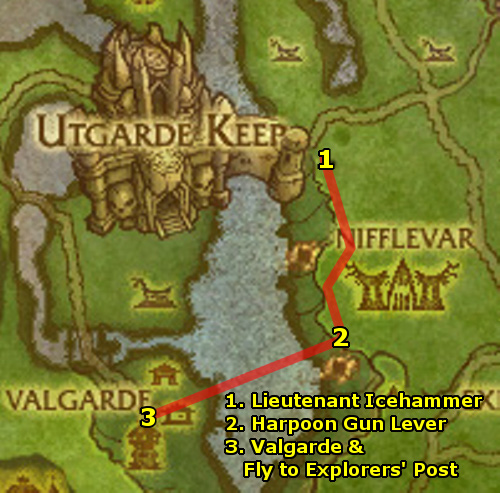
Then, talk to Captain Zorek again and ask him to fly
you to Lieutenant Icehammer.

-
Land in front of Lieutenant Icehammer. Turn in Meet
Lieutenant Icehammer and get the follow-up Drop It then
Rock It!
- Head north to the Baleheim Bonfire and use the Alliance
Banner. Kill the Vrykul who come to attack the banner.
- Return to Lieutenant Icehammer and turn in Drop It
then Rock It! and get the follow-up Harpoon Master Yavus.
- Head south to Nifflevar and clear your way to the southwest
house on the top of the hill with harpoon pointing towards the
river. Kill Harpoon Master Yavus.
- Use the Incense Burner outside the house and go to the
middle of Nifflevar. Stand next to King Ymiron and listen
to the speech.
- Ride southeast (you can do so while under the effects of
the Incense Burner to avoid mobs) to the Explorers' League
Outpost. Turn in The Explorers' League Outpost and
get the follow-up Problems on the High Bluff.
Turn in that quest and get the new quests:
- Tools to Get the Job Done
- Trust is Earned
Complete Trust is Earned by clicking on a Loose Rock
nearby the camp and get a Fjord Grub, then clicking
the Rock Falcon cage to feed a falcon. Get the follow-up The
Ransacked Caravan.
- Ride far northeast to Donny. Get Out of My Element?
from him.
- Head into the pit. Kill 10 Rune Destroyer, 5 Iron Rune
Laborer, and 2 Iron Rune Sage while looking for the Building
Tools. The tools are on top of the wooden platform.
- Then, go back to Donny and turn in Out of My Element?
- Return to the Explorers' League Outpost and turn in Tools
to Get the Job Done and get the follow-ups
- We Can Rebuild It
- We Have the Technology

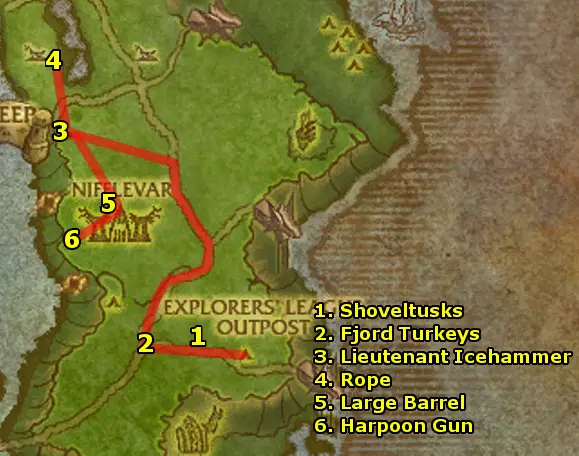
- Head southwest and kill any Shoveltusk until you get
a Pristine Shoveltusk Hide.
- Head further west to the crossroads. Pick up 5 Fjord Grubs
from the rocks and then target Fjord Turkeys, then
use your Trained Rock Falcon. Fetch 5 Fjord Turkeys.
- Ride north to Lieutenant Icehammer and turn in Harpoon
Master Yavus and get the follow-up It Goes to 11...
- Ride north to Baleheim and loot the Industrial Strength
Rope.
- Ride southeast to Nifflevar and loot the Large Barrel
which is close to the northern entrance (near a building
to the east right at the entrance)
- Head further south along the cliffs to the hut with harpoons
facing the river. Use the Harpoon Control Mechanism to
enter the vehicle.
Aim at the roof of the three buildings, then use Ability #1
to fire and destroy them. When they are destroyed, Flying
Defenders will come - target them and use Ability #2 to
kill them. If you need to kill more defenders after destroying
all the buildings, aim at the buildings again to spawn more defenders.
- Then, leave the vehicle and return north to Lieutenant
Icehammer.

- Return to Lieutenant Icehammer and turn in It Goes
to 11... and get the follow-up Let's Go Surfing Now.
- Head south to Nifflevar - go back to the harpoon hut.
Clear your way through the Dragonflayers and make sure
to obtain a Steel Ribbing.
The harpoon hut you fire off of this time is further southeast
than the other hut with the two harpoons. If you don't see a glowing
lever, go southeast to the next hut.
- Use the Large Harpoon Lever and surf back to Valgarde.
Turn in your quests:
- Anguish of Nifflevar
- Let's Go Surfing Now
And then head towards the docks and talk to McGoyver.
Select "Walt sent me to pick up some dark iron ingots"
and then select "Yarp" to be flown to the Explorers'
League Outpost.

- At the outpost, turn in your quests:
- The Ransacked Caravan and get the follow-up Falcon
Versus Hawk
- We Can Rebuild It
- We Have the Technology and get the follow-up Iron
Rune Constructs and You: Rocket Jumping
- Click the Work Bench next to Walt to get
suited into your robot suit. The next steps teach you
how to use the robot suit.
- Look around the camp for a Teleport Rune,
step on it, then use the Rocket Jump ability.
- Then, return to Walt and turn in Iron Rune
Constructs and You: Rocket Jumping and get the follow-up
Iron Rune Constructs and You: Collecting Data.
- Get suited up, and look around the camp for an Iron
Dwarf Relic on top of the cart by Gwendolyn
and use the Collect Data ability on it. (It
looks like a blue crystal, and you have to use the
ability while practically standing right on top of
it.)
- Then, return to Walt and turn in Iron Rune
Constructs and You: Collecting Data and get the follow-up
Iron Rune Constructs and You: The Bluff.
- Get suited up, and walk on Lebronski's Rug.
Then, use the Bluff ability.
- Then, return to Walt and turn in Iron Rune
Constructs and You: The Bluff and get the follow-up
quests:
- Lightning Infused Relics
- The Delicate Sound of Thunder
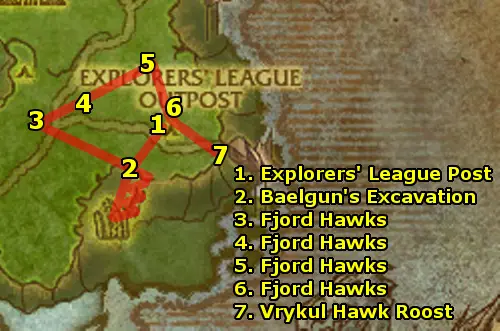
- Get suited up, then walk southwest to Baelgun's Excavation
Site. Make sure to use the Bluff ability whenever a
dwarf questions you. Go to the platform with three teleport runes
on it - take the middle one, Golem Transport - Level 2 and
use the Rocket Jump ability.
- Head west into the cave and look around for Iron Dwarf
Relics and use the ability Collect Data on them.
Head to the end of the cave and listen to Loken the titan's
speech until you get credit for quest completion.
- Continue down the cave to the other side. Exit the cave
and walk up the platforms all the way to the top, making sure
to finish gathering 15 Iron Rune Data. At the top,
exit the suit.
- To find Fjord Hawks, visit the rocks - they are perched
on them in pairs, and they are also flying in the sky. Whenever
you use the trained rock falcon on one of them, the other one
aggros and chases you. There are a lot in the sky which may be
pulled solo so they are the fastest ones to get - throughout the
next steps, keep an eye on the sky.
Mount up and ride northwest to the first pair of falcons. Pick
up Fjord Grub from the rocks along the way. Keep your eye
on the sky for Fjord Hawks - if you see any, use the Trained
Rock Falcon to capture it. Capture the falcons perched on
this rock.
- Head a little to the east and capture these hawks.
- Head northeast and capture these hawks.
- Head back to the Explorers' League Outpost and capture
the hawks perched nearby. If you still need more, head back west
to position 3 and 4 for them to respawn.
Turn in your quests:
- Lightning Infused Relics
- The Delicate Sound of Thunder and get the follow-up
News From the East
- Falcon Versus Hawk and get the follow-up There
Exists No Honor Among Birds
- Head east - when you reach Stonewall Lift look to the
south for the Vrykul Hawk Roost. Use your falcon to gain
control of the hawk.
Tip: hug the cliffside, because the enemy hawks generally patrol
the sky. Look straight down and look for Fjord Hawk Eggs.
- Head down, using Soar (Ability 2) on
cooldown to speed up and get right next to an egg. Use Scavenge
(Ability 1) to pick up eggs.
- Use Escape (Ability 3) to confuse a Hawk
Matriarch if you aggro one, then fly away.
Once you gather 8 Fjord Hawk Eggs, right click the buff
that you're controlling the bird to return to your character.
- Then, return to the Explorers' League Outpost and
turn in There Exists No Honor Among Birds.
- Talk to Walt and let him fly you to Westguard
Keep.

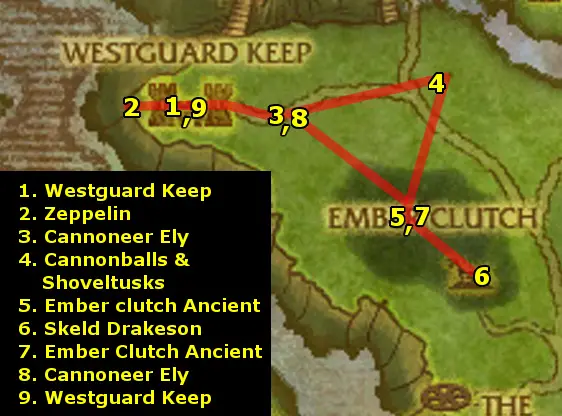
- Enter the keep at Westguard Keep and turn in:
- To Westguard Keep!
- News From the East
and get The Clutches of Evil.
- Head west to the zeppelin platform and get Break the Blockade.
Wait for the Zeppelin, then get on it.
Stand at the front side of the zeppelin and use Petrov's Cluster
Bombs on the cannons and pirates when they're in range until
Break the Blockade is complete. Turn it in.
- Head east to Cannoneer Ely and get One Size Does Not
Fit All.
- Head east and gather 10 Westguard Cannonballs and kill
Shoveltusks for 6 Shoveltusk Meat.
- Head southeast into Ember Clutch. Clear your way to the
Ember Clutch Ancient and get Root Causes.
Kill 15 Proto-Whelps and destroy 15 Proto-Drake Eggs.
- Head further southeast. Kill 5 Dragonflayer Handlers and
Skeld Drakeson, inside the building.
- Return to the Ember Clutch Ancient and turn in Root
Causes.
- Return to Cannoneer Ely and turn in One Size Does
Not Fit All.
- Return to Westguard Keep. Turn in:
- Shoveltusk Soup Again?
- The Clutches of Evil and get the follow-up Mage-Lieutenant
Malister. Turn that in and get the follow-up Two Wrongs...

- Head southeast to Ember Clutch. Look for Proto-Drakes
in the sky and use Malister's Frost Wand to pull them.
Kill 3 of them.
- Return to Westguard Keep and turn in Two Wrongs...
and get the new quests which open up:
- Report to Scout Knowles
- Danger! Explosives!
- Send Them Packing
- Head out of the keep and a bit south to Lunk-tusk and
get his quest: Orfus of Kamagua.
- Ride southeast along the road to Scout Knowles. Turn
in Report to Scout Knowles and get the follow-up Mission:
Eternal Flame.
- Head northeast to the Southwest Plague Tank. Use the
Ever-Burning Torch next to it to burn it.
- Head north (don't head into the valley - head around the
top) to the Northwest Plague Tank and burn it.
- Head east, again, around the top of the valley, to the Northeast
Plague Tank and burn it.
- Head south to the Southeast Plague Tank and burn it.
- Return to Scout Knowles and turn in Mission: Eternal
Flame and get the follow-up Mission: Package Retrieval.
- Head back, this time to the bottom of Halgrind. At the
northeastern area of the pond, get the Apothecary's Package
next to the Slain Apothecary.
- Return to Scout Knowles and turn in Mission: Package
Retrieval and get the follow-up Mission: Forsaken Intel.

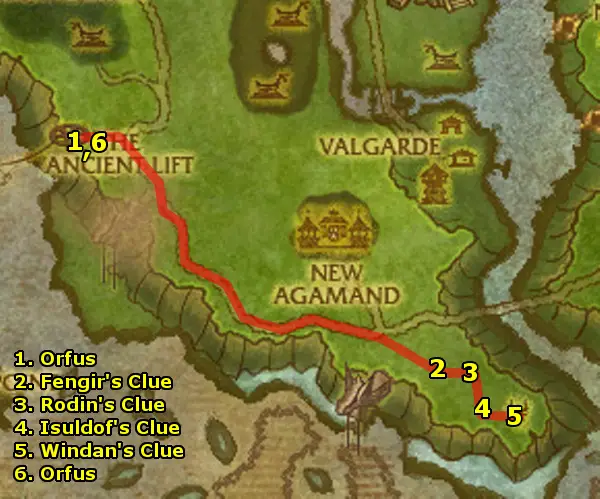
- Head southwest to Orfus of Kamagua. Turn in Orfus
of Kamagua and get the follow-up The Dead Rise!
- Ride a ways southeast along the road to Shield Hill.
First, loot the Mound of Debris inside the pit and get
Fengir's Clue.
- Head east to another pit and get Rodin's Clue from the
Unlocked Chest .
- Head south and get Isuldof's Clue from the Long Tail
Feather.
- Head east and get Windan's Clue from the Cannonball.
- Return to Orfus and turn in The Dead Rise! and
get the follow-up Elder Atuik and Kamagua.
Then, wait for a lift and take it down to the Isle of Spears.

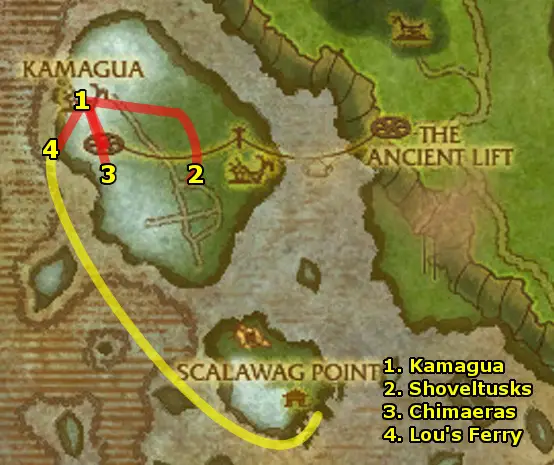
- Ride north to Kamagua and Get the new flight path.
Turn in Elder Atuik and Kamagua and get the quests:
- Grezzix Spindlesnap
- Feeding the Survivors
- Head southeast and kill Shoveltusks for 6 Island Shoveltusk
Meat.
- Then, return to Kamagua and turn in Feeding the
Survivors and get the follow-up Arming Kamagua.
- Head south and kill Frostwing Chimaeras for 3 Chimaera
Horns.
- Then, return to Kamagua and turn in Arming Kamagua
and get the follow-up Avenge Iskaal.
- Head southwest and turn in Grezzix Spindlesnap and get
the follow-up Street "Cred". Talk to Lou the
Cabin Boy and have him sail you to Scalawag Isle.

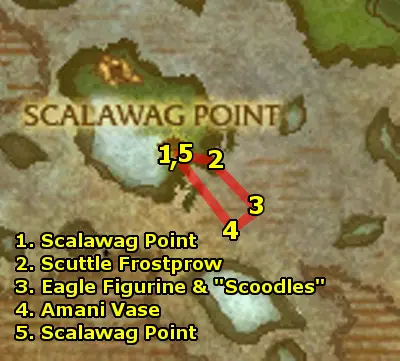
- At Scalawag Point, turn in Street "Cred"
to "Silvermoon" Harry inside the tent. Get
the follow-up "Scoodles".
Also, get the quest Forgotten Treasure from Handsome
Terry.
- Head southeast onto the pirate ship and get the quest Swabbin'
Soap from Scuttle Frostprow.
- Use your Fish Bladder so you can breathe underwater.
Dive and swim southeast to the wrecked ships. Around this area
is "Scoodles". Kill it for the Sin'dorei Scrying
Crystal.
Dive down to the ocean floor to the first ship and loot the Eagle
Figurine.
- Swim southwest to the other wrecked ship and loot the Amani
Vase.
- Return to Scalawag Point.

- At Scalawag Point, turn in:
- Forgotten Treasure and get the follow-up The Fragrance
of Money
- "Scoodles" and get the follow-ups:
- The Ancient Armor of the Kvaldir
- The Frozen Heart of Isuldof
- The Lost Shield of the Aesirites
- The Staff of Storm's Fury
Get the new quest Gambling Debt as well from Taruk.
Time to collect some debts:
- Go to "Silvermoon" Harry and talk to him,
then defeat him for his debt.
- Then, return to Taruk and turn in Gambling
Debt get the follow-up Jack Likes His Drink.
- Go to the tavern. Talk to Olga, the Scalawag Wench and
give her 1 gold to get Jack Adams drunk. Get the debt
from the passed out Jack Adams.
- Then, return to Taruk and turn in Jack Likes
His Drink and get the follow-up Dead Man's Debt.
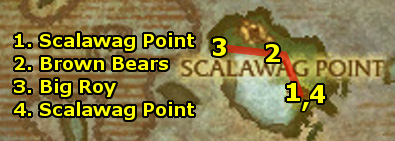
- Head north and kill Rabid Brown Bears for 4 Bear Musk.
- Head west to Big Roy at the northwest shore of the island.
Loot Big Roy's Blubber.
- Return to Scalawag Point.

- At Scalawag Point, turn in:
- The Fragrance of Money and get the follow-up A
Traitor Among Us. Turn that quest in and get the follow-up
Zeh'gehn Sez. Next, turn that in and get the follow-up
A Carver and a Croaker.
- In the nearby area, look for a Scalawag Frog.
Right click it to pick it up.
- Also, go to "Silvermoon" Harry and
buy a Shiny Knife.
- Then, turn in A Carver and a Croaker. Get the
follow-up "Crowleg" Dan.
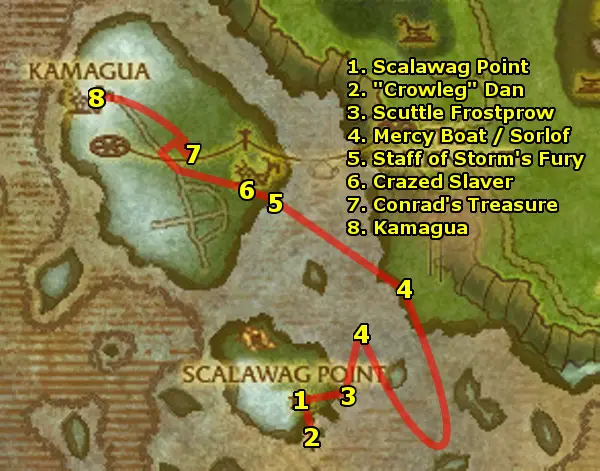
- Head south to the ship. Talk to "Crowleg" Dan,
then kill him.
- Then, return to Handsome Terry and turn in "Crowleg"
Dan and get the follow-up Meet Number Two. Go into
the tavern's second floor and turn in that quest and get the
follow-up The Jig is Up.
- Get on Scuttle Frostprow's ship and turn in Swabbin'
Soap.
- Swim northeast to an island with the NPC Juniper on it.
Wait for the boat to come.
- On the boat, turn in The Lost Shield of the Aesirites
and get the follow-up Mutiny on the Mercy.
- Go down to the bottom of the ship and kill the pirates for
5 Barrel of Blasting Powder.
- Then, head back to the top of the boat and turn in Mutiny
on the Mercy and get the follow-up Sorlof's Booty.
- Head to the back of the ship (still on the top floor) to
The Big Gun. When the ship starts attacking Sorlof,
keep using The Big Gun to kill Sorlof. Once he's
dead, jump off and loot Sorlof's Booty.
- Swim northwest to the ship and wait for Abdul the Insane
to path away from the entrance to the ship's hold. Sneak past
him into the hold and loot The Staff of Storm's Fury.
- Head northwest and use your Horn of Kamagua to summon
a Tuskarr to help. Kill 8 Crazed Northsea Slaver.
- Head further northwest and find the bridge. Cross it and loot
the Dirt Mound. This spawns Black Conrad's Ghost and
two other ghosts. Kill them for Black Conrad's Treasure.
- Ride northwest to Kamagua.

- At Kamagua, turn in Avenge Iskaal. Get the new
quests The Way to His Heart and Travel to Moa'ki Harbor.
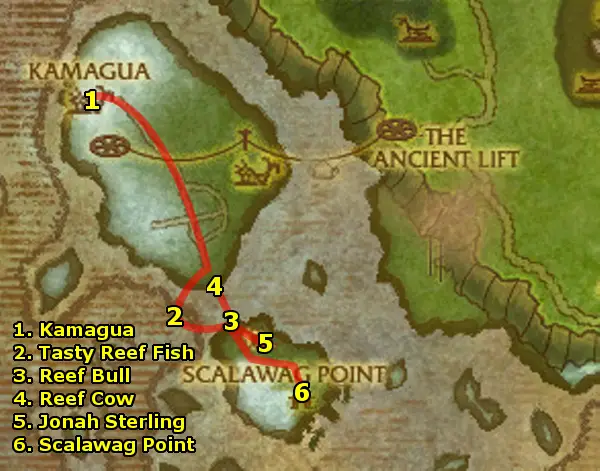
- Ride south to the southern coast of the island and head west
for the fish. Use Anuniaq's Net to collect about 10
Tasty Reef Fish.
- Head south and, from maximum range, use the fish on a Reef
Bull.
- Repeat "pulling" the Reef Bull north until
the Reef Bull reaches the Reef Cow.
- Ride southeast and into the cave. Despite the group quest label,
it can be solo'd.
- The first portion is easy - don't blow any cooldowns on
it. Bring "Mad" Jonah Sterling down to near
death and he will escape and jump through a hole in the wall
to Hozzer.
- Follow him down and use your cooldowns. Kite and stun Hozzer
as best you can, as he hits fairly hard. Loot Jonah
Sterling's Spyglass off of its corpse.
- Behind Hozzer at the end of the cave, loot The Frozen
Heart of Isuldof.
- Return to Scalawag Point.

- At Scalawag Point, turn in The Jig is Up and A
Dead Man's Debt.
- Head south to the docks and talk to Alanya next to
the flying machine and take the flight.
- Go down to the ship's hold on the island and loot The
Ancient Armor of the Kvaldir.
- Use the flying machine to return to Scalawag Point.
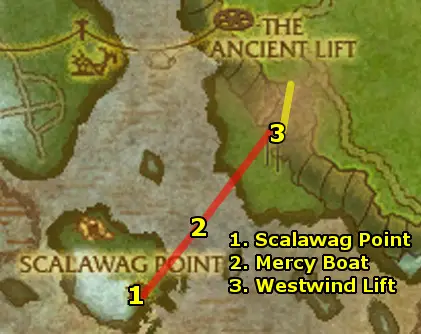
- Swim northeast to the island again and wait for the boat to
arrive. Turn in Sorlof's Booty and get the follow-up The
Shield of the Aesirites.
- Swim northeast to the Westwind Lift and take the lift
up.

- Head northwest to Orfus of Kamagua and turn in your quests:
- The Ancient Armor of the Kvaldir
- The Frozen Heart of Isuldof
- The Shield of the Aesirites
- The Staff of Storm's Fury
and get the follow-up A Return to Resting.
- Ride southeast to Shield Hill. We're going back to the
same locations as before when first getting the clues.
Go southeast and use the Bundle of Vrykul Artifacts at
Fengir.
- Head east and use the bundle at Rodin.
- Head south and use the bundle at Isuldof.
- Head east and use the bundle at Windan.
- Return to Orfus and turn in A Return to Resting and
get the follow-up Return to Atuik.
- Then, take the lift down to Kamagua. Turn in Return
to Atuik and The Way to His Heart.

- Fly to Westguard Keep and go to the inn. Turn in Mission:
Forsaken Intel and get the follow-up Absholutely... Thish
Will Work!
- Go to the jail in the keep and use Peppy's Special Mix
on the Dragonflayer Vrykul Prisoner.
- Return to the inn and turn in Absholutely... Thish Will
Work! and get the follow-up You Tell Him ...Hic!
- Go to the keep to Captain Adams and turn in You
Tell Him ...Hic! and get the follow-up Mission: Plague
This!
- Go to Greer Orehammer next to the gryphon master
and go on the bombing mission. Bomb 5 Plague Tanks with
Orehammer's Precision Bombs.
- Return to Captain Adams and turn in Mission: Plague
This! and get the follow-up Operation: Skornful Wrath.
Also, get the new quest Everything Must Be Ready outside
the keep.
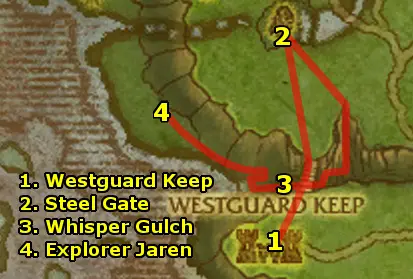
- Ride north to Steel Gate and get the quests:
- Scare the Guano Out of Them!
- See to the Operations
- The Cleansing
- Where is Explorer Jaren?
Go to the flying machine and turn in See to the Operations
to the Steel Gate Archaeologist and get the follow-up
I've Got a Flying Machine!
- Enter the flying machine and fly it to the sacks and land
it near them, then use the Grappling Hook ability.
- Fly up to the top to a platform (marked with a red arrow
pointing at them). Land on them to drop off a sack of
relics. Repeat until you've delivered 3 Sacks of Relics.
- Turn in I've Got a Flying Machine! and get the follow-up
Steel Gate Patrol.
- Enter the flying machine again and use your abilities -
Rockets (Ability 2) on cooldown and Machine
Gun (Ability 1) to kill 8 Gjaelerbron Gargoyles.
- Turn in Steel Gate Patrol.
- Head southeast down the slope to Whisper Gulch.
Clear your way west, then south across the bridge, then continue
west - you'll need to make a small drop as you continue west.
Emote /raise next to 10 Abandoned Pack Mules and
use Steelring's Foolproof Dynamite on the ore to split
them into fragments. Gather 18 Whisper Gulch Gem and 6 Whisper
Gulch Fragments as you head down the path.
- Follow the path to Explorer Jaren.

- At Explorer Jaren, turn in Where is Explorer Jaren?
and get the follow-up And You Thought Murlocs Smelled Bad!
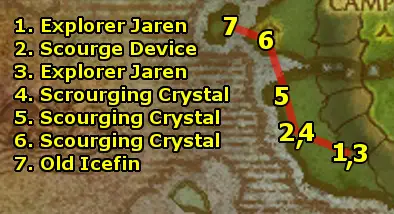
- Head northwest and kill all the undead until you get a Scourge
Device. Get the quest It's a Scourge Device from it.
- Return to Explorer Jaren and turn in It's a Scourge
Device and get the follow-up Bring Down Those Shields.
- Return to the undead camp and use the Scourging Crystal Controller
next to the crystal, then destroy it.
- Head north to the next crystal and destroy it.
- Head north to the next crystal and destroy it.
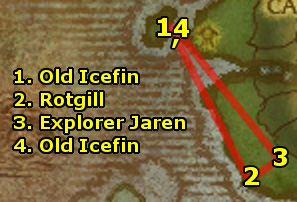
- Swim west to Old Icefin.

- At Old Icefin, get Trident of the Son.
- Head all the way south and kill Rotgill for Rotgill's
Trident. Also, finish killing 15 Scourge if you haven't
already.
- Return to Explorer Jaren and turn in:
- And You Thought Murlocs Smelled Bad!
- Bring Down Those Shields
- Return to Old Icefin and turn in Trident of the Son.
Once done, Hearth to Westguard Keep.

- After hearthing to Westguard Keep, turn in your quests:
- Send Them Packing
- Danger! Explosives! and get the follow-up Leader
of the Deranged
- Ride northeast along the road to Fort Wildervar. Reach
Christopher Sloan at the pier and get I'll Try Anything!
- Dive into the lake and gather 5 Northern Barbfish from
the Water Plants. The plants often spawn random enemies
as well.
- Return to Fort Wildervar. Turn in I'll Try Anything!
and get the follow-up The One That Got Away.
Turn in Everything Must Be Ready further up in town. Make
sure to gather all the quests in town, they're a bit scattered:
- Preying Upon the Weak
- The Enigmatic Frost Nymphs
- Down to the Wire
- The Book of Runes
- The Yeti Next Door
- March of the Giants (Group)
(Optional: if you find someone else interested in the quest,
your group can hunt down Runed Stone Giants at Giants'
Run to the east. They are fairly tough and hit hard. Once
done with this, you can do the follow-up group quest The
Lodestone as well in the northern area of Giants' Run.)

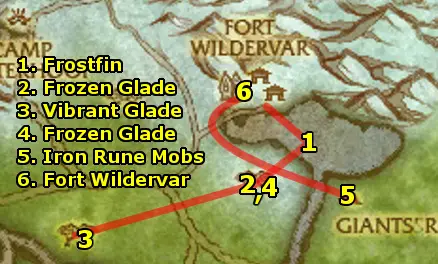
- Dive into the lake again and near the Sunken Boat, use
the Fresh Barbfish Bait to lure Frostfin, then kill
it.
- Head southwest out of the lake to the Frozen Glade. Turn
in The Enigmatic Frost Nymphs and get the follow-up Spirits
of the Ice.
During all the following next steps, gather 10 Spotted Hippogryph
Down and 8 Trapped Prey scattered around the area.
There's no need to finish gathering all of them immediately, just
accumulate them over the next steps - you'll easily have your
10 by the end of all the Fort Wildervar quests.
Kill Ice Elementals for 15 Icy Cores around the
area, then turn in Spirits of the Ice and get the follow-ups:
- The Fallen Sisters
- Wild Vines
- Head southwest to the Vibrant Glade and kill 8 Scarlet
Ivy and use Lurielle's Pendant on 7 Chill Nymphs
after you've weakened them.
- Return to the Frozen Glade and turn in:
- The Fallen Sisters
- Wild Vines
and get the follow-ups:
- Spawn of the Twisted Glade
- Seeds of the Blacksouled Keepers
- Head east and kill Iron Rune Stonecallers & Binders
for Book of Runes Chapters 1, 2, and 3. Combine it
into The Book of Runes.
- Return to Fort Wildervar.

- At Fort Wildervar, turn in your quests:
- The One That Got Away
- The Book of Runes and get the follow-up Mastering
the Runes
- Ride northwest to the Twisted Glade and kill 10 Thornvine
Creepers and 8 Spores. Use the Enchanted Ice Core on
the spore corpses.
- Return southeast to the Frozen Glade and turn in:
- Spawn of the Twisted Glade
- Seeds of the Blacksouled Keepers
and get the follow-up Keeper Witherleaf
-
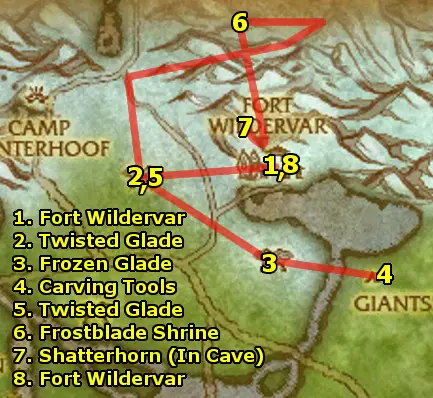
Head east and loot the Iron Rune Carving Tools under
a canopy building.
- Ride northwest to the Twisted Glade and kill Keeper
Witherleaf.
- Ride northeast along a long path, killing rams for 4 Tough
Ram Meat on the way up. Click the Frostblade Shrine
at the top to spawn Your Inner Turmoil. Kill it and you
will gain a levitation buff.
- With your levitation buff, you can just float down from the
mountain south into Fort Wildervar. Aim for the western
area. Head down the west path and enter the mine. Combine your
4 Tough Ram Meat into a Giant Yeti Meal and use
it next to Shatterhorn to wake him up. Then, kill him.
- Return to Fort Wildervar.

- At Fort Wildervar, turn in your quests:
- The Yeti Next Door
- Mastering the Runes and get the follow-up The
Rune of Command
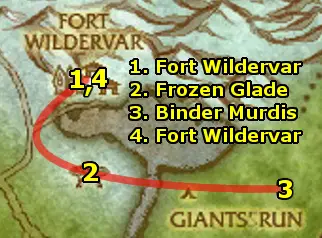
- Head south to the Frozen Glade and turn in Keeper
Witherleaf.
If you haven't finished gathering 10 Spotted Hippogryph Down
and 8 Trapped Prey, this is the last opportunity to gather
them, so keep an eye out for them during the next steps!
- Ride east and look in the nearby area for a neutral non-aggressive
Stone Giant and use the Rune of Command on it to
gain control of it.
Then, head to Binder Murdis and kill him.
- Return to Fort Wildervar and turn in your quests:
- The Rune of Command - don't get the follow-up
quest
- Preying Upon the Weak
- Down to the Wire and get the follow-up They Call
Him Steelfeather
Type /target Steelfeather to be able to find Steelfeather,
flying above. Use the Feathered Charm next to Gil
Grisert to watch Steelfeather. Wait for the hippogryph
to go back to her nest of eggs to receive the completion credit,
then turn in They Call Him Steelfeather.

- Fly to Westguard Keep.
- Ride north to Steel Gate and turn in The Cleansing
and get the follow-up In Worg's Clothing.
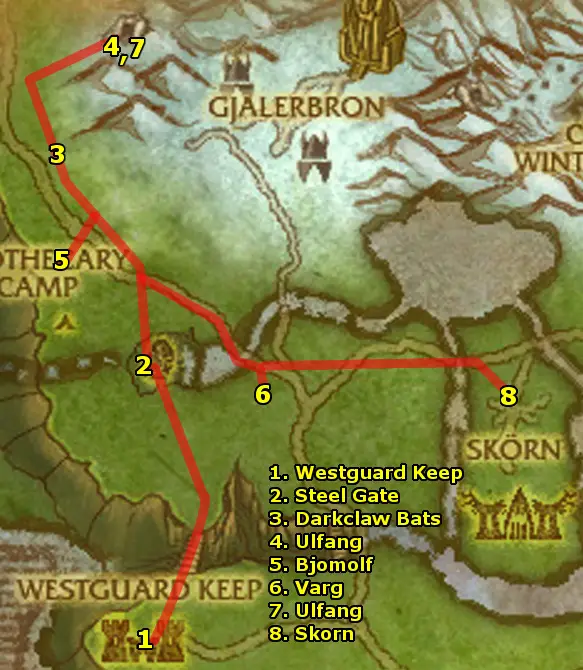
- Head north into Rivenwood. Look around and above for
Darkclaw Bats hanging in trees. Use your Feknut's Firecrackers
targeting the ground by the tree under the bats to get them
to drop Darkclaw Guano and attack you. Gather 10 Darkclaw
Guano as you continue heading north.
- Once the cave with worgs by it is in sight, use the Worg
Disguise and go into the cave to Ulfang. Turn in In
Worg's Clothing and get the follow-up Brother Betrayers.
- Ride southwest to Bjomolf who wanders around a bit. Search
for him and kill him around the worg area.
- Head southeast to Varg who also wanders around a little,
and kill him.
- Return all the way back to Ulfang in the cave. Use the
disguise, enter the cave, and turn in Brother Betrayers and
get the follow-up Eyes of the Eagle.
- Ride southeast along the path to Skorn. Use your Westguard
Command Insignia to summon a Westguard Sergeant. Turn
in Operation: Skornful Wrath and get the quests from him:
- Towers of Certain Doom
- Gruesome, But Necessary
- Burn Skorn, Burn!
In Skorn and in the next steps, kill all Vrykul in
the way and use The Sergeant's Machete on their corpse.
If your sergeant dies, summon a new one to help.

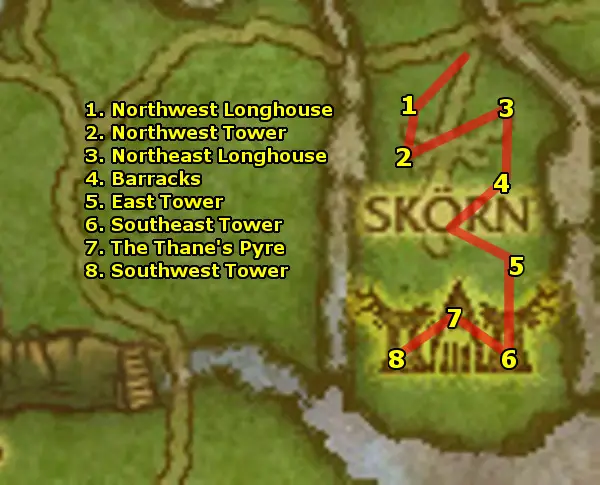
- Clear your way through to the Northwest Longhouse. Use
your Sergeant's Torch inside to burn it.
- Clear your way south to the Northwest Tower. Use the
Sergeant's Flare near it.
- Clear your way northeast to the Northeast Longhouse.
Use your Sergeant's Torch inside to burn it.
- Clear your way south to the Barracks. Use your Sergeant's
Torch inside to burn it.
- Clear your way south to the East Tower. Use the Sergeant's
Flare near it.
- Clear your way south to the Southeast Tower. Use the
Sergeant's Flare near it.
- Head northwest to The Thane's Pyre and finish Dismembering
20 Vrykul. Keep killing them if you haven't received the Vrykul
Scroll of Ascension yet, a random drop. Get the quest Stop
the Ascension! from it.
Use the Vrykul Scroll of Ascension next to the pyre and
kill Halfdan the Ice-Hearted.
- Clear your way southwest, past the bonfire, to the Southwest
Tower. Use the Sergeant's Flare near it.
Turn in your quests to the summoned Westguard Sergeant:
- Towers of Certain Doom
- Gruesome, But Necessary
- Burn Skorn, Burn!
and get the follow-up All Hail the Conqueror of Skorn!

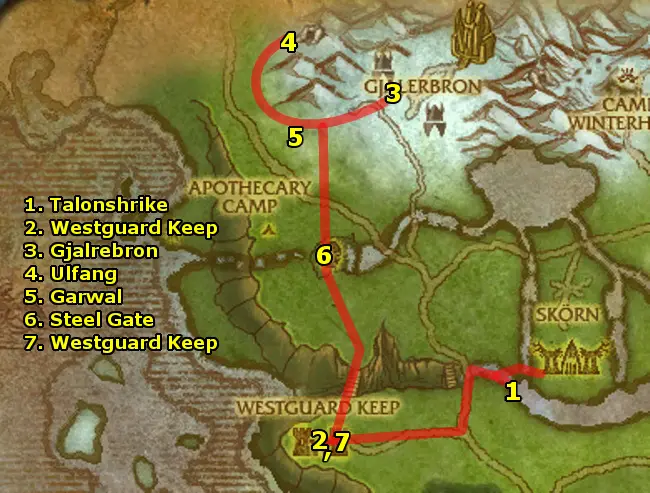
- Head west, hopping down the cliffside slowly - take
intermediate jumps, don't fall the entire distance in jump. There
are small ledges to fall on as you make your way down. You should
see a waterfall soon - at the bottom of the waterfall is a nest.
Open an egg to get Talonshrike to attack you. Kill him
for the Eyes of the Eagle.
- Return to Westguard Keep and turn in:
- Stop the Ascension!
- All Hail the Conqueror of Skorn
and get the follow-ups. Note: Don't get
Of Traitors and Treason yet!
- Dealing with Gjalerbron
- Of Keys and Cage
- Ride north to Gjalrebron. Kill all the vrykuls until
you've:
- Freed 10 Gjalerbron Prisoners
- Killed 15 Gjalerbron Warrior, 8 Gjalebron Rune-Caster,
and 8 Gjalerbron Sleep-Watcher
- Found the Gjalerbron Attack Plans - a random drop,
and started the quest Gjalerbron Attack Plans.
- Ride northwest to the worg cave. Put on the costume, go inside
and talk to Ulfang and turn in Eyes of the Eagle and
get the follow-up Alpha Worg.
- Head southwest and look for Garwal who wanders around
a large amount of territory. Search for him and kill him.
- Head south to Steel Gate and turn in your quests:
- Scare the Guano Out of Them!
- Alpha Worg
- Ride back to Westguard Keep. Again, Note:
Don't get Of Traitors and Treason yet! Turn in:
- Dealing with Gjalerbron and get the follow-up
Necro-Overlord Mezhen
- Of Keys and Cage and get the follow-up In Service
to the Light
- Gjalerbron Attack Plans and get the follow-up The
Frost Wyrm and its Master
and get the new quest, Sleeping Giants.

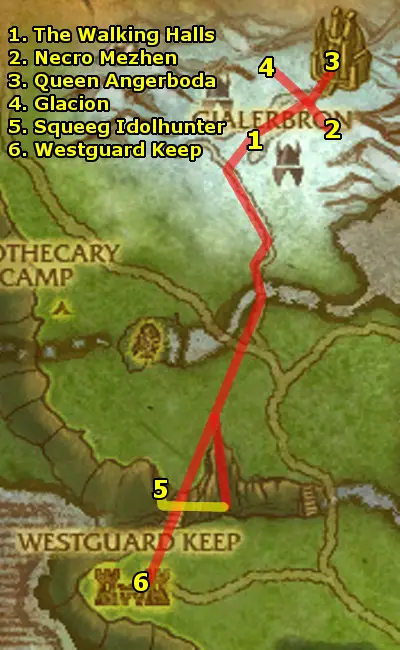
- Ride back to Gjalerbron. Enter the building at the entrance
and go down into The Walking Halls. Kill Necrolords
for 5 Awakening Rods and use them on the Dormant
Vrykuls, and kill 4 Fearsome Horrors.
- Head northeast to the top "floor" of Gjalerbron.
At the top, go east up the platform and kill all Deathless
Watchers and Putrid Wights. Then, kill Necro Overlord Mezhen
and loot Mezhen's Writings, which starts the quest
The Slumbering King. Then, go back to the top "floor".
- Head northeast into the building. Go around the ritual to the
back side, and pull and kill Queen Angerboda. Then, exit
the building.
- Head west to the platform and kill all Deathless Watchers
and Putrid Wights. Then, kill the Wyrmcaller Vile to
get Wyrmcaller's Horn. Use the horn to summon Glacion.
It is soloable.
Finish killing 10 Deathless Watchers and 2 Putrid Wights -
if you need more, on the platform down the stairs, there's also
two branches to the east and west with the mobs on them.
- Ride south and go down the slope to Whisper Gulch, and
clear your way west into the cave and kill Squeeg Idolhunter.
- Ride back to Westguard Keep and turn in your quests:
- Leader of the Deranged
- In Service to the Light
- Necro Overlord Mezhen
- Sleeping Giants
- The Frost Wyrm and its Master
Again, Note: Don't get Of Traitors
and Treason yet!
That concludes the Howling Fjord for now. Fly back to
Valgarde, then take the boat back to Menethil Harbor.
Fly to Stormwind, and Train Your Skills. Also, check the
auction house for an Overcharged Capacitator and buy it.
And while you're in Stormwind, check to see if you have 5,000 gold
for your Epic Flying Mount. If so, continue on to buy your Epic
Flying Mount as explained on the next page.
|
|

