|
At Orgrimmar, train your Cold Weather Flying at
the Flight Master for 500g. That's a decent chunk of gold...or maybe
not much at all if you've been following the Gold
Guide. If you have been, you might be in the thousands
of gold right now - and you'll be on track for the Epic Flying Mount
coming up at level 70 with the cost of 5,000g.
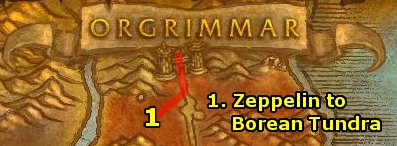
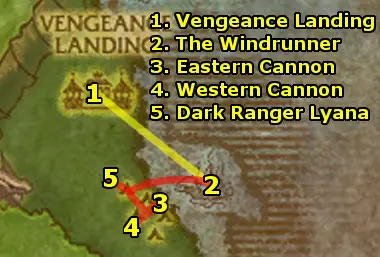
- Head southwest out of Orgrimmar to the west Zeppelin
Tower. Take the zeppelin to Borean Tundra.
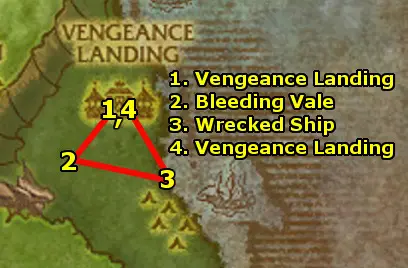
- After taking the Zeppelin from Tirisfal Glades,
you will arrive at Vengeance Landing, Howling Fjord. Get
the Flight Path and get the quests:
- Let Them Eat Crow
- The New Plague
- War is Hell
- Ride southwest to the Bleeding Vale. Use your Plaguehound
Cage to summon a Plaguehound pet.
- Use your Plaguehound's Sic 'Em! ability to bring
Fjord Crows flying in the air to the ground. Kill them
for 5 Crow Meat and use it to feed your Plaguehound.
- Use your Burning Torch next to corpses. Burn 10.
- Ride southeast onto the Wrecked Ship. Go on board and
collect 10 Intact Plague Containers.
- Return to Vengeance Landing.
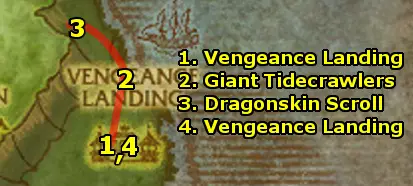
- At Vengeance Landing, turn in your quests:
- Let Them Eat Crow and get the follow-up Sniff
Out the Enemy
- The New Plague and get the follow-up Spiking the
Mix
- War is Hell and get the follow-up Reports from
the Field
- Head northeast and kill Giant Tidecrawlers for 3 Giant
Toxin Gland.
- Enter the cave and click the Dragonskin Scroll. Turn
in Sniff Out the Enemy and get the follow-up The Dragonskin
Map.
- Return to Vengeance Landing.
- At Vengeance Landing, turn in your quests:
- Spiking the Mix and get the follow-up Test at
Sea
- The Dragonskin Map and get the follow-up The Offensive
Begins
Go to Bat Handler Camille next to the flight master.
Tell her to send you on the bombing mission. Use your Plague
Vials on cooldown and target the ships as you fly over them
to Infect 16 North Fleet Reservists. To complete this
in one flight, you must use your vials on cooldown every chance
you get.
When done, turn in Test at Sea and get the follow-up
New Agamand.
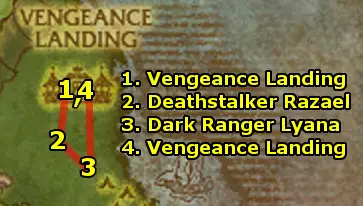
- Ride southwest to Deathstalker Razael. Talk to him and
get his report.
- Ride southeast to Dark Ranger Lyana. Talk to her and
get her report.
- Return to Vengeance Landing.
- At Vengeance Landing, turn in Reports from the Field
and get the follow-up The Windrunner Fleet.
Once again, talk to Bat Handler Camille, next to the flight
master. Tell her to send you to deliver a message.
- You will be sent to The Windrunner. Turn in The Windrunner
Fleet and get the follow-up Ambushed!
- Kill 15 North Fleet Marines on the ships.
- Then, turn in Ambushed! and get the follow-up Guide
Our Sights.
- Swim west. Go through the entrance to the barricade defense
to the Eastern Cannon. Use the Cannoneer's Smoke Flare at
it.
- Clear your way southwest to the Western Cannon. Use the Cannoneer's
Smoke Flare at it.
- Ride northwest to Dark Ranger Lyana.
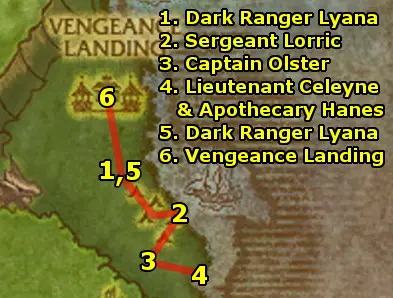
- At Dark Ranger Lyana, turn in Guide Our Sights.
Get the follow-up Landing the Killing Blow.
- Ride southeast into the camp. Kill Sergeant Lorric.
- Go southwest and kill Captain Olster.
- Go southeast and kill Lieutenant Celeyne. Also here is
Apothecary Hanes - talk to him and accept the escort quest
Trail of Fire.
- After the escort quest, you will arrive at Dark Ranger Lyana.
Turn in Landing the Killing Blow and get the follow-up
Report to Anselm.
- Ride north to Vengeance Landing.
- At Vengeance Landing, turn in your quests:
- Report to Anselm and get the follow-up A Score
to Settle (Dungeon - Utgarde Keep)
- Trail of Fire
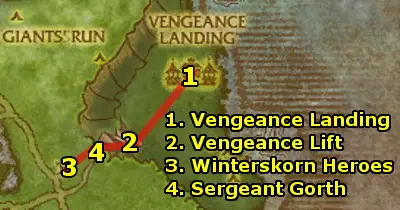
- Ride southwest to Vengeance Lift. Take the lift up. Get
off and at the Horde Blockade, turn in The Offensive
Begins. Get the follow-ups A Lesson in Fear and Help
for Camp Winterhoof.
- Kill many Winterskorn Defenders southwest. Killing the
defenders will spawn the winterskorn heroes - they spawn with
a yell. They may already be there as well - check the area and
kill Oric the Baleful, Ulf the Bloodletter, and Gunnar
Thorvardsson. Use the Forsaken Banner on their corpses.
- Return to Sergeant Gorth.
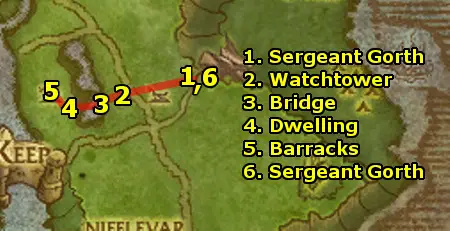
- At Sergeant Gorth, turn in A Lesson in Fear. Get
the follow-up quests: Baleheim Bodycount and Baleheim
Must Burn!
- Ride west to Baleheim. In the next steps, kill all the
Vrykul in your way along your way between each step.
Using Gorth's Torch, burn the Watchtower, which
is the first building with an entrance you see.
- Clear your way west to the Bridge and burn it.
- Clear your way west to the Dwelling and burn it.
- Clear your way up northwest to the Barracks and burn
it. You can burn it from the outside.
- Return to Sergeant Gorth once you're done killing 16
Winterskorn Vrykul inside Baleheim.
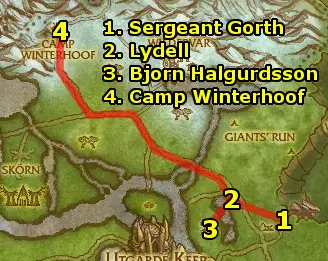
- At Sergeant Gorth, turn in Baleheim Bodycount and
Baleheim Must Burn! Get the follow-up The Ambush.
- Ride northwest to Lydell. Turn in The Ambush and
get the follow-up Adding Injury to Insult.
- Clear your way southwest to Bjorn Halgurdsson. Use the
Vrykul Insult and then RUN straight back to Lydell.
When Bjorn arrives, he will be ambushed and will quickly die.
- Turn in Adding Injury to Insult to Lydell.
- Ride northwest to Camp Winterhoof.
- At Camp Winterhoof, Get the Flight Path. Turn
in Help for Camp Winterhoof and get the quests:
- Hasty Preparations
- Making the Horn
- Suppressing the Elements
During all the following next steps, look for Spotted Hippogryph
Down littered on the floor. Gather 10. There's no need to
finish gathering all of them immediately, just accumulate them
over the next steps - you'll easily have your 10 by the end
of all the Camp Winterhoof quests.
- Ride northeast. Kill 8 Iceshard Elementals and Frosthorn
Rams for 6 Undamaged Ram Horns.
- Then, return to Camp Winterhoof. Turn in Suppressing
the Elements and Making the Horn. Get the follow-up
Mimicking Nature's Call. Also, get all the new quests available:
- Keeping Watch on the Interlopers
- The Book of Runes
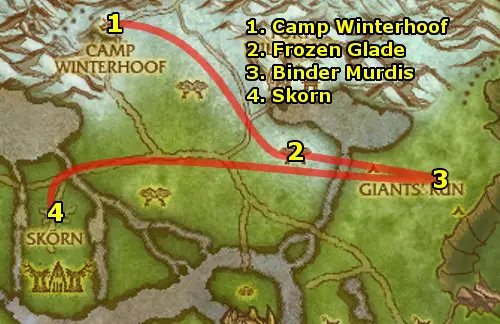
- The Frozen Glade
- March of the Giants (Group)
(Optional: if you find someone else interested in the quest,
your group can hunt down Runed Stone Giants at Giants'
Run to the east. They are fairly tough and hit hard. Once
done with this, you can do the follow-up group quest The
Lodestone as well in the northern area of Giants' Run.)
- Ride northeast to the Frozen Waterfall. Right underneath
it, use your Carved Horn to summon Frostgore. Kill
it.
- Ride southeast to the Frozen Glade.
- At the Frozen Glade, turn in The Frozen Glade and
get the follow-up Spirits of the Ice.
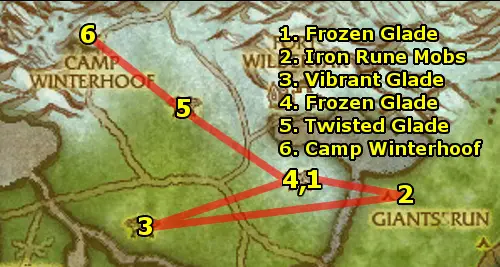
- In the area, kill Ice Elementals for 15 Icy Cores.
- Then turn in Spirits of the Ice and get the follow-ups
The Fallen Sisters and Wild Vines.
- Head east and kill Iron Rune Stonecallers & Binders
for Book of Runes Chapters 1, 2, and 3. Combine it
into The Book of Runes.
- Ride southwest to the Vibrant Glade. Kill 8 Scarlet
Ivy and use Lurielle's Pendant on 7 Chill Nymphs
after you've weakened them.
- Ride northeast back to the Frozen Glade. Turn in The
Fallen Sisters and Wild Vines and get the follow-up
quests: Spawn of the Twisted Glade and Seeds of the
Blacksouled Keepers.
- Ride northwest to the Twisted Glade. Kill 10 Thornvine
Creepers and kill 8 Spores & use the Enchanted
Ice Core on the spore corpses.
- Ride northwest back to Camp Winterhoof.
- At Camp Winterhoof, turn in your quests:
- Mimicking Nature's Call
- The Book of Runes and get the follow-up Mastering
the Runes
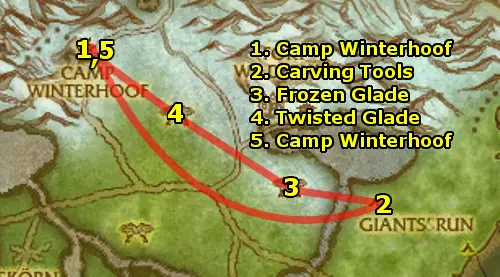
- Ride southeast to Giant's Run. Look under the canopies
for the Iron Rune Carving Tools. They can be under any
of the canopies in the area.
- Ride northwest to the Frozen Glade. Turn in Spawn
of the Twisted Glade and Seeds of the Blacksouled Keepers.
Get the follow-up quest Keeper Witherleaf.
- Ride northwest to the Twisted Glade. Search out Keeper
Witherleaf and kill him.
- Ride back to Camp Winterhoof.
- At Camp Winterhoof, turn in Mastering the Runes and
get the follow-up The Rune of Command.
- Ride southeast to the Frozen Glade and turn in Keeper
Witherleaf.
- Ride east to Giants' Run. Use your Rune of Command
on a non-aggressive Stone Giant to gain control of
it. Also, kill Binder Murdis.
- Ride west to Skorn. Use your Winterhoof Emblem to
summon a Winterhoof Brave. Turn in Skorn Must Fall!
and get the quests from him:
- Towers of Certain Doom
- Gruesome, But Necessary
- Burn Skorn, Burn!
In Skorn and in the next steps, kill all Vrykul in
the way and use The Brave's Machete on their corpse.
If your brave dies, summon a new one to help.
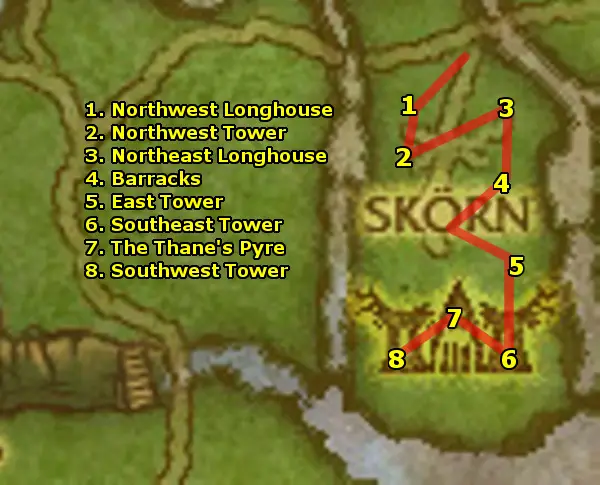
- Clear your way through to the Northwest Longhouse. Use
your Brave's Torch inside to burn it.
- Clear your way south to the Northwest Tower. Use the
Brave's Flare near it.
- Clear your way northeast to the Northeast Longhouse.
Use your Brave's Torch inside to burn it.
- Clear your way south to the Barracks. Use your Brave's
Torch inside to burn it.
- Clear your way south to the East Tower. Use the Brave's
Flare near it.
- Clear your way south to the Southeast Tower. Use the
Brave's Flare near it.
- Head northwest to The Thane's Pyre and finish Dismembering
20 Vrykul. Keep killing them if you haven't received the Vrykul
Scroll of Ascension yet, a random drop. Get the quest Stop
the Ascension! from it.
Use the Vrykul Scroll of Ascension next to the pyre and
kill Halfdan the Ice-Hearted.
- Clear your way southwest, past the bonfire, to the Southwest
Tower. Use the Sergeant's Flare near it.
Turn in your quests to the summoned Westguard Brave:
- Towers of Certain Doom
- Gruesome, But Necessary
- Burn Skorn, Burn!
and get the follow-up The Conqueror of Skorn!

- Ride northeast back to Camp Winterhoof. Turn in Rune
of Command, Stop the Ascension! and The Conqueror of Skorn!
and get the new quests:
- Dealing with Gjalerbron
- Of Keys and Cage
- Find Sage Mistwalker
- Ride west to the Steel Gate. Turn in Find Sage Mistwalker
and get the follow-ups The Artifacts of Steel Gate and
Rivenwood Captives.
- Go down into the Excavation Pit and collect 10
Steel Gate Artifacts.
- Then, head back up and turn in The Artifacts of Steel Gate.
Get the follow-up The Cleansing.
- Ride west to the Apothecary Camp. Get the Flight Path.
Turn in Keeping Watch on the Interlopers and get the quests:
- And You Thought Murlocs Smelled Bad!
- Brains! Brains! Brains!
- What's in That Brew?
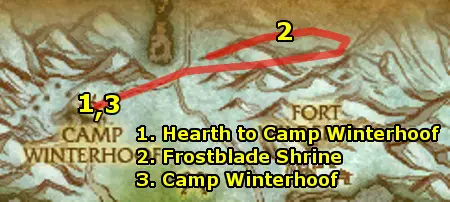
- Hearth to Camp Winterhoof.
- Ride northeast along a long path into the mountains to the Frostblade
Shrine. Click it to spawn Your Inner Turmoil - kill
it. You will gain a levitation buff.
- Mount up and jump off southwest and float your way back to Camp
Winterhoof.
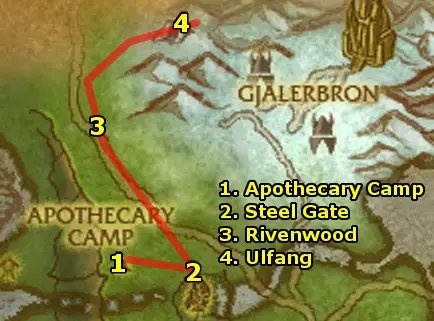
- Fly to Apothecary Camp.
- Ride southeast to Steel Gate. Turn in the Cleansing
and get the follow-up In Worg's Clothing.
- Ride north into Rivenwood. As you clear your way north,
kill all the Riven Widow Cocoons on the way and free 7
Winterhoof Longrunners.
- Once done freeing the longrunners and out of the forest, you
will be near a cave. Use your Worg Disguise to turn into
a worg so you may enter Ulfang's cave.
- Inside the cave, talk to Ulfang and turn in In Worg's
Clothing. Get the follow-up Brother Betrayers.
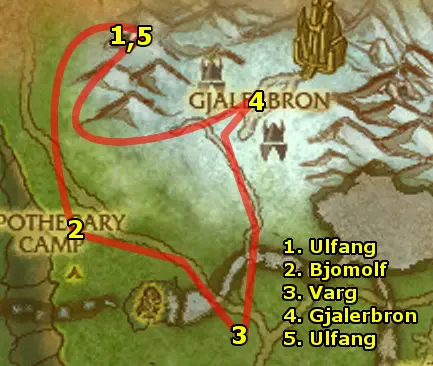
- Ride southwest to Bjomolf who wanders around a bit. Search
for him and kill him around the worg area.
- Ride southeast to Varg who also wanders around a little,
and kill him.
- Ride northeast into Gjalerbron. Kill all the vrykuls
until you've:
- Freed 10 Gjalerbron Prisoners
- Killed 15 Gjalerbron Warrior, 8 Gjalebron Rune-Caster,
and 8 Gjalerbron Sleep-Watcher
- Found the Gjalerbron Attack Plans - a random drop,
and started the quest Gjalerbron Attack Plans.
- Ride northwest back to Ulfang in the worg cave. Put on
the Worg Disguise.
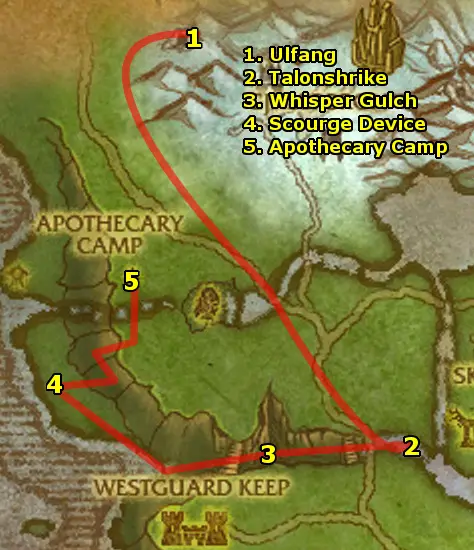
- At Ulfang, turn in Brother Betrayers and get the
follow-up Eyes of the Eagle.
- Ride southeast and head down the path to the Waterfall.
Under it is a nest of eggs - open Talonshrike's Egg to
lure Talonshrike down. Kill it for the Eyes of the Eagle.
- Ride west into Whisper Gulch. Kill Deranged Explorer
Brains and use Grick's Bonesaw on their corpses to
get 12 Deranged Explorer Brains. Also, pick up 5 Dwarven
Kegs lying around in the area.
- Continue down northwest carefully - look for the ramp down,
or jump down carefully and take a little bit of fall damage.
You'll arrive at an area with undead. Kill them until you
get a Scourge Device. Get the quest It's a Scourge Device
from it.
- Ride up the path northeast back to the Apothecary Camp.
- At the Apothecary Camp, turn in your quests:
- Brains! Brains! Brains!
- It's a Scourge Device and get the follow-up Bring
Down Those Shields
- What's in That Brew?
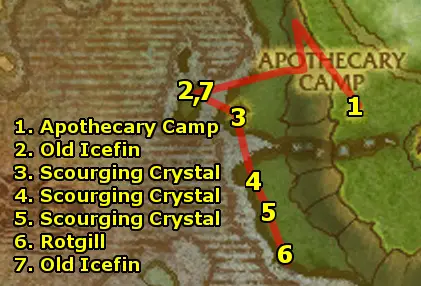
- Ride west down the path and swim to west to Old Icefin.
Get the quest Trident of the Son.
- Head southeast to the undead camp and use the Scourging Crystal
Controller next to the crystal to destroy it.
- Head south to the next crystal and destroy it.
- Head south to the next crystal and destroy it.
- Head south and find Rotgill. Kill him for Rotgill's
Trident.
- Return northwest to Old Icefin, making sure to finish
killing 15 Chillmere Coast Scourge along the way - any
undead in the way. Turn in Trident of the Son.
- Fly back to the Apothecary Camp. Turn
in And You Thought Murlocs Smelled Bad! and Bring Down
Those Shields.
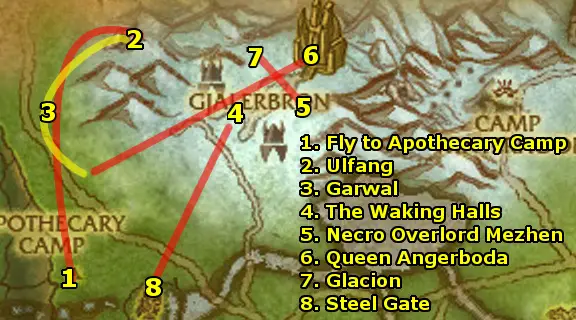
- Ride northeast to the worg cave. Put on the Worg Disguise,
go in and speak to Ulfang. Turn in Eyes of the Eagle
and get the follow-up Alpha Worg.
- Ride southwest and look for Garwal, who patrols a decent
amount of distance along the yellow path marked. Find him and
kill him.
- Ride to Gjalerbron. Enter the building at the entrance
and go down into The Waking Halls. Kill Necrolords for
5 Awakening Rods and use them on the Dormant Vrykuls,
and kill 4 Fearsome Horrors.
- Head northeast to the top "floor" of Gjalerbron.
At the top, go east up the platform and kill all Deathless
Watchers and Putrid Wights. Then, kill Necro Overlord Mezhen
and loot Mezhen's Writings, which starts the quest
The Slumbering King. Then, go back to the top "floor".
- Head northeast into the building. Go around the ritual to the
back side, and pull and kill Queen Angerboda. Then, exit
the building.
- Head west to the platform and kill all Deathless Watchers
and Putrid Wights. Then, kill the Wyrmcaller Vile to
get Wyrmcaller's Horn. Use the horn to summon Glacion.
It is soloable.
Finish killing 10 Deathless Watchers and 2 Putrid Wights -
if you need more, on the platform down the stairs, there's also
two branches to the east and west with the mobs on them.
- Ride southwest to the Steel Gate.
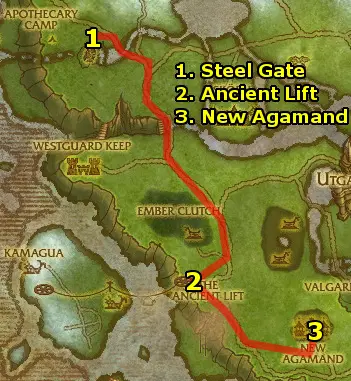
- At the Steel Gate, turn in Alpha Worg and Rivenwood
Captives.
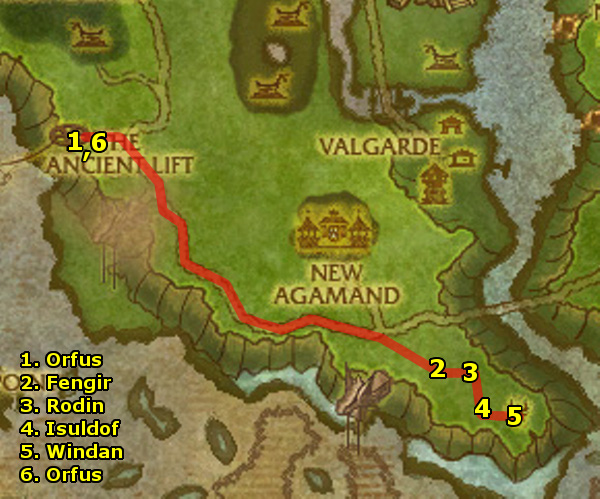
- Ride far southeast to The Ancient Lift. Get The Dead
Rise! from Orfus.
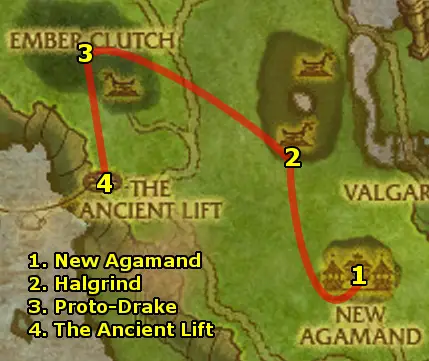
- Ride southeast to New Agamand.
- At New Agamand, Get the Flight Path and the quests:
- A Tailor-Made Formula
- Give it a Name NOTE: Don't turn
this quest in! It
will make you take a forced flight to Dragonblight. Turn it
in at the end of the zone.
- Green Eggs and Whelps
- Shield Hill
Set your Hearthstone to New Agamand.
- Ride west to Thorvald's Camp. Kill Thorvald for
his Dragonflayer Patriarch's Blood.
- Ride north to Halgrind. Use your Plague Spray on
10 Vrykuls.
- Ride northwest to Ember Clutch. Find the Ember Clutch
Ancient and get his quest, Root Causes.
- Use your Tillinghast's Plague Canister on a Proto-Drake
Egg to spawn a Plagued Proto-Whelp. Kill them for
10 Plagued Proto-Whelp Specimen.
- Clear your way southeast. Kill 5 Dragonflayer Handlers
wandering near the building and Skeld Drakeson inside
the building.
- Return to the Ember Clutch Ancient and turn in Root
Causes.
- Ride back to New Agamand.

- At New Agamand, turn in your quests:
- Field Test and get the follow-up Time for Cleanup
- Time for Cleanup and get the follow-up Parts for
the Job
- Green Eggs and Whelps and get the follow-up Draconis
Gastritis
- Ride a ways southeast along the road to Shield Hill.
As you go from step to step, kill Risen Vrykul Ancestors for
5 Ancient Vrykul Bone.
First, loot the Mound of Debris inside the pit and get
Fengir's Clue.
- Head east to another pit and get Rodin's Clue from the
Unlocked Chest .
- Head south and get Isuldof's Clue from the Long Tail
Feather.
- Head east and get Windan's Clue from the Cannonball.
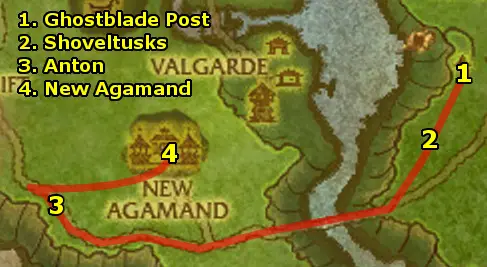
- Ride northeast to Ghostblade Post.
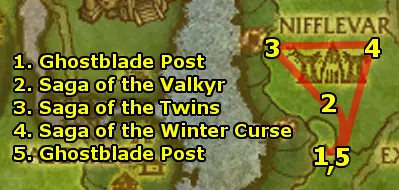
- At Ghostblade Post, get the two quests: Against Nifflevar
and The Enemy's Legacy.
- Clear your way north into Nifflevar, killing all Dragonflayers
in the way.
First, enter the first building and get the Saga of the Valkyr.
- Clear your way northwest and loot the Saga of the Twins
inside the building.
- Clear your way east and loot the Saga of the Winter Curse.
- Once done killing 5 Dragonflayer Warrior, 4 Dragonflayer
Rune-Seer, and 4 Dragonflayer Hunting Hound, return
to Ghostblade Post.
- At Ghostblade Post, turn in Against Nifflevar and
The Enemy's Legacy.
- Kill Shoveltusks for 6 Shoveltusk Ligament. All
shoveltusks will drop them.
- Ride west Anton who walks along the road. Buy a Fresh
Pound of Flesh from this merchant.
- Ride northeast into New Agamand.
- At New Agamand, turn in your quests:
- Parts for the Job and get the follow-up Warning:
Some Assembly Required
- Shield Hill
- Ride north to Halgrind. Use your Abomination Assembly
Kit on one of the overlooking cliffs to take control of an
abomination.
- Run your abomination into the Vrykul into the camp.
Gather several Vrykuls together. Use Thunderclap
(Ability 2) while gathering them up in order to
slow their chasing. Then, use Plagued Blood Explosion (Ability
1) to kill all around you. You have an infinite amount
of these abominations, so keep assembling more abominations
until you Kill 20 Plagued Vrykul.
- Ride west to Ember Clutch. Look for a Proto-Drake
in the sky and use your Tillinghast's Plagued Meat when
you're beneath one. Kill the drake.
- Ride southwest to The Ancient Lift. Turn in The Dead
Rise! and get the follow-up Elder Atuik and Kamagua.
- Get on the lift and ride down.
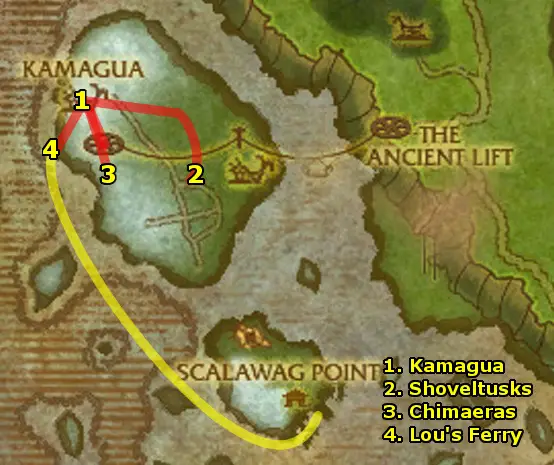
- Ride north to Kamagua and Get the new flight path.
Turn in Elder Atuik and Kamagua and get the quests:
- Grezzix Spindlesnap
- Feeding the Survivors
- Head southeast and kill Shoveltusks for 6 Island Shoveltusk
Meat.
- Then, return to Kamagua and turn in Feeding the
Survivors and get the follow-up Arming Kamagua.
- Head south and kill Frostwing Chimaeras for 3 Chimaera
Horns.
- Then, return to Kamagua and turn in Arming Kamagua
and get the follow-up Avenge Iskaal.
- Head southwest and turn in Grezzix Spindlesnap and get
the follow-up Street "Cred". Talk to Lou the
Cabin Boy and have him sail you to Scalawag Isle.
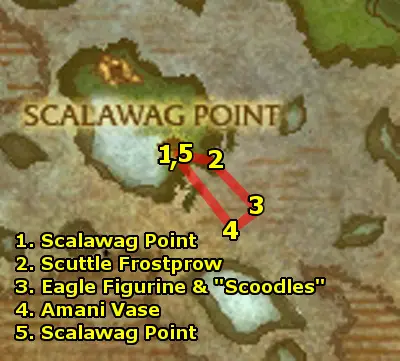
- At Scalawag Point, turn in Street "Cred"
to "Silvermoon" Harry inside the tent. Get
the follow-up "Scoodles".
Also, get the quest Forgotten Treasure from Handsome
Terry.
- Head southeast onto the pirate ship and get the quest Swabbin'
Soap from Scuttle Frostprow.
- Use your Fish Bladder so you can breathe underwater.
Dive and swim southeast to the wrecked ships. Around this area
is "Scoodles". Kill it for the Sin'dorei Scrying
Crystal.
Dive down to the ocean floor to the first ship and loot the Eagle
Figurine.
- Swim southwest to the other wrecked ship and loot the Amani
Vase.
- Return to Scalawag Point.
- At Scalawag Point, turn in:
- Forgotten Treasure and get the follow-up The Fragrance
of Money
- "Scoodles" and get the follow-ups:
- The Ancient Armor of the Kvaldir
- The Frozen Heart of Isuldof
- The Lost Shield of the Aesirites
- The Staff of Storm's Fury
Get the new quest Gambling Debt as well from Taruk.
Time to collect some debts:
- Go to "Silvermoon" Harry and talk to him,
then defeat him for his debt.
- Then, return to Taruk and turn in Gambling
Debt get the follow-up Jack Likes His Drink.
- Go to the tavern. Talk to Olga, the Scalawag Wench and
give her 1 gold to get Jack Adams drunk. Get the debt
from the passed out Jack Adams.
- Then, return to Taruk and turn in Jack Likes
His Drink and get the follow-up Dead Man's Debt.
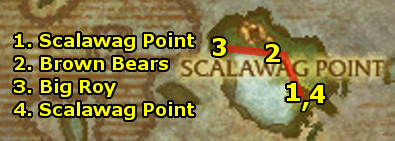
- Head north and kill Rabid Brown Bears for 4 Bear Musk.
- Head west to Big Roy at the northwest shore of the island.
Loot Big Roy's Blubber.
- Return to Scalawag Point.
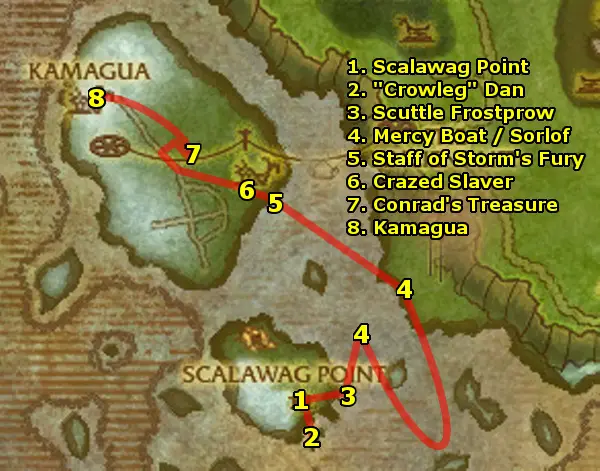
- At Scalawag Point, turn in:
- The Fragrance of Money and get the follow-up A
Traitor Among Us. Turn that quest in and get the follow-up
Zeh'gehn Sez. Next, turn that in and get the follow-up
A Carver and a Croaker.
- In the nearby area, look for a Scalawag Frog.
Right click it to pick it up.
- Also, go to "Silvermoon" Harry and
buy a Shiny Knife.
- Then, turn in A Carver and a Croaker. Get the
follow-up "Crowleg" Dan.
- Head south to the ship. Talk to "Crowleg" Dan,
then kill him.
- Then, return to Handsome Terry and turn in "Crowleg"
Dan and get the follow-up Meet Number Two. Go into
the tavern's second floor and turn in that quest and get the
follow-up The Jig is Up.
- Get on Scuttle Frostprow's ship and turn in Swabbin'
Soap.
- Swim northeast to an island with the NPC Juniper on it.
Wait for the boat to come.
- On the boat, turn in The Lost Shield of the Aesirites
and get the follow-up Mutiny on the Mercy.
- Go down to the bottom of the ship and kill the pirates for
5 Barrel of Blasting Powder.
- Then, head back to the top of the boat and turn in Mutiny
on the Mercy and get the follow-up Sorlof's Booty.
- Head to the back of the ship (still on the top floor) to
The Big Gun. When the ship starts attacking Sorlof,
keep using The Big Gun to kill Sorlof. Once he's
dead, jump off and loot Sorlof's Booty.
- Swim northwest to the ship and wait for Abdul the Insane
to path away from the entrance to the ship's hold. Sneak past
him into the hold and loot The Staff of Storm's Fury.
- Head northwest and use your Horn of Kamagua to summon
a Tuskarr to help. Kill 8 Crazed Northsea Slaver.
- Head further northwest and find the bridge. Cross it and loot
the Dirt Mound. This spawns Black Conrad's Ghost and
two other ghosts. Kill them for Black Conrad's Treasure.
- Ride northwest to Kamagua.
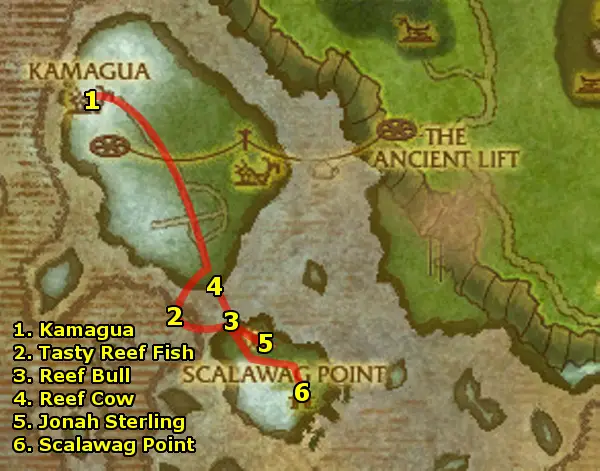
- At Kamagua, turn in Avenge Iskaal. Get the new
quest The Way to His Heart.
- Ride south to the southern coast of the island and head west
for the fish. Use Anuniaq's Net to collect about 10
Tasty Reef Fish.
- Head south and, from maximum range, use the fish on a Reef
Bull.
- Repeat "pulling" the Reef Bull north until
the Reef Bull reaches the Reef Cow.
- Ride southeast and into the cave. Despite the group quest label,
it can be solo'd.
- The first portion is easy - don't blow any cooldowns on
it. Bring "Mad" Jonah Sterling down to near
death and he will escape and jump through a hole in the wall
to Hozzer.
- Follow him down and use your cooldowns. Kite and stun Hozzer
as best you can, as he hits fairly hard. Loot Jonah
Sterling's Spyglass off of its corpse.
- Behind Hozzer at the end of the cave, loot The Frozen
Heart of Isuldof.
- Return to Scalawag Point.

- At Scalawag Point, turn in The Jig is Up and A
Dead Man's Debt.
- Head south to the docks and talk to Alanya next to
the flying machine and take the flight.
- Go down to the ship's hold on the island and loot The
Ancient Armor of the Kvaldir.
- Use the flying machine to return to Scalawag Point.
- Swim northeast to the island again and wait for the boat to
arrive. Turn in Sorlof's Booty and get the follow-up The
Shield of the Aesirites.
- Swim northeast to the Westwind Lift and take the lift
up.
- Head northwest to Orfus of Kamagua and turn in your quests:
- The Ancient Armor of the Kvaldir
- The Frozen Heart of Isuldof
- The Shield of the Aesirites
- The Staff of Storm's Fury
and get the follow-up A Return to Resting.
- Ride southeast to Shield Hill. We're going back to the
same locations as before when first getting the clues.
Go southeast and use the Bundle of Vrykul Artifacts at
Fengir.
- Head east and use the bundle at Rodin.
- Head south and use the bundle at Isuldof.
- Head east and use the bundle at Windan.
- Return to Orfus and turn in A Return to Resting and
get the follow-up Return to Atuik.
- Then, take the lift down to Kamagua. Turn in Return
to Atuik and The Way to His Heart.
To complete the Howling Fjord, Hearth to New Agamand.
Turn in Draconis Gastritis and Warning: Some Assembly
Required.
And...finally, turn in Give it a Name (if you've managed
to hold off on turning it until now!) You will get the follow-up
To Venomspite! and be flown off to Venomspite, Dragonblight.
|
|
