|
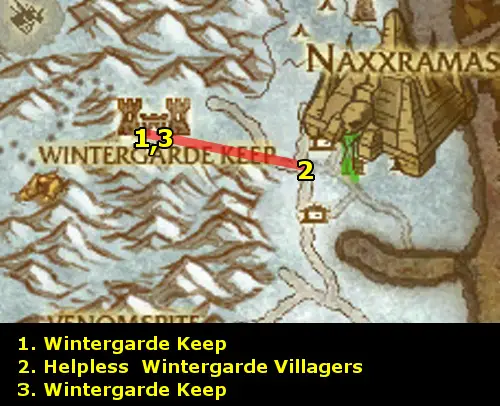
- Land in Wintergarde Keep, Dragonblight.
- Get The Hills Have Us next to the Gryphon Master
yet which will send you to Grizzly Hills. Get the
Flight Path at Grizzly Hills.
- Fly right back to Wintergarde Keep. Turn in High
Commander Halford Wyrmbane and get Naxxramas and the
Fall of Wintergarde - go to the Gryphon Master
and turn it in to get the follow-up Flight of the Wintergarde
Defender.
- Use your Wintergarde Gryphon Whistle and fly east. Use
Soar on cooldown to fly faster.
- Land next to a Helpless Wintergarde Villager, noticeable
because of the fear "debuff" showing over their
heads and their running around. Then, use Rescue Villager
(Ability 1) to pick them up. You can only rescue
one villager at a time.
- Then, return northwest to the gryphon master area and use
Drop Off Villager (Ability 2) to drop them
off.
- Repeat and Rescue 10 Villagers in this fashion.
-
Turn in Flight of the Wintergarde Defender and get the
follow-up Return to the High Commander. Turn that in
and pick up the many new quests in Wintergarde Keep:
- A Disturbance in the West (don't turn it in yet
- it flies you to the west)
- Imprints on the Past
- Rescue from Town Square
- The Demo-gnome
- The Fate of the Dead
and get the three group quests from the inn, and the quest
from inside the keep:
- My Old Enemy (Group)
- Wanted: Kreug Oathbreaker (Group)
- Wanted: High Shaman Bloodpaw (Group)
- Wanted: Onslaught Commander Iustus (Group)
Look in the southern part of the keep for Siege Engineer
Quarterflash and turn in The Demo-Gnome and get the
follow-ups:
- The Search for Slinkin
- The Bleeding Ore
- Not In Our Mine
Start looking for a group for the three wanted quests. There is
usually a lot of interest in those three quests - see if you can
get the group to stop by Abbendis for My Old Enemy as
well.
Try and get a healer and a tank for all the quests, as well as
a DPS. The quests can be comfortably three-manned with a healer
and a tank. When you find a group, follow the following path.
If you don't have a group yet, skip this section, and get back
to it later when you get a group. Keep looking during your time
in Dragonblight.
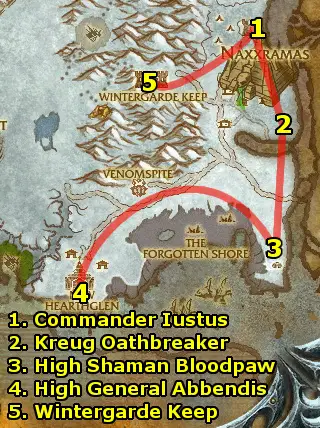
- (Group) Head northeast to Commander Iustus and
kill him.
- (Group) Head south to Kreug Oathbreaker and kill
him.
- (Group) Head southeast and kill High Shaman Bloodpaw.
- (Group) Head southwest to High General Abbendis Abbendis
and kill her.
- Return to Wintergarde Keep and turn in the four group
quests:
- My Old Enemy (Group)
- Wanted: Kreug Oathbreaker (Group)
- Wanted: High Shaman Bloodpaw (Group)
- Wanted: Onslaught Commander Iustus (Group)
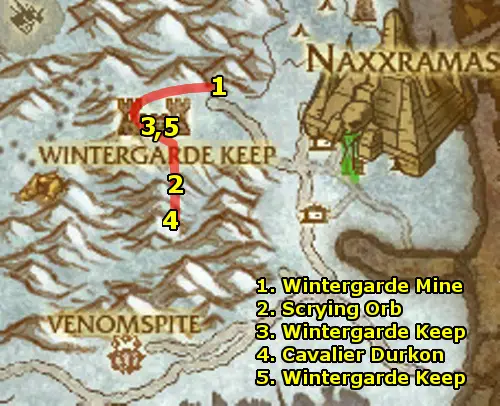
- Next to Siege Engineer Quarterflash, Use Quarterflash's
Homing Bot and follow it to Wintergarde Mine. In the
mine:
- Find Slinkin the Demo-Gnome and turn in Search
for Slinkin and get the follow-up Leave Nothing to
Chance
- Pick up the Wintergarde Mine Bombs from the room
directly north of Slinkin
- Collect 10 Wintergarde Miner's Card from the Risen
Wintergarde Miners
- Collect 10 Bleeding Ore
- Exit the mine and use the Wintergarde Mine Bombs
at the lower entrance and the upper entrance. Both are accessible
from the outside.
- Then, return to Wintergarde Keep and turn in:
- The Bleeding Ore
- Leave Nothing to Chance and get the follow-up
Understanding the Scourge War Machine. Turn this
quest to the High Commander in town.
- Not In Our Mine
- Head south out of the gate. Enter the western two story building
and get the Scrying Orb from the second floor. In all the
buildings, kill Vengeful Geists which are terrorizing Trapped
Wintergarde Villagers. Rescue 6 Trapped Wintergarde Villagers
and kill 15 Vengeful Geist.
- Return to Wintergarde Keep and turn in:
- Rescue from Town Square and get the follow-up Find
Durkon!
- The Fate of the Dead
- Imprints on the Past and get the follow-up Orik
Trueheart and the Forgotten Shore.
- Head back south further into the village to meet Cavalier
Durkon next to a crypt. Turn in Find Durkon! and get
the follow-up The Noble's Crypt.
- Enter the crypt, and at the bottom of it, kill Necrolord
Amarion. Pick up the Flesh Bound Tome behind him
to start the quest Secrets of the Scourge, then run
out of the crypt since many scourge will spawn and attack
you.
Return to Durkon and turn in:
- The Noble's Crypt
- Secrets of the Scourge and get the follow-up Mystery
of the Tome
- Return to Wintergarde Keep.
- Turn in The Mystery of the Tome to High Commander
Halford Wyrmbane and get the follow-up Understanding
the Language of Death
- Go to the prison downstairs in the keep and turn in the
quest and get the follow-up A Righteous Sermon.
- Return to the commander and turn in the quest and get the
follow-up Into Hostile Territory.
- Go to the gryphon area (don't turn in the other quest,
A Disturbance in the West, yet!) and right click a Winterguard
Gryphon to mount it.
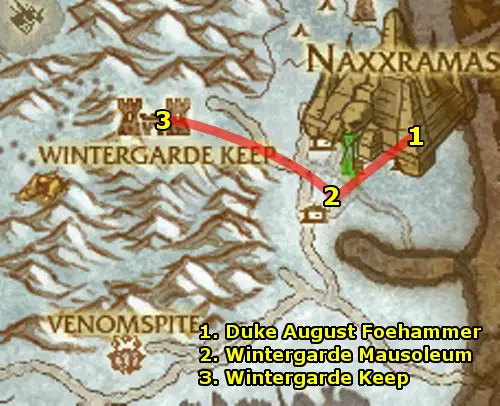
- You will be flown to Duke August Foehammer. Turn in Into
Hostile Territory and get the follow-up Steamtank Surprise.
Get in a Steam Tank. Look over the controls first. When
fighting, you should use Ice Prison (Ability 2) first
to freeze enemies in the surrounding area, then Ice Cannon
(Ability 1) to fire an AoE attack which does triple
damage to frozen targets.
- Head southwest and look for Plague Wagons. Drop Off
Gnome (Ability 3) when near one. Sabotage 6 Plague
Wagons. When done, ride to the Wintergarde Mausoleum and
Drop Off Soldier (Ability 4). The next steps all
take place within or around the Mausoleum.
- Enter the Mausoleum and turn in Steamtank Surprise and
get the follow-up Scattered to the Wind.
- Exit the Mausoleum and look in the surrounding area and pick
up 8 Winterguard Munitions.
- Go down into the Mausoleum again and turn in Scattered
to the Wind and get the follow-up The Chain Gun And You.
- Go east to the 7th Legion Chain Gun and click on it.
Use Ability #2 to call for a soldier to run out - give
it cover fire. Aim by holding down the right mouse button and
then constantly using Ability #1 to fire at the undead
near the running soldier.
To speed things up, you don't have to wait for the soldier to
fully reach the safe area - you can just call soldiers out on
cooldown with Ability #2 and then give both soldiers cover fire.
Save 8 Injured 7th Legion Soldiers.
- Return to the entrance of the mausoleum and turn in The
Chain Gun And You and get the follow-up quests:
- Plunderbeard Must Be Found!
- Breaking Off a Piece
- Go down the stairs in the Mausoleum. You'll reach a four-way
intersection. First, turn right and at the end of it, kill Necrolord
X'avius.
- Return to the intersection and go straight. Kill Necrolord
Horus.
- Return to the intersection and take the final remaining path
deeper into the mausoleum. At the end of it, find Plunderbeard
and turn in Plunderbeard Must Be Found! and get the
follow-up Plunderbeard's Journal.
- Enter the tunnel behind Plunderbeard and kill the Dreadbone
Constructs and Wailing Souls for Page 4, 5, 6,
and 7 of Plunderbeard's Journal.
- Return to the entrance of the mausoleum and turn in:
- Breaking Off A Piece
- Plunderbeard's Journal and get the follow-up Chasing
Icestorm: The 7th Legion Front
- Ride back to Wintergarde Keep. Turn in A Disturbance
in the West and get the follow-up To Star's Rest! which
will send you on a flight to Star's Rest.

- Arrive at Star's Rest. Turn in To Star's Rest!
and get the quests.
- Rifle the Bodies
- The Liquid Fire of Elune
- The Magical Kingdom of Dalaran (Don't teleport
to Dalaran yet!)
- Kill 6 Blighted Elk and 6 Rabid Grizzly and use the Liquid
Fire of Elune to burn their corpses.
- Then, return to Star's Rest and turn in The Liquid
Fire of Elune and get the follow-up Kill the Cultists.
- Head north into Icemist Village. The southern side of
the village - inside the building, as well as on the cliff facing
the river has many of the Anuub'ar Cultists. Kill them
for 5 Functional Cultist Suits and The Favor of Zangus,
which starts the quest The Favor of Zangus.
- Then, return to Stars' Rest and turn in:
- Kill the Cultists
- The Favor of Zangus and get the follow-up The
High Cultist
- Head north and down the slope. Inside, get the instance quests
from Kilix the Unraveler:
- Death to the Traitor King (Azjol-Nerub)
- Don't Forget the Eggs! (Azjol-Nerub)
- The Faceless Ones (The Old Kingdom)
East of Kilix the Unraveler, kill High Cultist Zangus.
- Then, return to Stars' Rest and turn in The High
Cultist.
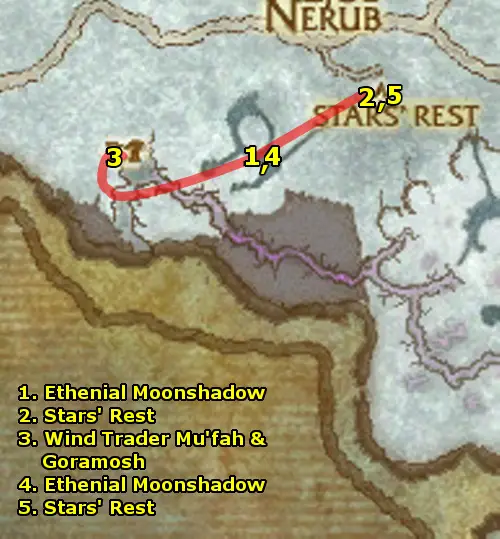
- Ride southwest to Ethenial Moonshadow and get Avenge
this Atrocity!
Loot all the Dead Mage Hunters (corpses already
on the ground) for their Mage Hunter's Personal Effects.
Keep opening them until you find the Moonrest Garden Plans.
- Return to Stars' Rest and turn in Rifle the Bodies
and get the follow-up Prevent the Accord.
- Head further southwest and kill 15 Blue Dragonflight Forces.
Clear your way to the front of the building and kill Wind Trader
Mu'fah for Wind Trader Mu'fah's Remains.
Head inside the building and go up the ramp to the left. Kill
Goramosh for The Scales of Goramosh and Goramosh's
Strange Device, which starts the quest A Strange Device.
- Return to Ethenial Moonshadow and turn in Avenge this
Atrocity! and get the follow-up End Arcanimus.
- Return to Stars' Rest and turn in your quests:
- A Strange Device and get the follow-up Projections
and Plans
- Prevent the Accord
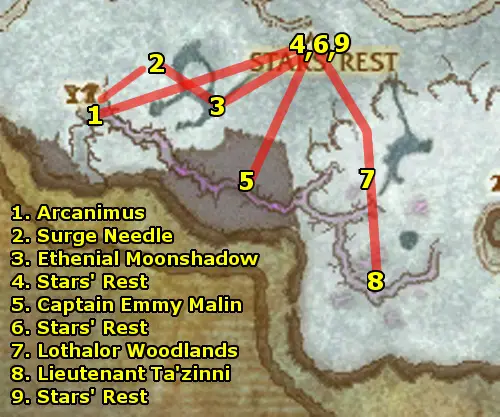
- Head southwest into the crater and kill Arcanimus.
- Use the Surge Needle Teleporter to teleport you onto
a platform. Walk to the center of the platform to get credit for
Object on the Surge Needle Observed. Then, use the Surge
Needle Teleporter again.
- Ride southeast to Ethenial Moonshadow and turn in End
Arcanimus.
- Return to Stars' Rest and turn in Projections and
Plans and get the follow-up The Focus on the Beach
- Ride south to Captain Emmy Malin and kill her for the
Ley Line Focus Control Ring and Captain Malin's Letter.
- Get the quest A Letter for Home from the letter.
(The letter is readable if you want some lore)
- Use the Ley Line Focus Control Ring next to the Ley
Line Focus.
- Return to Stars' Rest and turn in:
- A Letter for Home
- The Focus on the Beach and get the follow-up Atop
the Woodlands
and get the new quest, Strengthen the Ancients
- Head southeast into the Lothalor Woodlands. Look for
Woodlands Walker and ask them for their bark. Get three
of the bark and use them on the uncorrupted Lothalor Ancients.
- Go south and kill Lieutenant Ta'zinni for the Ley
Line Focus Control Amulet. Use it next to the Ley Line Focus.
- Return to Stars' Rest and turn in:
- Strengthen the Ancients
- Atop the Woodlands and get the follow-up Search
Indu'le Village
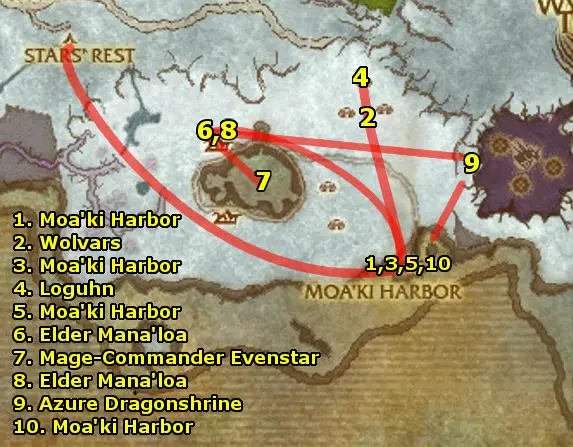
- Ride southeast to Moa'ki Harbor. Get the quests:
- Let Nothing Go To Waste
- Planning for the Future
Set your Hearthstone to Moa'ki Harbor.
- Head north and kill the Wolvars for 6 Stolen Moa'ki
Goods and and collect 12 Snowfall Glade Pups in the
village.
- Return to Moa'ki Harbor and turn in:
- Let Nothing Go To Waste and get the follow-up Slay
Loguhn
- Planning for the Future
- Head to the northern hut of the village and kill Loguhn
for the Blood of Loguhn. Use the blood.
- Return to Moa'ki Harbor and turn in Slay Loguhn.
Get the follow-up, Spiritual Insight.
- Use Toalu'u's Spiritual Incense to enter into an
automated flight. When returned, turn in Spiritual Insight
and get the follow-up Elder Mana'loa.
- Follow the road northwest to Elder Mana'loa and turn
in Elder Mana'loa and get the follow-up Freedom for
the Lingering.
- Dive into the lake and swim to the corpse of Mage-Commander
Evenstar.
- Turn in Search Indu'le Village and get the follow-up
The End of the Line.
- Use the Ley Line Focus Control Talisman next to the
Ley Line Focus.
- Kill 15 Indu'le Fisherman, Warriors, or Mystics nearby.
- Return to Elder Mana'loa and turn in Freedom for the
Lingering and get the follow-up Conversing With the Depths.
- Ride east to the western ledge of Azure Dragonshrine to
get credit for Azure Dragonshrine Observed.
- Return to Moa'ki Harbor. Go to the coast and get Tua'kea's
Crab Traps.
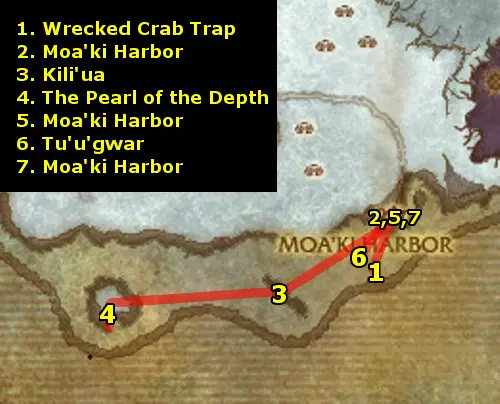
- Dive down south and get the quest Signs of Big Watery Trouble
from the Wrecked Crab Trap. Also, collect 8 Tua'kea
Crab Traps around the area.
- Return to Moa'ki Harbor and turn in:
- Tua'kea's Crab Traps
- Signs of Big Watery Trouble and get the follow-up
The Bait.
- Swim southwest and kill Kili'ua for The Flesh of "Two
Huge Pincers".
- Swim west to the island and head all the way up to The Pearl
of the Depth. Use it to summon Oacha'noa. Jump into
the water when she tells you to.
- Swim back to Moa'ki Harbor and turn in The Bait and
get the follow-up Meat on the Hook.
- Follow the giant fishing line out and dive and use Tu'u'gwar's
Bait next to Tua'kea's Fishing Hook and kill Tu'u'gwar.
- Return to Moa'ki Harbor and turn in:
- Meat on the Hook
- Conversing With the Depths
Make sure your Hearthstone is set to Moa'ki Harbor!
Fly to Star's Rest. Turn in The End of the Line and
get the follow-up Gaining an Audience (This quest opens
up at level 74, which you should have hit by now).
- Talk to the Image of Archmage Modera again and ask her
to teleport you to Dalaran.
- At Dalaran, turn in The Magical Kingdom of Dalaran
to Archmage Celindra near the location where you warp in.
Get the quest Learning to Leave and Return: the Magical Way.
- Use the Teleport to Violet Strand Crystal behind her,
then use the Teleport to Dalaran Crystal to go back. Turn
in Learning to Leave and Return: the Magical Way.
- Take one of the portals to a capital city and train your
skills.
- Once done, Hearth back to Moa'ki Harbor.
- Hearth back to Moa'ki Harbor.
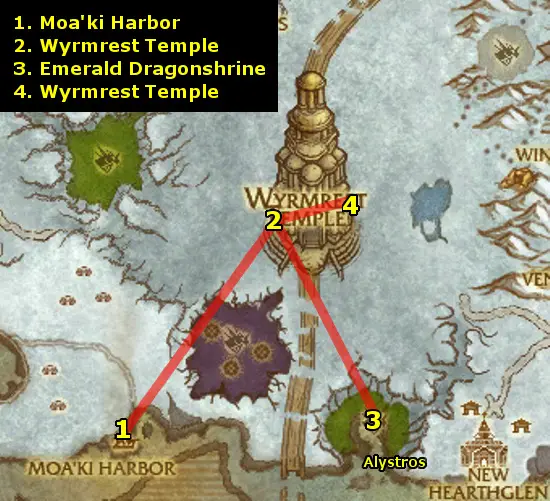
- Head northeast to Wyrmrest Temple to Tariolstrasz.
Turn in Gaining an Audience and get the follow-up Speak
with your Ambassador. Talk to him again and ask him to have
a drake fly you to the top of the temple. At the top, get the
quests:
- Seeds of the Lashers
- The Obsidian Dragonshrine
- Mystery of the Infinite
Then, go back and ask to be flown back to ground level.
- Ride south to the Emerald Dragonshrine to Nishera
the Garden Keeper who wanders around the lake. Get Cycle
of Life.
- At the glade, kill Emerald Lashers for 3 Lasher
Seeds, and look in the sky above the lake and pull and
kill 5 Emerald Skytalons.
- Return to Nishera and turn in Cycle of Life and
get the follow-up Plume of Alystros (Group).
(Group) If there's anyone around in the grove, ask
if they want to team up for Plume of Alystros. If not,
ask in chat. If you don't find anybody readily available,
skip this step for now and get back to it later.
- Get a group with at least a tank and healer, and head
to the southeast area of the glade and use the Skytalon
Molts to pull Alystsros. Kill him and loot
his Plume of Alystros.
- Return to Nishera and turn in The Plume of
Alystros.
- Return north to Wyrmrest Temple to Tariolastrasz.
- Return to the ground floor, and enter the temple.
Turn in Speak with your Ambassador and get the
follow-up Report to the Ruby Dragonshrine.
- Get the Flight Path at the northeastern area of the
temple.

- Ride northeast to the Bronze Dragonshrine. In the area,
use your Hourglass of Eternity to summon Future You.
Let Future You tank the attacking waves of dragons, you can pick
them off one by one.
- Ride northwest to the 7th Legion Front. On the way, look
to the sky for a Reanimated Frost Wyrm. Get in range, target
it, and use your Seeds of Nature Wrath to bring it down,
then kill it. If you don't find one, keep looking in the later
steps.
Turn in Chasing Icestorm: The 7th Legion Front and get
the quests:
- Chasing Icestorm: Thel'zan's Phylactery
- Pest Control
Talk to Wyrmbait, a flying mount rider with the large
pack of soldiers. Tell him to get Icestorm. When Icestorm
comes, all the soldiers attack it. Let the soldiers tank Icestorm.
Attack from the back of Icesetorm to avoid its frost breath,
don't pull aggro - take it easy.
Loot Thel'zan's Phylactery which drops to the floor once
Icestorm is dead.
- Head southeast and kill all Snobolds in the area.
- Head southwest to another Snobold camp. Finish killing 10
Snowplain Snobolds and 3 Dragonblight Magnataur.
- Return to the 7th Legion Front and turn in Pest Control.
Get the follow-up Canyon Chase. You will see snobolds start
running away from you - mount up and chase them!
- Chasing the snobolds leads you to Chilltusk. Kill it
and loot the Emblazoned Battle Horn, which starts the quest
Disturbing Implications.
- Ride southeast over the hills to Wintergarde Keep. Turn
in Chasing Icestorm: Thel'zan's Phylactery and get the
follow-up Finality.
Set your Hearthstone to Wintergarde Keep.
- Head southeast out of the gate and immediately turn right to
go down the slope to the Wintergarde Mausoleum. (A different
mausoleum than earlier) Turn in Finality and get the
follow-up An End And A Beginning.
Help the guards kill Thel'zan's adds, then kill Thel'zan.
- Then, return to Wintergarde Keep and turn in An
End And A Beginning and get the follow-up To Fordragon
Hold!
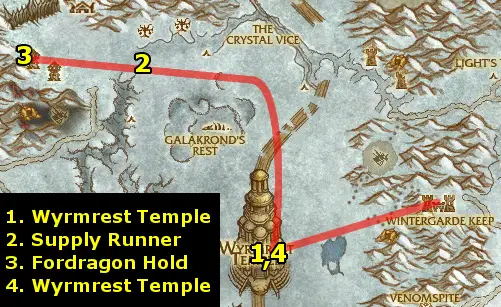
- Fly to Wyrmrest Temple.
- Ride northwest to the fallen body of a Nozzlerust Supply
Runner Get the quest Return to Sender.
- Ride west to Fordragon Hold. Get the Flight Path.
Ride all the way west up the path to the top of the tower to Highlord
Bolvar Fordragon. Turn in To Fordragon Hold! and get
the follow-up Audience With The Dragon Queen.
- Fly to Wyrmrest Temple. On the bottom floor, turn in
Disturbing Implications and get the follow-up One of
a Kind (Group)
Fly to the top floor and turn in:
- Mystery of the Infinite
- Seeds of the Lashers and get the follow-up
That Which Creates Can Also Destroy
- Audience With The Dragon Queen and get the follow-up
Galakrond and the Scourge.
Head back to Torastrasza and turn in Galakrond and
the Scourge. Get the follow-up Ruby Wings.
You will get a Ruby Beacon of the Dragon Queen - this
is a very useful item which summons a dragon which you can use
in the Dragon Wastes which is the entire center area
of the map. Don't turn this quest in until you're done with
the zone. Whenever you're travelling in the area, use it to
travel much faster. You can use it for the rest of the
guide as a flying mount!
Look for a partner to do the quest chain for One of a Kind.
Any two will be good, but the last steps are recommended to
have a tank and healer in your group. The below map shows the
locations of all the minotaur for the quest - get to it whenever
you find someone to do the minotaur chain with you. If you don't
readily have someone to do it with you, skip the steps and get
back to it whenever you can.
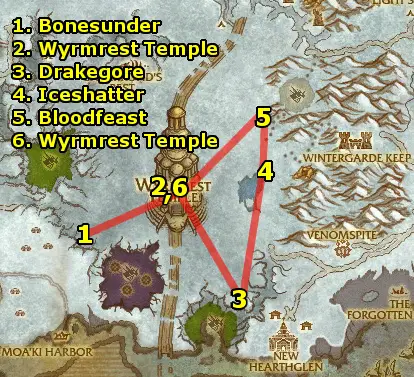
- (Group) Use your Ruby Beacon of the Dragon Queen to
summon a dragon. Use it to fly southwest to Bonesunder.
Kill him for his Emblazoned Battle Horn.
- (Group) Fly back to Wyrmrest Temple and turn in
One of a Kind and get the follow-up Mighty Magnataur.
- (Group) Fly southeast to Bloodfeast. Have one
person attack Bloodfeast and one person kill all the maggots.
- (Group) Fly north to Iceshatter. Kill him.
- (Group) Fly north to Drakegore. Kill him.
- (Group) Return to Wyrmrest Temple and turn in
Mighty Magnataur and get the follow-up Reclusive Runemaster.
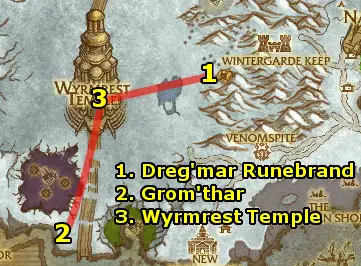
- (Group) Fly east to Dreg'mar Runebrand and defeat
him.
- Return to Wyrmrest Temple. Turn in Reclusive Runemaster
and get the follow-up Wanton Warlord.
- (Group) Fly southwest to Grom'thar and kill him.
- (Group) Head back northeast to where you can summon a
dragon, then fly to Wyrmrest Temple and turn in Wanton
Warlord.
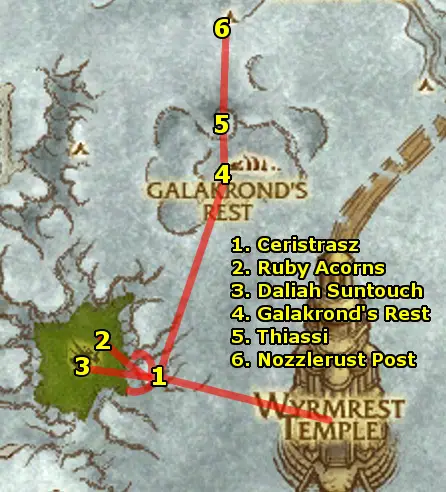
- Use your Ruby Beacon of the Dragon Queen to summon your
dragon and fly northwest to Ceristrasz. Turn in Report
to the Ruby Dragonshrine and get the follow-up Heated Battle.
- Follow the alliance forces, which alternate between the
south entrance and the east entrance. The NPCs will quickly
bring down all the undead - all you need to do is tag them
with a little bit of damage to get credit for the kill. Help
kill 12 Frigid Ghoul Attacker, 8 Frigid Geist Attacker,
and 1 Frigid Abomination Attacker.
- Then, return to Ceristrasz and turn in Heated
Battle. Get the follow-up Return to the Earth.
- Fly down to the center area and pick up the Ruby Acorns on
the ground. Target the fallen red dragons and use the acorns on
them to Free 6 Dragons.
- Then, return to Ceristrasz and turn in Return
to the Earth. Get the follow-up Through Fields of Flame.
- Fly down to the center tree in the middle. Enter from the southeast
side and kill 6 Frigid Necromancers and Daliah Suntouch.
Loot the Ruby Brooch which starts the quest The Fate
of the Ruby Dragonshrine.
- Then, return to Ceristrasz and turn in Through
Fields of Flame. Get the follow-up The Steward of Wyrmrest
Temple.
- Fly north to Galakrond's Rest. Fly to the bottom of
the dug out area and kill 30 Waste Scavengers with your
Engulfing Fireball (Ability 1 and 2). Use Devour
Ghoul (Ability 3) to regain hp and mana near a ghoul.
- Fly northwest to Thiassi. Kill it with your dragon's
attacks, then dismount and kill Grand Necrolord Antiok.
Loot the Scythe of Antiok which drops to the floor.
- Fly north to Nozzlerust Post.
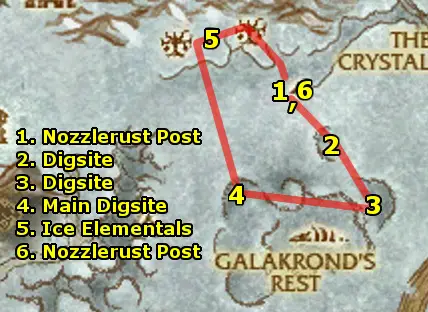
- At Nozzlerust Post, turn in Return to Sender.
Get the quests at the post:
- Nozzlerust Defense
- Shaved Ice
- Stocking Up
During the next steps, look to the skies for a Reanimated
Frost Wyrm. When you see one, use the Seeds of Nature's
Wrath on it to bring it down, then kill it.
- Fly southeast to a digsite. Loot all the Composite Ore in
the carts and kill all the Waste Diggers in the area.
- Fly southeast to the next digsite. Loot all the Composite
Ore in the carts and kill all the Waste Diggers in
the area.
- Fly west to the main digsite. Finish collect 8 Composite
Ore and killing 12 Wastes Digger and 1 Wastes Taskmaster.
- Fly north to the mountainous area and kill Crystalline Ice
Elementals for 4 Iceshard Cluster.
- Ride southeast back to Nozzlerust Post.
- At Nozzlerust Post, turn in:
- Nozzlerust Defense
- Shaved Ice and get the follow-up Soft Packaging
- Stocking Up
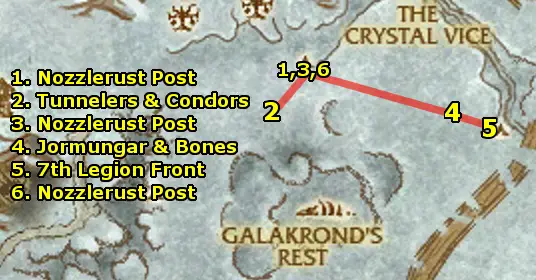
- Head southwest and kill Jormugar Tunnelers and Dragonbone
Condors for 12 Thin Animal Hide.
- Return to Nozzlerust Post and turn in Soft Packaging
and get the new quests:
- Something That Doesn't Melt
- Hard to Swallow
- Ride southeast and weaken a Hulking Jormungar. When it
opens its mouth once you bring it down to 80% HP, use the Potent
Explosives Charges. Pick up the 6 Seared Jormungar Meat
from the resulting explosion.
Pick up 12 Splintered Bone Chunks along the way near the
bones.
- Reach the 7th Legion Front and turn in Canyon Chase.
- Return to Nozzlerust Post.
- At Nozzlerust Post, turn in:
- Something That Doesn't Melt
- Hard to Swallow
get the new quests:
- Harp on This!
- Lumber Hack
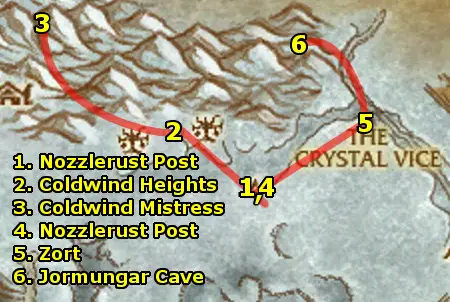
- Ride south a bit so you can mount on your dragon, then fly northwest
to Coldwind Heights.
Use Xink's Shredder Control Device to take control of a
shredder.
- Head northwest. Along the way, use Gather Lumber (Ability
6) next to trees marked with a cross to collect lumber. If
it doesn't work, it means it has been recently gathered by someone
else.
Enter the harpy area. Kill Harpies by constantly using
Twisting Blade (Ability 1) and throwing in Launch
Saw Blades (Ability 2) on cooldown. Use Emergency
Repair Kit (Ability 4) to regain life. Finally, in
the northwest area, kill Mistress of the Coldwind.
Finish gathering 50 Coldwind Lumber.
- Return to Nozzlerust Post and turn in your quests:
- Harp on This!
- Lumber Hack
and get the new quest, Stiff Negotiations.
-
Fly northeast to Zort, inside the canyon. Turn in Stiff
Negotiations and get the follow-up Slim Pickings.
- Follow the path northwest into the cave. At the entrance, click
the Ravaged Crystalline Ice Giant to get a Sample of
Rock Flesh.
- Return to Zort and turn in Slim Pickings and
get the follow-up Messy Business. Also, get the new
quest, Stomping Grounds from Ko'char the Unbreakable.
- Return northwest deeper into the cave. Kill 8 Ice Heart
Jormungar Feeders. Whenever you get the Corosive Spit
debuff, use Zort's Scraper and collect 2 scraping
samples.
- Return to Zort and turn in your quests:
- Messy Business and get the follow-up Apply
This Twice A Day
- Stomping Grounds
- Apply This Twice A Day
Get the new quests:
- Really Big Worm (Group)
- Worm Wrangler
- Head northwest and enter the cave again. Use the Sturdy
Crates on 3 Jormungar Spawns and collect them.
Also, if you have a partner with you, at the end of the
cave, drink Zort's Protective Elixir. Kill Rattlebore.
If not, just ignore the Really Big Worm quest.
- Finally, return to Zort and turn in Worm Wrangler.
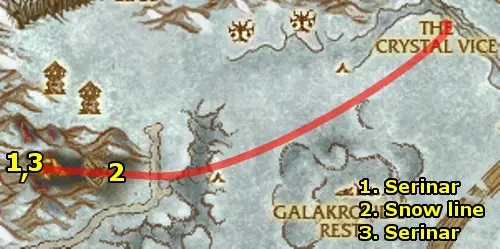
- Fly southwest to the Obsidian Dragonshrine. Head inside
and talk to Serinar and turn in The Obsidian Dragonshrine.
Get the follow-ups:
- No One to Save You
- No Place to Run
- Head east out of the cave. At the snow line, use the Destructive
Wards. Defend the ward.
Also, kill 6 Burning Depths Necrolyte and 10 Smoldering Skeleton.
- Return to Serinar inside the cave and turn in:
- No One to Save You
- No Place to Run and get the follow-up The Best
of Intentions
With the disguise on, run to the end of the cave to Rothin
the Decaying. Then, return to Serinar and turn in
The Best of Intentions. Get the follow-ups:
- Culling the Damned
- Defiling the Defilers
Clear your way towards the end of the cave. Click on 8 Necromatic
Runes to destroy them. Kill 3 Burning Blade Necromancer,
6 Smoldering Construct, and 6 Smoldering Geist.
Then, return to Serinar and turn in
- Culling the Damned
- Defiling the Defilers and get the follow-up Neltharion's
Flame.
Return to the end of the cave next to Rothin the Decayed
and use Neltharion's Flame, then kill Rothin the
Decayed.
Return to Serinar and turn in Neltharion's Flame and
get the follow-up Tales of Destruction.
Hearth to Wintergarde Keep.
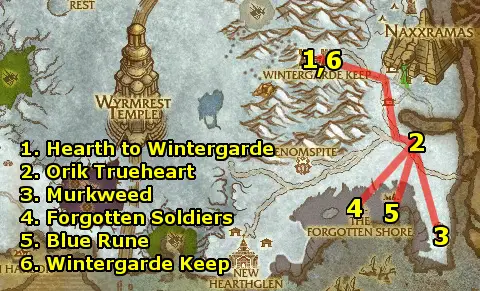
- Hearth to Wintergarde Keep.
- Ride southeast to Orik Trueheart and turn in Orik
Trueheart and the Forgotten Shore and get the follow-up The
Murkweed Elixir as well as The Call of the Crusade.
- Ride southeast and collect 5 Murkweed.
- Then, return to Orik Trueheart and turn in The
Murkweed Elixir and get the follow-up The Forgotten
Tale.
- Head east to The Forgotten Shore and use your Murkweed
Elixir. Talk to a Forgotten Peasant, Forgotten Riflemen,
Forgotten Footman, and Forgotten Knight.
- Then, head northeast away from the mobs, then cancel the
Binding Life buff to return to the "live world".
Return to Orik Trueheart and turn in The Forgotten
Tale and get the follow-up The Truth Shall Set Us Free.
- Ride back to the Forgotten Shore - now, all the mobs
are friendly. Go to the blue rune and use Orik's Crystalline
Orb.
- Return to Orik again turn in The Truth Shall Set
Us Free and get the follow-up Parting Thoughts.
- Return to Wintergarde Keep and turn in Parting Thoughts
and get the follow-up What Secrets Men Hide. Get the
new quests:
- The Return of the Crusade?
- The Path of Redemption
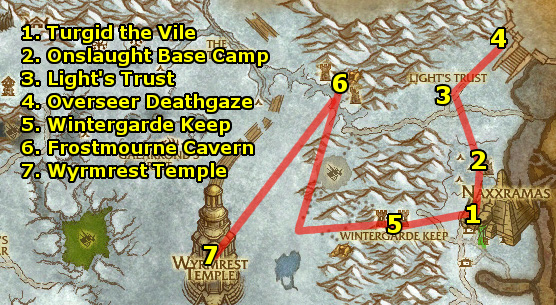
- Ride northeast to Turgid the Vile, in the ruined keep.
Use the Seeds of Nature's Wrath on him, then kill him.
- Ride north to the Onslaught Base Camp. Kill 20 Scarlet
Onslaught - more, if you still need The Path of Redemption
(random drop) on your way to the Onslaught Map in
the tower.
- Ride north to Light's Trust. Turn in The Call of
the Crusade and get the follow-up The Cleansing Of Jintha'kalar.
- Ride northeast to Jintha'kalar. Clear your way northeast
and kill 15 Jintha'kalar Scourge. Use your Seeds of
Nature's Wrath on Overseer Deathgaze on the eastern
area of the camp then kill him.
- Then, return to Light's Trust and turn in The
Cleansing Of Jintha'kalar and get the follow-up Into
the Breach!
- Ride back to Wintergarde Keep and turn in your quests:
- The Return of the Crusade?
- The Path of Redemption
- What Secrets Men Hide and get the follow-up Frostmourne
Cavern.
- Head west out of the keep, then fly to Frostmourne Cavern.
Use Zelig's Scrying Orb at the Altar of Frostmourne.
- Fly to Wyrmrest Temple. Use your dragon to travel around
the temple quickly. On the bottom floor, turn in The Steward
of Wyrmrest Temple and get the follow-up Informing the
Queen.
Fly to the top floor and turn in:
- On Ruby Wings and get the follow-up Return to
Angrathar
- Tales of Destruction
- That Which Creates Can Also Destroy
- Informing the Queen and get the follow-up Report
to Lord Afrasastrasz
- The Fate of the Ruby Dragonshrine
Now you have no more flying dragon. Go to the middle floor
the usual way by asking for a drake. Turn in Report to Lord
Afrasastrasz and get the follow-up Defending Wyrmrest
Temple.
Head west to the balcony and mount a Wyrmrest Defender.
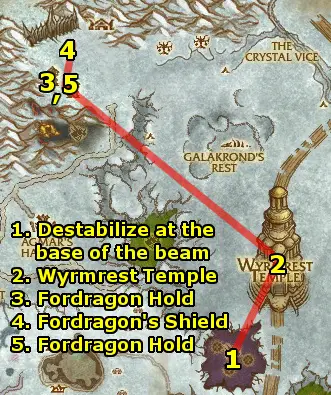
- Head southwest towards the big purple beam of light. Kill 3
Azure Dragon and 5 Azure Drake along the way with your dragon's
damage abilities (Ability 1 & 2). Use your Renew
whenever you get damaged (Ability 3) and use Ability
4 to run away if you aggro too many. When you reach the beam of
light, use Ability 5 to destabilize it.
- Then, return to Lord Afrasastrasz and turn in Defending
Wyrmrest Temple.
- Ask him to get a drake to fly you back down to the bottom
level of the temple.
- Fly to Fordragon Hold. Head up the west tower to Highlord
Bolvar Fordragon and turn in Return to Angrathar and
be treated to the cinematic.
- Head down to the remnants of the battle and get Reborn from
the Ashes from Alexstrasza. Loot Fordragon's Shield,
just southwest of where Alexstrasza is standing.
- Ride back to Fordragon Hold and take the flight to Dalaran.
Take a portal to Stormwind and train your skills.
- Enter Stormwind Keep and turn in Reborn From The
Ashes to King Varian Wrynn and get the follow-up
Fate, Up Gainst Your Will.
- Talk to Lady Jaina Proudmoore and take her portal
to Orgrimmar. Turn in Fate, Up Against Your Will
and get the follow-up A Royal Coup. Take the portal
back to Stormwind.
- Turn in A Royal Coup and get the follow-up The
Killing Time. Talk to Jaina and take the portal
to The Undercity.
- Turn in The Killing Time and get the follow-up The
Battle For the Undercity. Wait for a couple minutes, then
follow King Varian into the Undercity. The most important
thing is to continually follow King Varian - stay in
range of their auras and you will be invincible and deal massive
damage. Use your Area of Effect abilities for the most effect!
- At one point, King Varian will run off alone without
Jaina - follow King Varian.
- Once done, you will return to Stormwind. Turn in
The Battle For The Undercity.
To finish Dragonblight, Hearth to Wintergarde Keep.
Turn in Frostmourne Cavern.
Finally, fly off to the next zone - Amberpine Lodge, The Grizzly
Hills.
|
|
